1. Introduction
This manual provides comprehensive instructions for the safe and efficient operation, setup, and maintenance of your RudiUsoy 110V Pneumatic Single-Color Ink Pad Printer. Please read this manual thoroughly before operating the machine to ensure proper usage and to prevent damage or injury.
The RudiUsoy Pad Printing Machine is designed for single-color logo transfer and stamping on various materials, including plastics, metals, glass, ceramics, paper, cardboard, and leather. It is particularly effective for printing on small areas or objects with irregular or non-flat surfaces.

Figure 1.1: The RudiUsoy Pad Printing Machine is suitable for a wide range of applications, including printing on textiles, fruits, plastics, toys, wood, and cardboard boxes.
2. Safety Instructions
- Always ensure the machine is properly grounded before connecting to a power source.
- Operate the machine in a well-ventilated area to avoid inhaling ink fumes.
- Wear appropriate personal protective equipment (PPE), such as gloves and safety glasses, when handling ink and operating the machine.
- Keep hands and loose clothing away from moving parts during operation.
- Disconnect power before performing any maintenance, cleaning, or adjustments.
- Do not attempt to modify the machine. Use only original replacement parts.
- Ensure the air compressor is connected correctly and operating within the recommended pressure range.
- Keep children and unauthorized personnel away from the operating machine.
3. Package Contents
Upon unpacking, please verify that all the following components are included:
- RudiUsoy Pad Printing Machine (Main Unit)
- Plastic Head (Printing Pad)
- Power Cord
- Set of Tools (e.g., Allen wrenches, screwdrivers)
- Instruction Manual (This document)
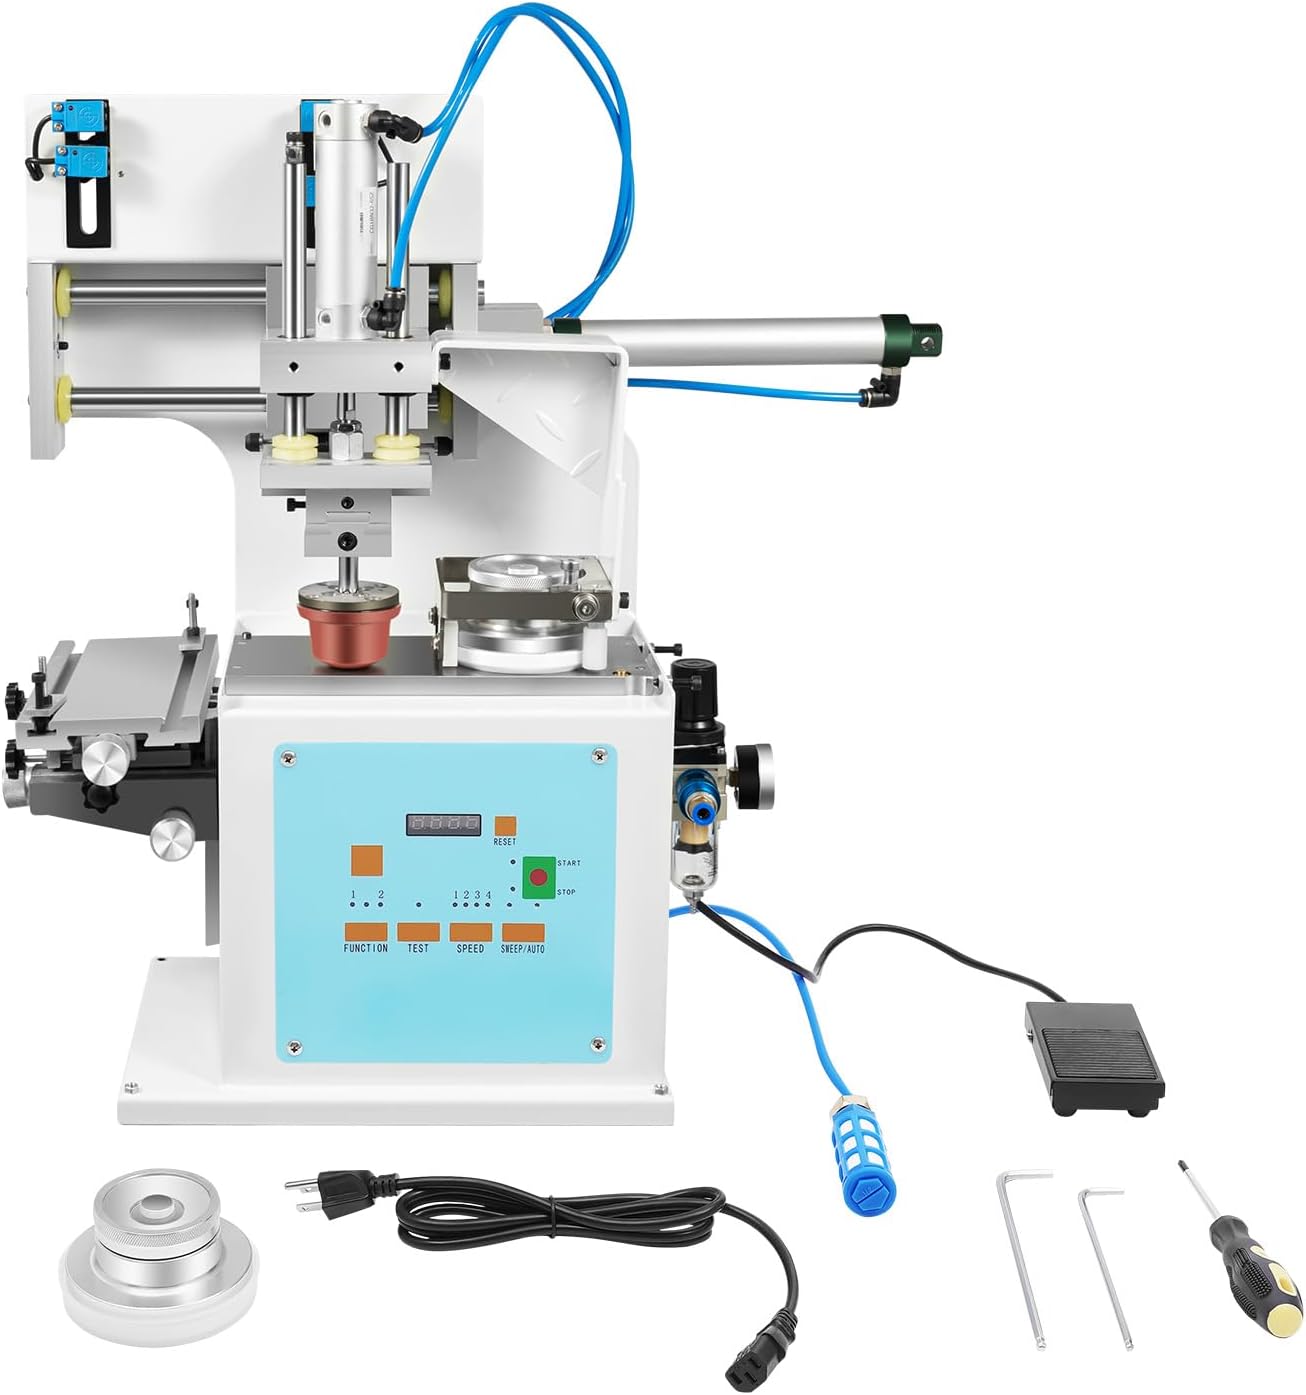
Figure 3.1: The main unit of the RudiUsoy Pad Printing Machine along with its standard accessories.
4. Product Overview and Components
The RudiUsoy Pad Printing Machine features a robust design for precise and efficient single-color printing. Key components include the adjustable workbench, flexible adhesive head, and an intuitive control panel.
4.1. Adjustable Workbench
The machine is equipped with an adjustable workbench that allows for precise positioning of the printing object. This flexibility is crucial for adapting to various product shapes and sizes, ensuring accurate print alignment.

Figure 4.1: The adjustable workbench features knobs for precise adjustments: (1) Front/Back, (2) Left/Right, and (3) Up/Down positioning.
4.2. Flexible Adhesive Head
The printing head, also known as the adhesive head or pad, is designed for flexibility to ensure optimal ink transfer and clear printing patterns. It can move in multiple directions to accommodate the printing surface.

Figure 4.2: The flexible adhesive head allows for movement in left & right, up & down, and front & back directions to achieve the best printing effect.
4.3. Sealed Ink Cup System
This machine utilizes a sealed ink cup system, which helps to reduce ink consumption and minimize evaporation. The sealed design also contributes to a cleaner working environment by preventing ink leakage.
4.4. Control Panel
The control panel provides access to all operational settings, including print count reset, speed adjustments, and various printing modes. Refer to Section 6 for detailed operation instructions.
5. Specifications
| Feature | Specification |
|---|---|
| Voltage | 110V 60HZ |
| Power Type | Pneumatic |
| Operation Mode | Semi-automatic |
| Printing Color | Single Color (Monochrome) |
| Steel Plate Size | 100mm x 250mm |
| Maximum Printing Diameter | 75mm (3 inches) |
| Recommended Printing Area | 50mm x 50mm (2 x 2 inches) |
| Running Speed | Up to 2200 PCS/hour |
| Product Dimensions (L x W x H) | Approximately 80cm x 47cm x 77cm (31.5 x 18.5 x 30.3 inches) |
| Machine Weight | 30 KG (66 lbs) |
| Item Weight (Shipping) | 1.06 ounces (This seems to be a discrepancy in the source data, likely referring to a small component or packaging weight, not the machine itself. Refer to Machine Weight for actual unit weight.) |
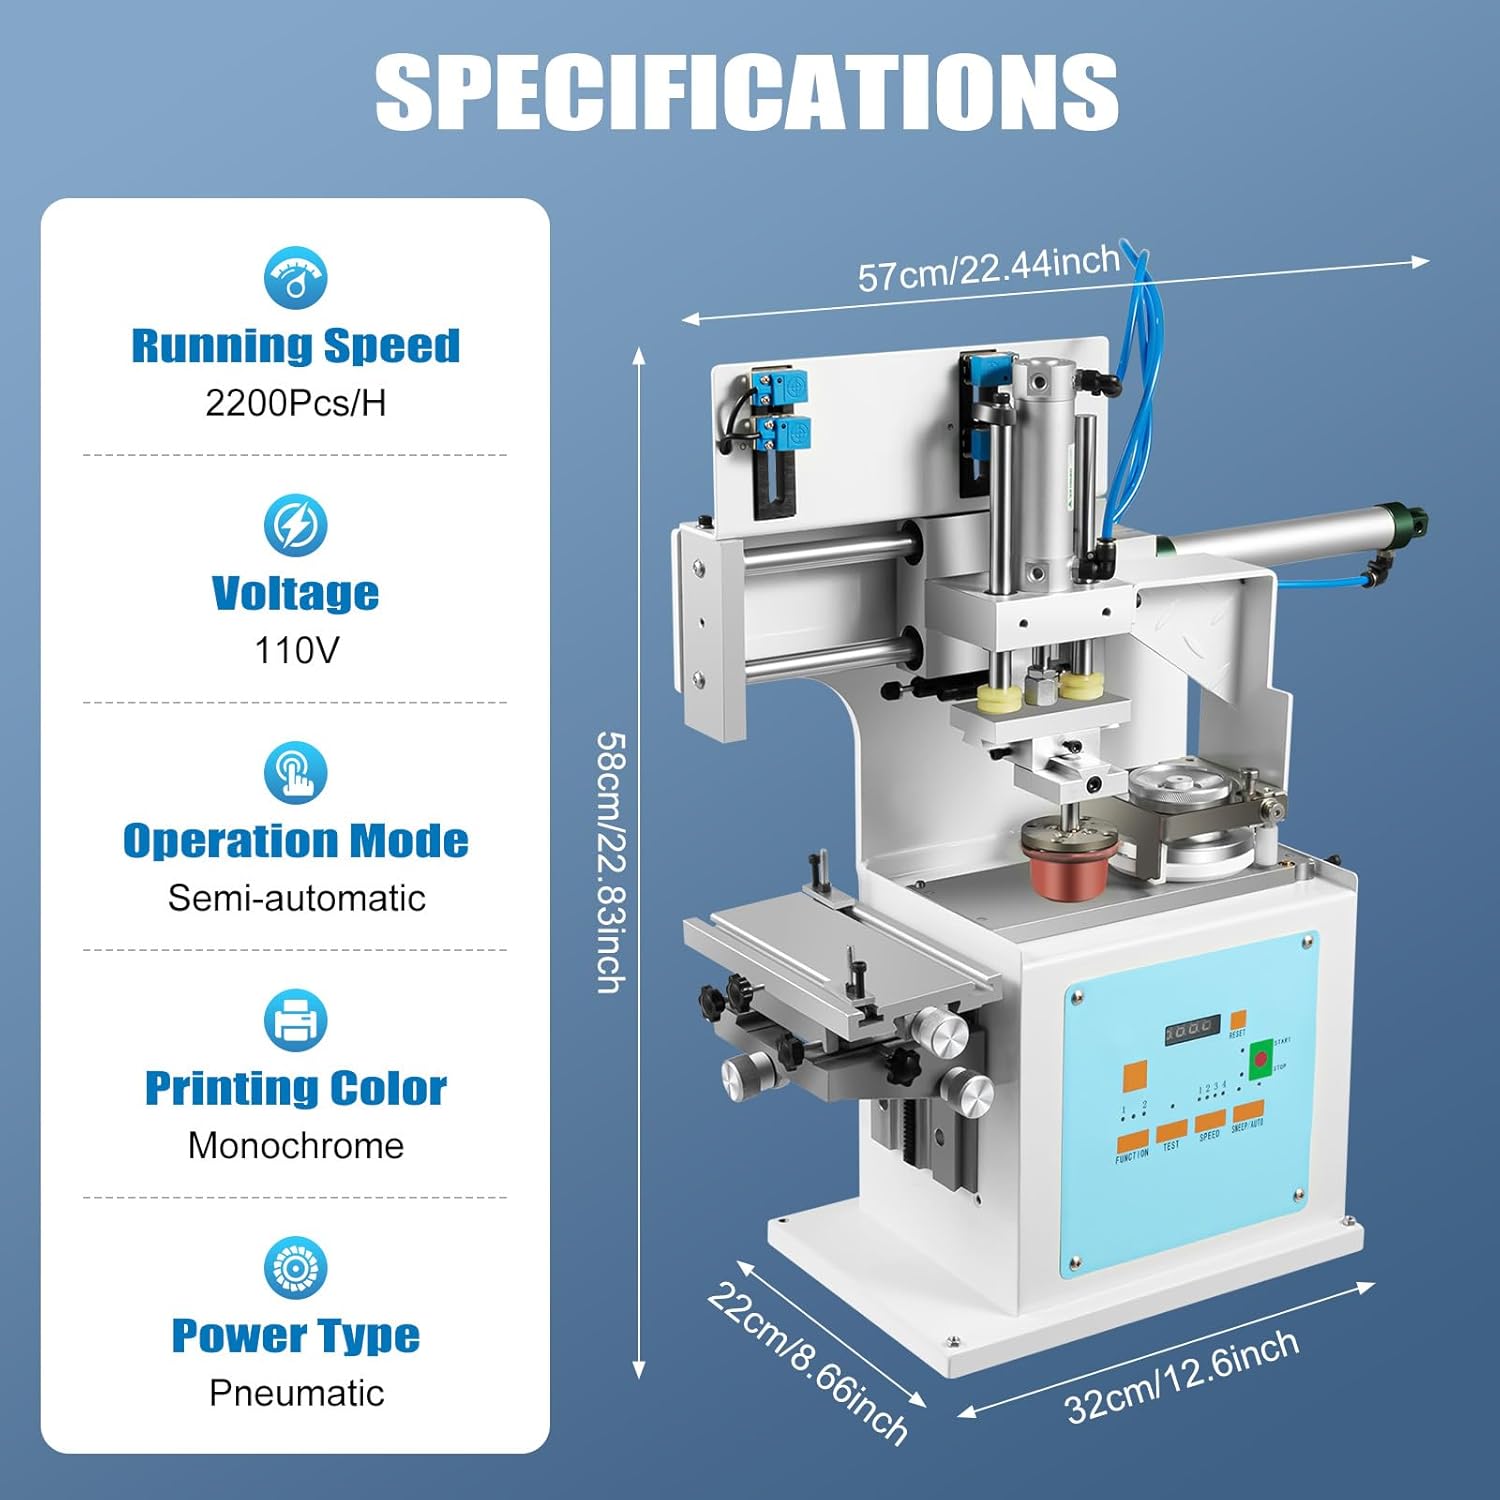
Figure 5.1: Visual summary of the machine's key specifications and dimensions.

Figure 5.2: Details on the printing coverage area and recommended dimensions for optimal results.
6. Setup
- Unpacking and Placement: Carefully remove the machine from its packaging. Place it on a stable, level surface in a well-ventilated area.
- Power Connection: Connect the power cord to the machine and then to a grounded 110V 60HZ power outlet.
- Air Supply Connection: This is a pneumatic machine. Connect an air compressor (not included) to the machine's air inlet. Ensure the air pressure is set according to the machine's requirements (refer to specifications or machine labels for exact pressure).
- Install Printing Pad: Securely attach the plastic printing pad to the adhesive head mechanism.
- Prepare Ink Cup: Fill the sealed ink cup with the desired ink. Ensure the ceramic/tungsten steel knife ring is properly installed for effective ink scraping.
- Adjust Workbench: Use the adjustment knobs on the workbench (Figure 4.1) to position the printing object correctly relative to the printing pad. Adjust front/back, left/right, and up/down as needed.
7. Operation
Familiarize yourself with the control panel before beginning operation. Refer to Figure 7.1 for a detailed layout of the control panel functions.

Figure 7.1: Control Panel Layout and Functions.
- 1. Count Reset to Zero: Resets the print counter.
- 2. Fast: Increases the operational speed.
- 3. Slow: Decreases the operational speed.
- 4. Start/Pause: Initiates or temporarily stops the printing cycle.
- 5. Apply Ink for Printing Once (Function 1): Sets the machine to apply ink once per print cycle.
- 6. Apply Ink for Printing Twice (Function 2): Sets the machine to apply ink twice per print cycle for denser prints.
- 7. Continuous Printing: Activates continuous printing mode.
- 8. Drop Adhesive Head to Align (Test): Lowers the printing pad for alignment checks without a full print cycle.
- 9. Four Speed: Selects one of four preset speed levels.
- 10. Adhesive Head Moves Forward & Backward (Sweep/Auto): Controls the movement of the adhesive head for ink pickup and transfer.
7.1. Basic Printing Procedure
- Power On: Ensure the machine is connected to power and air supply. Turn on the main power switch.
- Load Ink: Ensure the sealed ink cup contains sufficient ink.
- Place Object: Position the object to be printed on the adjustable workbench. Use the adjustment knobs to fine-tune its position for accurate printing.
- Select Function: Choose between single ink application (Function 1) or double ink application (Function 2) based on desired print density.
- Set Speed: Adjust the printing speed using the "Speed" buttons (Fast/Slow or Four Speed) according to the ink type and material.
- Test Print: Perform a test print using the "Test" button (8) to verify alignment and print quality. Adjust the workbench or pad as necessary.
- Start Printing: Once satisfied with the test print, press the "Start" button (4) to begin the printing process. For continuous operation, select "Continuous Printing" (7).
- Monitor: Observe the printing process. The digital display will show the print count.
- Stop: Press the "Stop" button (4) to pause or end the printing cycle.
8. Maintenance
Regular maintenance ensures the longevity and optimal performance of your pad printing machine.
- Daily Cleaning: After each use, clean the ink cup, printing pad, and steel plate thoroughly with appropriate cleaning solutions. This prevents ink from drying and clogging.
- Check Air Lines: Periodically inspect air lines and connections for leaks or damage. Ensure the air filter is clean.
- Lubrication: Apply a small amount of machine oil to moving parts as recommended by the manufacturer (refer to specific machine labels if available).
- Pad Inspection: Regularly check the printing pad for wear or damage. Replace if necessary to maintain print quality.
- Knife Ring: Inspect the ceramic/tungsten steel knife ring for sharpness and damage. A dull or chipped ring can lead to poor ink scraping and print quality.
- Storage: When not in use for extended periods, clean the machine thoroughly and store it in a dry, dust-free environment.
9. Troubleshooting
| Problem | Possible Cause | Solution |
|---|---|---|
| Poor Print Quality / Faded Prints |
|
|
| Machine Not Starting |
|
|
| Ink Leakage |
|
|
| Inconsistent Printing |
|
|
10. Warranty and Support
RudiUsoy products are backed by a free lifetime warranty and a replacement parts policy. This commitment ensures long-term reliability and customer satisfaction.
Should you encounter any issues or have questions regarding the operation, maintenance, or troubleshooting of your RudiUsoy Pad Printing Machine, please contact our customer service department. Our team is dedicated to providing prompt assistance and will respond to your inquiries within 24 hours.
For support, please refer to the contact information provided with your purchase or visit the official RudiUsoy website.
11. Official Product Videos
No official product videos from the seller were available in the provided data for embedding. Please refer to the manufacturer's website or product page for any available video resources.