
VABIRA VBR-LightFan
VABIRA VBR-LightFan Control System User Manual
Model: VBR-LightFan
1. Introduction
The VABIRA VBR-LightFan Control System is designed to provide comprehensive environmental control for indoor plant cultivation. This system integrates control over grow lights, inline duct fans, and Vapor Pressure Deficit (VPD) management. It features a 4.3-inch touch color screen for intuitive operation and records environmental data such as temperature, humidity, and VPD over time.
This manual provides detailed instructions for the proper installation, operation, and maintenance of your VBR-LightFan Control System. Please read this manual thoroughly before use to ensure optimal performance and longevity of the device.
2. Product Overview
The VBR-LightFan controller allows for precise management of your grow environment. Key features include:
- Light Control: Time-based ON/OFF, power percentage setting, sunrise/sunset simulation, and automatic light shut-off during high temperatures via RJ11 or RJ14 ports.
- Fan Control: Adjustable fan speed, time-based ON/OFF, and speed adjustments based on temperature thresholds.
- VPD Management: Control VPD, temperature, and humidity by adjusting fan speed.
- Data Recording: Records VPD, temperature, and humidity data hourly or daily, displayed as curves for up to one year.
- User Interface: 4.3-inch touch color screen for easy navigation and settings adjustment.

Figure 1: Front view of the VBR-LightFan controller with its touch screen display, showing various environmental parameters. Below it is the rear view of the controller, displaying connection ports including DC12V, 0-10V, RS485 I, RS485 II, and sensor inputs (T+RH, PI, PII).
3. Setup and Installation
3.1 Unpacking
Carefully unpack all components. Ensure the following items are present:
- VABIRA VBR-LightFan Control System
- Power Adapter
- Mounting Hardware
- Temperature and Humidity Sensor (if included)
3.2 Mounting the Controller
The VBR-LightFan controller can be mounted using the provided iron plate and mounting hardware. Choose a location that is easily accessible, away from direct water spray, and within reach of your grow lights and fans.
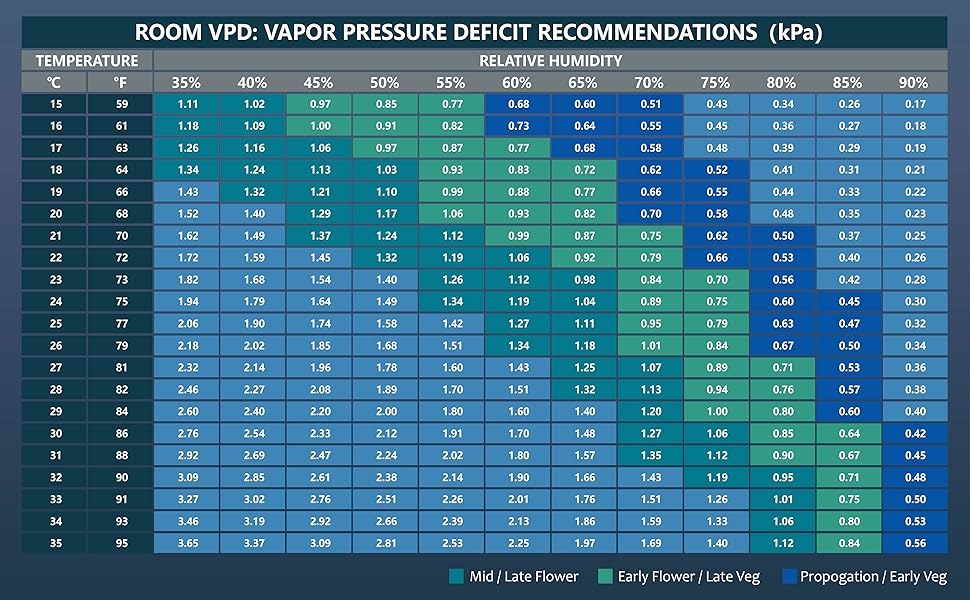
Figure 2: Illustration demonstrating the mounting process of the VBR-LightFan controller. It shows an iron plate being secured to a surface, and then the controller sliding onto the plate, indicating its dimensions (5.12 inches length, 3.66 inches width, 1.06 inches depth).
3.3 Wiring Connections
Connect your grow lights and inline duct fans to the VBR-LightFan controller using the appropriate ports. Ensure all connections are secure before powering on the device.
- DC12V: Power input for the controller.
- 0-10V: Output for controlling devices that accept 0-10V dimming signals.
- RS485 I & II: Communication ports for connecting compatible devices.
- T+RH: Input for the temperature and humidity sensor.
- PI & PII: Additional sensor inputs.
- RJ11/RJ14: Ports for connecting compatible grow lights for control.
Note: The VBR-LightFan can control specific grow lights like LU*** and GA**** models. Ensure your light's driver is compatible (e.g., 1-10V dimming, 0V for off).
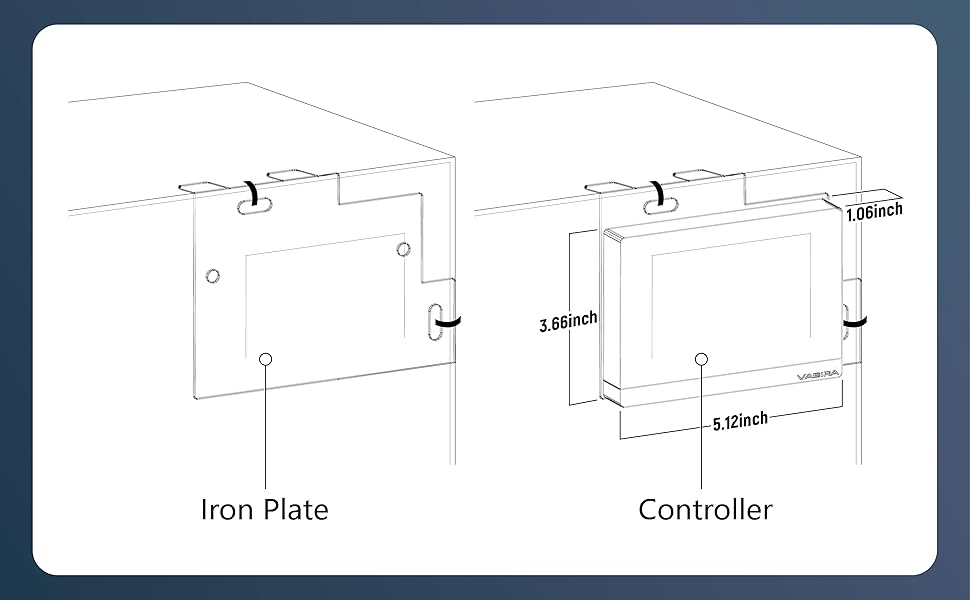
Figure 3: This image illustrates the connection of the VBR-LightFan controller to different types of grow lights. It shows the controller connected to a light with a dimming knob and another light, demonstrating its compatibility with various lighting systems. The text also highlights the importance of a 0V signal for light off with 1-10V dimming drivers.
4. Operating Instructions
4.1 Initial Power On and Screen Navigation
Once powered on, the 4.3-inch touch screen will display the main interface. Navigate through menus by tapping the icons or swiping. The main screen provides an overview of current light settings, fan status, VPD, temperature, and humidity.
4.2 Light Control Settings
Access the light control menu to configure your grow light schedule. You can set specific ON/OFF times, adjust the light power percentage, and enable sunrise/sunset simulation.
- Time-based ON/OFF: Set the exact time for your lights to turn on and off.
- Power % Set: Adjust the intensity of your grow lights.
- Sunrise and Sunset: Configure a gradual increase or decrease in light intensity to simulate natural light cycles.
- Light Off when high temperature: Enable this safety feature to automatically turn off lights if the temperature exceeds a set threshold.

Figure 4: This image displays the light control settings on the VBR-LightFan controller's screen. It shows options to set "On at" and "Off at" times with a power percentage, and a separate section for "Sunrise" and "Sunset" duration settings. A graph below illustrates how light power percentage changes over time with sunrise and sunset simulations.
4.3 Fan Control Settings
Manage your inline duct fan operations through the fan control menu.
- Fan Speed Set: Manually adjust the fan speed.
- Time-based Fan ON/OFF: Schedule fan operation times.
- Fan Speed Set when high/low temperature: Configure the fan to automatically adjust speed based on temperature thresholds to maintain desired climate.
- Fan Speed Set when close the fan: This likely refers to setting a minimum speed or behavior when the fan is otherwise 'off' or in a low-power state.

Figure 5: This image shows the fan control interface on the VBR-LightFan controller. It illustrates how the fan speed automatically adjusts to maximum when the temperature is too high, and to 50% when the temperature is lower, demonstrating temperature-based fan automation.
4.4 VPD Control
The VBR-LightFan allows you to control Vapor Pressure Deficit (VPD) by adjusting fan speed. This helps optimize transpiration, nutrient absorption, and stomatal regulation for plant health.
- Set a target VPD range.
- The system will automatically increase or decrease fan speed to maintain the desired VPD by influencing temperature and humidity.

Figure 6: This image illustrates the VPD control mechanism. It shows two scenarios with an inline duct fan: one where VPD is below 1.35 kPa, resulting in 100% fan speed, and another where VPD is above 1.5 kPa, resulting in 50% fan speed. The controller screen displays settings for "Target VPD" with corresponding fan speed percentages.
4.5 Data Recording and Analysis
The controller records VPD, temperature, and humidity data, presenting it as curves for daily or monthly analysis. This feature is crucial for monitoring environmental trends and making informed adjustments.

Figure 7: This image shows the data recording feature of the VBR-LightFan controller. It displays graphs for VPD, temperature, and humidity over a day and a month, allowing users to review historical environmental data.
4.6 Understanding VPD
VPD (Vapor Pressure Deficit) is a critical parameter in plant cultivation. It represents the difference between the amount of moisture in the air and how much moisture the air can hold when it is saturated. Controlling VPD is essential for:
- Transpiration and Water Management: Optimal VPD ensures healthy transpiration rates, allowing plants to absorb sufficient water and nutrients.
- Nutrient Absorption: Proper VPD regulates the flow of transpiration, which transports minerals and nutrients throughout the plant.
- Stomatal Regulation and Photosynthesis: VPD influences the opening and closing of stomata, impacting gas exchange and photosynthesis efficiency.
- Disease Risk Management: Maintaining optimal VPD helps prevent excessively humid conditions that favor fungal diseases.
- Temperature and Humidity Balance: VPD reflects the balance between these two factors, crucial for overall plant physiological condition.
- Growth and Yield Optimization: Effective VPD management can lead to increased production, improved quality, and shorter growth cycles.
- Coordination Between Roots and Shoots: VPD affects water and nutrient exchange, promoting balanced growth.

Figure 8: This chart provides Vapor Pressure Deficit (VPD) recommendations in kPa, based on various temperatures (in °F and °C) and relative humidity percentages. Different color codes indicate optimal VPD ranges for different plant growth stages: Propagation/Early Veg, Early Flower/Late Veg, and Mid/Late Flower.
5. Maintenance
To ensure the longevity and accurate performance of your VBR-LightFan Control System, follow these maintenance guidelines:
- Cleaning: Regularly wipe the touch screen and exterior with a soft, dry cloth. Avoid using abrasive cleaners or solvents.
- Sensor Care: Keep the temperature and humidity sensors clean and free from dust or debris to ensure accurate readings.
- Connection Check: Periodically inspect all cable connections (power, sensors, light, fan) to ensure they are secure and free from damage.
- Software Updates: Check the manufacturer's website for any available firmware updates to improve performance or add features.
6. Troubleshooting
If you encounter issues with your VBR-LightFan Control System, refer to the following common problems and solutions:
| Problem | Possible Cause | Solution |
|---|---|---|
| Controller does not power on. | No power supply or faulty adapter. | Ensure the power adapter is correctly connected and plugged into a working outlet. Test the adapter if possible. |
| Lights/Fans not responding to control. | Incorrect wiring, incompatible device, or incorrect settings. | Verify all RJ11/RJ14 or 0-10V connections. Check device compatibility. Review light/fan control settings on the screen. |
| Inaccurate temperature/humidity/VPD readings. | Sensor dirty, faulty, or improperly placed. | Clean the sensor. Ensure it is placed in an area representative of the overall environment, away from direct airflow or heat sources. Check sensor connection. |
| Touch screen unresponsive. | Temporary software glitch or screen damage. | Restart the controller by disconnecting and reconnecting power. If the issue persists, contact customer support. |
7. Specifications
- Model: VBR-LightFan
- Dimensions: 5.12 x 3.62 x 1.02 inches
- Weight: 1.66 Pounds
- Screen: 4.3-inch Touch Color Screen
- Input Voltage: DC12V (via included adapter)
- Control Ports: RJ11, RJ14, 0-10V, RS485 I, RS485 II
- Sensor Inputs: T+RH, PI, PII
- Data Storage: Up to one year of VPD, temperature, and humidity data.
- Manufacturer: De-Power
8. Warranty and Support
8.1 Warranty Information
The VABIRA VBR-LightFan Control System comes with a standard manufacturer's warranty. Please refer to the warranty card included in your product packaging or visit the official VABIRA website for detailed warranty terms and conditions. Keep your proof of purchase for warranty claims.
8.2 Customer Support
For technical assistance, troubleshooting not covered in this manual, or warranty inquiries, please contact VABIRA customer support. Contact information can typically be found on the VABIRA website or on the product packaging.
Online Resources: Visit the VABIRA Store on Amazon for additional product information and support.
Ask a question about this manual
Ask about setup, troubleshooting, compatibility, parts, safety, or missing instructions. Manuals+ will review the question and use this page’s manual context to help answer it.