Introduction
This manual provides essential information for the safe and efficient operation, installation, and maintenance of the Thermo Fisher Scientific Basic Vortex Mixer, model 88882011-JP. Please read this manual thoroughly before using the device and keep it for future reference.
The Basic Vortex Mixer is designed for laboratory applications requiring efficient mixing of samples in tubes or small containers. It features a digital display for clear visibility and excellent stability, and offers both continuous and touch-start operation modes for user convenience.
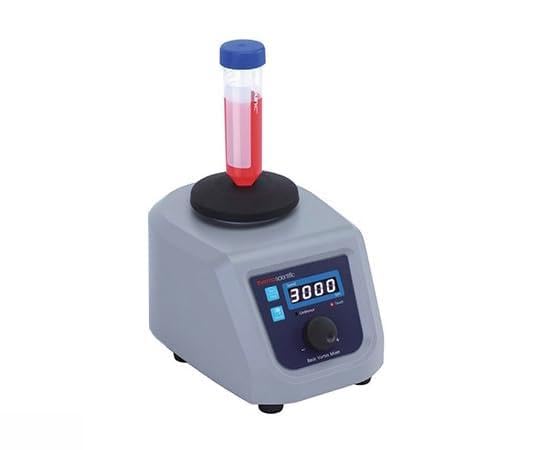
Figure 1: Thermo Fisher Scientific Basic Vortex Mixer 88882011-JP. The device features a compact design with a digital display and a platform for sample tubes.
Safety Information
Always observe the following safety precautions to prevent injury and damage to the device:
- Ensure the power supply matches the device's requirements (100-240V, 50/60Hz).
- Do not operate the mixer in hazardous environments or with flammable materials.
- Place the device on a stable, level surface to prevent tipping during operation.
- Do not exceed the maximum load capacity of 0.5kg (at 800rpm).
- Keep hands and loose clothing away from moving parts during operation.
- Disconnect the power cord before cleaning or maintenance.
- Do not immerse the device in water or other liquids.
Setup
- Unpacking: Carefully remove the vortex mixer and all accessories from the packaging. Inspect for any signs of damage during transit. Report any damage to your supplier immediately.
- Placement: Position the mixer on a clean, dry, stable, and level surface. Ensure adequate ventilation around the unit. Avoid placing it near heat sources or in direct sunlight.
- Accessory Installation: Attach the included rubber plate holder (Part No. 88882120) to the mixing platform. Ensure it is securely seated.
- Power Connection: Connect the power cord to the mixer's power inlet and then to a grounded electrical outlet. Ensure the voltage matches the device's specifications.
Operating Instructions
- Power On: Plug in the device. The digital display will illuminate.
- Select Operation Mode: The mixer supports two modes:
- Continuous Mode: Press the mode button (if available, or turn the speed knob to activate) to engage continuous mixing. The mixer will operate until manually stopped.
- Touch-Start Mode: In this mode, the mixer activates only when a tube or container is pressed onto the rubber plate holder. It stops when the pressure is released.
- Adjust Speed: Use the speed control knob or buttons to set the desired mixing speed within the range of 200 to 3,000 rpm. The digital display will show the current speed setting.
- Place Sample: Securely place the sample tube or container onto the rubber plate holder. Ensure the sample volume and container size are appropriate for the mixer and do not exceed the maximum load capacity of 0.5kg (at 800rpm).
- Start Mixing: If in continuous mode, the mixer will start immediately. If in touch-start mode, gently press the sample tube onto the platform to initiate mixing.
- Stop Mixing: For continuous mode, press the stop button or turn the speed to zero. For touch-start mode, simply lift the sample tube from the platform.
- Power Off: Unplug the device from the power outlet when not in use for extended periods.
Maintenance
Cleaning
- Always disconnect the power cord before cleaning.
- Wipe the exterior surfaces of the mixer with a soft, damp cloth. A mild detergent can be used if necessary.
- Do not use abrasive cleaners, solvents, or harsh chemicals, as these can damage the finish or internal components.
- Ensure no liquid enters the device.
- The rubber plate holder can be removed and cleaned separately with water and mild soap, then thoroughly dried before reattaching.
Storage
When not in use, store the mixer in a clean, dry, and dust-free environment at room temperature. Protect it from direct sunlight and extreme temperatures.
Troubleshooting
| Problem | Possible Cause | Solution |
|---|---|---|
| Mixer does not power on. | No power supply; loose power cord. | Check power cord connection; ensure outlet is functional. |
| Inconsistent mixing. | Unstable surface; overloaded; damaged rubber plate. | Place on a stable surface; reduce sample load; inspect and replace rubber plate if damaged. |
| Unusual noise during operation. | Foreign object; internal component issue. | Stop operation immediately. Inspect for foreign objects. If noise persists, contact customer support. |
| Digital display not working. | Power issue; internal fault. | Check power. If power is present and display remains off, contact customer support. |
If you encounter problems not listed here or if the suggested solutions do not resolve the issue, please contact Thermo Fisher Scientific customer support or your local distributor for assistance.
Specifications
| Feature | Specification |
|---|---|
| Model Number | 88882011-JP |
| Manufacturer | Thermo Fisher Scientific |
| Speed Range | 200 - 3,000 rpm |
| Speed Accuracy | ±5% |
| Maximum Load Capacity | 0.5 kg (at 800 rpm) |
| Power Supply | 100 - 240 V, 50/60 Hz |
| Weight | 6.5 kg |
| Dimensions (W×D×H) | 151 × 205 × 131 mm |
| Included Accessories | Rubber plate holder (Part No. 88882120) |
| Batteries Required | No |
Warranty and Support
This product is covered by the standard warranty provided by Thermo Fisher Scientific. For detailed warranty terms and conditions, please refer to the documentation included with your purchase or visit the official Thermo Fisher Scientific website.
For technical support, service, or to order replacement parts, please contact Thermo Fisher Scientific customer service or your authorized distributor. Have your model number (88882011-JP) and serial number ready when contacting support.
Contact Information:
Please refer to the official Thermo Fisher Scientific website or your purchase documentation for the most current contact details.


