Introduction
This manual provides essential instructions for the assembly, operation, and maintenance of your IRONCK KC-KD-04 Kitchen Island. Please read this manual thoroughly before assembly and use to ensure safe and efficient operation. Keep this manual for future reference.

Image: The IRONCK Kitchen Island in a kitchen setting, showcasing its various compartments, including the tilt-out trash cabinet, microwave space, and open shelves. A power cord is visible, indicating the integrated outlets.
Safety Instructions
- Always assemble the unit on a clean, soft surface to prevent scratches.
- Ensure all parts are present and undamaged before beginning assembly. Contact customer support if any parts are missing or damaged.
- Do not overtighten screws during assembly, as this may damage the material.
- Keep small parts and packaging materials away from children and pets.
- Do not exceed the weight capacity of the shelves or countertop.
- When moving the island, ensure the lockable wheels are unlocked. Lock them when the island is in its desired position to prevent accidental movement.
- Only use the integrated power outlets for appropriate kitchen appliances. Do not overload the outlets.
Setup and Assembly
Assembly of the IRONCK KC-KD-04 Kitchen Island is required. Please follow the detailed instructions provided in the separate assembly guide included with your product packaging. It is recommended to have at least two people for assembly due to the size and weight of some components.
- Unpack Components: Carefully remove all parts from the packaging and lay them out on a soft, clean surface. Verify all parts against the included parts list.
- Identify Hardware: Separate and identify all screws, dowels, and other hardware components.
- Follow Step-by-Step Guide: Refer to the numbered steps in your assembly manual. Pay close attention to diagrams and ensure correct orientation of parts.
- Attach Casters: Install the four swivel casters to the base of the island. Ensure two of the casters are lockable and positioned for easy access.
- Install Power Outlet: Secure the power outlet unit into its designated slot as per the assembly guide.
- Final Checks: Once assembled, gently test the stability of the island. Ensure all connections are secure and drawers slide smoothly.
Note: Assembly can be time-consuming. Allocate sufficient time and follow instructions carefully to avoid errors.
Operating Instructions
Trash Can Cabinet
The kitchen island features a tilt-out cabinet designed to discreetly house a trash can up to 11 gallons. This helps to contain odors and keep your kitchen tidy.
- To open, gently pull the top edge of the cabinet door outwards. The door will tilt forward and down.
- Place your trash can inside the designated compartment.
- To close, push the door upwards until it is flush with the island's frame. The buffer door device ensures a smooth and secure closure.

Image: A close-up view of the tilt-out trash cabinet in the open position, showing an 11-gallon trash can. The image also highlights the buffer door device for smooth operation.
Integrated Power Outlets
The island is equipped with a power strip featuring 2 AC outlets (110V/12A) and 2 USB ports (5V/2A) for convenient access to power for small appliances and charging devices.
- Plug the island's main power cord (4.92-foot) into a standard wall outlet.
- Use the AC outlets for kitchen appliances such as blenders, toasters, or coffee makers.
- Use the USB ports to charge mobile phones, tablets, or other USB-powered devices.
- Avoid overloading the outlets. Refer to the power strip's specifications for maximum wattage.
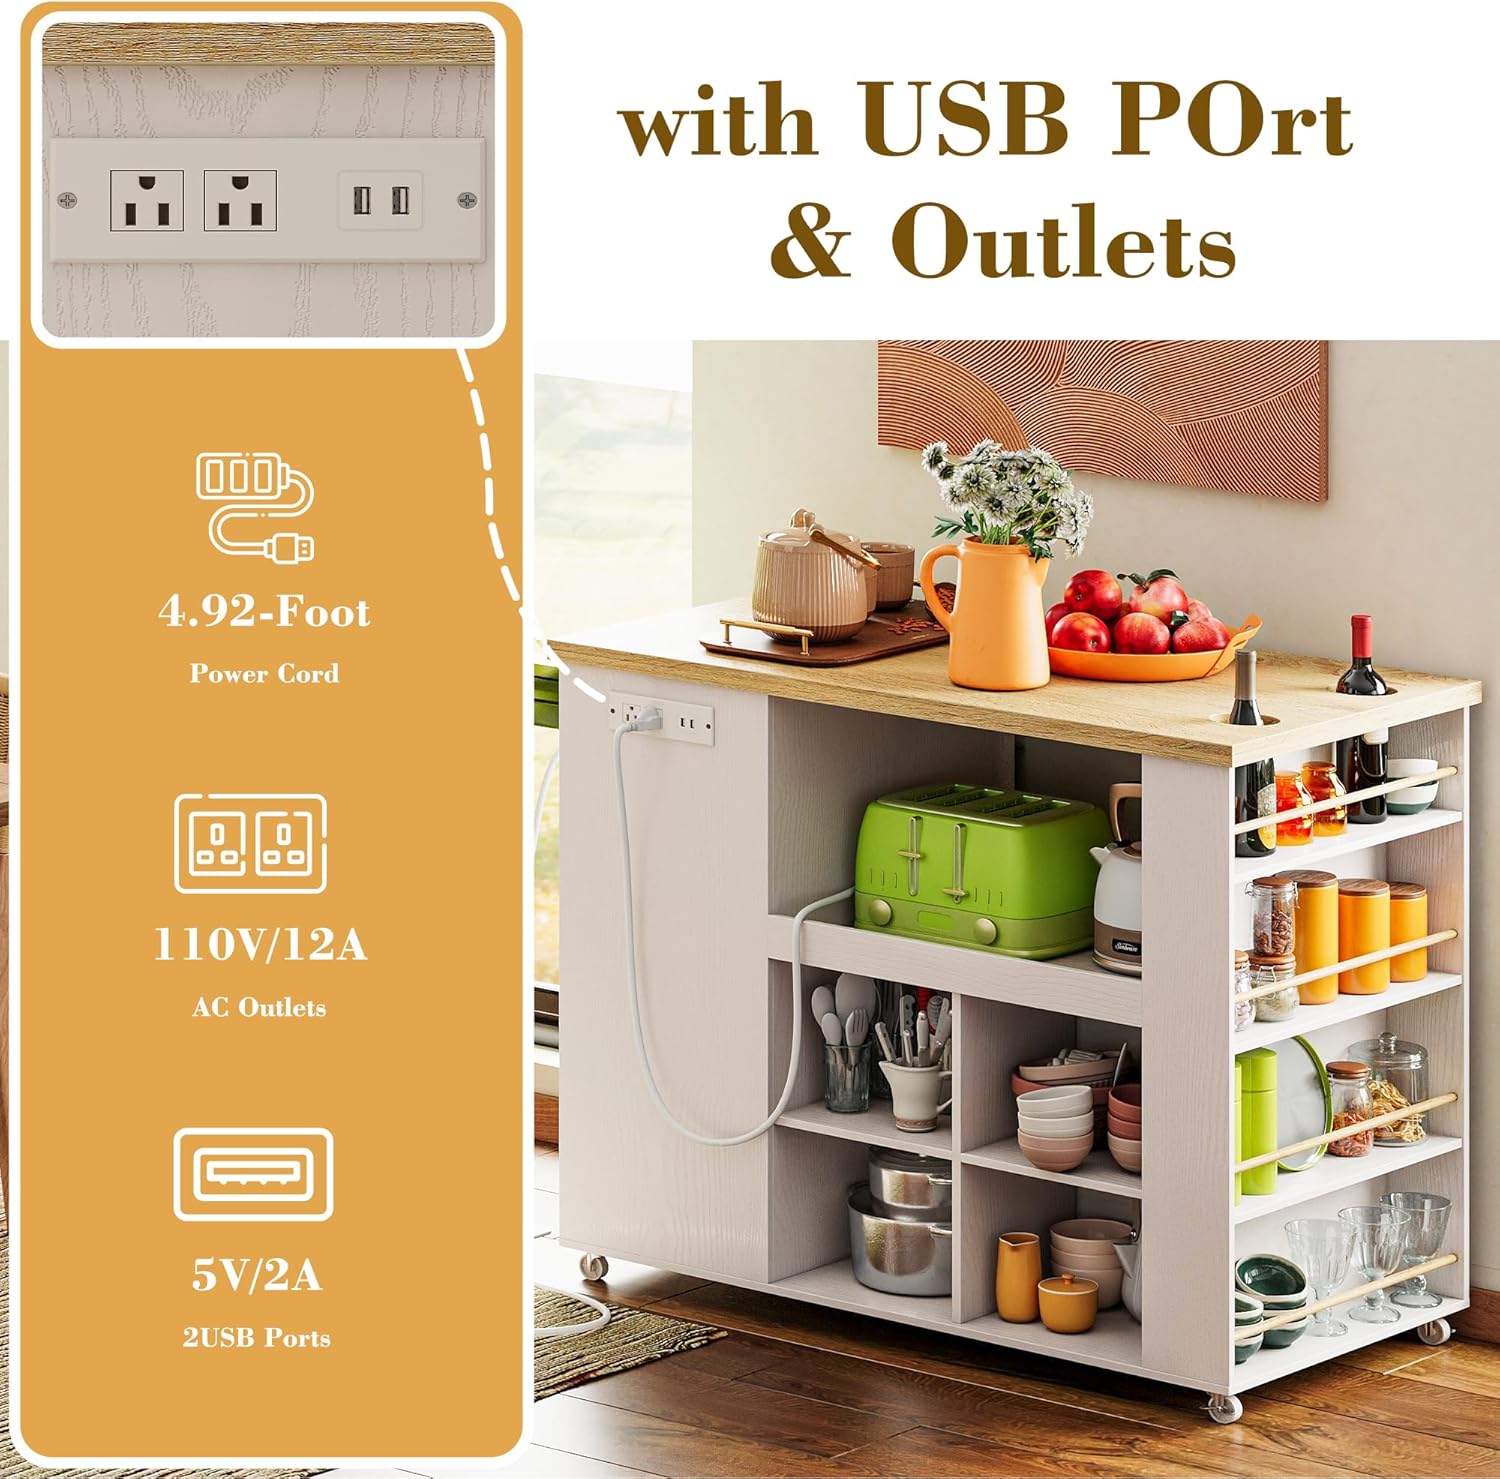
Image: A detailed view of the integrated power outlet unit on the side of the kitchen island, showing two AC outlets and two USB ports, along with the power cord.
Storage Compartments
The island offers various storage options:
- Central Open Space: Designed to accommodate a microwave or coffee machine. Ensure proper ventilation for appliances.
- Drawers: Two smooth-gliding drawers are provided for organizing silverware, utensils, or other small kitchen items.
- Open Shelves: Four open compartments on the bottom are suitable for plates, bowls, or other frequently accessed items.
- Spice Rack Shelf: A 4-tier spice rack shelf with inner holes is located on the side, ideal for storing bottles and spices. The tabletop also features inner holes for easy access to bottles.

Image: A close-up view of the side of the kitchen island, highlighting the 4-tier spice rack with bottles and the tabletop's inner holes designed for bottle storage.
Mobility and Stability
The island is equipped with four swivel casters for easy movement. Two of these casters are lockable to ensure stability when the island is in use.
- To move the island, unlock the two lockable casters by pressing down on the lever.
- Roll the island to your desired location.
- To secure the island in place, press down on the lever of the lockable casters until they click into the locked position.

Image: A composite image showing a close-up of the lockable wheels at the base of the kitchen island and a view of the solid wood tabletop, emphasizing its texture and durability.
Maintenance
Proper care will extend the life and appearance of your kitchen island.
- Cleaning: Wipe surfaces with a damp cloth. Avoid harsh chemicals or abrasive cleaners, which can damage the finish.
- Spills: Clean up spills immediately to prevent staining, especially on the solid wood tabletop.
- Hardware: Periodically check all screws and fasteners to ensure they are tight. Retighten if necessary.
- Casters: Keep casters free of debris to ensure smooth rolling.
Troubleshooting
| Problem | Possible Cause | Solution |
|---|---|---|
| Island is wobbly or unstable. | Loose fasteners; uneven floor; casters not locked. | Check and tighten all screws. Ensure casters are locked. Adjust position on floor. |
| Drawers do not slide smoothly. | Misaligned drawer slides; debris in tracks. | Recheck drawer slide installation. Clean tracks of any obstructions. |
| Power outlets not working. | Island not plugged in; wall outlet issue; overloaded circuit. | Ensure the island's power cord is securely plugged into a functioning wall outlet. Check your home's circuit breaker. Do not overload the outlets. |
| Trash cabinet door does not close properly. | Obstruction; hinge misalignment; damaged buffer device. | Check for any items blocking the door. Inspect hinges for proper alignment. Contact support if the buffer device appears damaged. |
Specifications
- Model Number: KC-KD-04
- Brand: IRONCK
- Color: Industrial White
- Material: Engineered Wood, Solid Wood Top
- Product Dimensions (D x W x H): 59.9 cm x 100.1 cm x 89.9 cm (23.6"D x 39.4"W x 35.4"H)
- Item Weight: 50.8 kg
- Number of Drawers: 2
- Number of Shelves: 4 (open compartments)
- Trash Can Capacity: Up to 11 gallons (trash can not included)
- Power Outlets: 2 AC (110V/12A), 2 USB (5V/2A)
- Power Cord Length: 4.92 feet
- Special Features: Durable, Waterproof (top), Lockable Casters, Spice Rack, Tilt-out Trash Cabinet
- Assembly Required: Yes
- Care Instructions: Wipe with Damp Cloth

Image: A technical diagram illustrating the various dimensions of the IRONCK Kitchen Island, including overall width, depth, height, and measurements for drawers, shelves, and the trash cabinet opening.
Warranty and Support
For warranty information, please refer to the documentation included with your purchase or contact the retailer. If you require assistance with assembly, missing parts, or have any questions regarding the operation or maintenance of your IRONCK KC-KD-04 Kitchen Island, please contact IRONCK customer support.
Contact Information: Please refer to your purchase receipt or the IRONCK official website for the most current customer support contact details.