sinocare Accu2 100 Kit
sinocare Safe-Accu2 Blood Glucose Meter Kit User Manual
Model: Accu2 100 Kit
Brand: sinocare
1. Introduction
The sinocare Safe-Accu2 Blood Glucose Meter Kit is designed for the quantitative measurement of glucose in fresh capillary whole blood from the fingertip, palm, or forearm. It is intended for self-testing by people with diabetes at home and by healthcare professionals in clinical settings as an aid in monitoring the effectiveness of diabetes control. This manual provides essential information for the safe and effective use of your blood glucose monitoring system.

Image showing the complete sinocare Safe-Accu2 Blood Glucose Meter Kit, including the meter, test strips, lancing device, lancets, and carrying case.
2. Safety Precautions
- This device is for in vitro diagnostic use only. Do not use it for the diagnosis or screening of diabetes.
- Consult your healthcare professional before making any changes to your medication, diet, or exercise program based on your blood glucose results.
- Keep the meter and all components away from young children. Choking hazards may exist.
- Use only sinocare Safe-Accu2 test strips with the sinocare Safe-Accu2 Blood Glucose Meter. Using other test strips may lead to inaccurate results.
- Always wash and dry your hands thoroughly before and after handling the meter, lancing device, and test strips.
- Dispose of used lancets and test strips in a proper sharps container to prevent injury and infection.
- Store the meter and test strips within the specified temperature and humidity ranges to ensure accuracy.
3. Package Contents
Your sinocare Safe-Accu2 Blood Glucose Meter Kit includes the following items:
- sinocare Safe-Accu2 Blood Glucose Meter
- 100 x sinocare Safe-Accu2 Test Strips
- 100 x Lancets
- Lancing Device
- Carrying Case
- User Manual

Diagram illustrating the main components of the Safe Accu2 100 Kit: the Safe Accu2 Blood Glucose Monitor, 100 Test Strips, and 100 Lancets.
4. Device Overview
4.1. sinocare Safe-Accu2 Blood Glucose Meter
The meter features a large, clear display for easy reading of results, and intuitive buttons for navigation. It uses advanced technology for accurate and stable measurements.
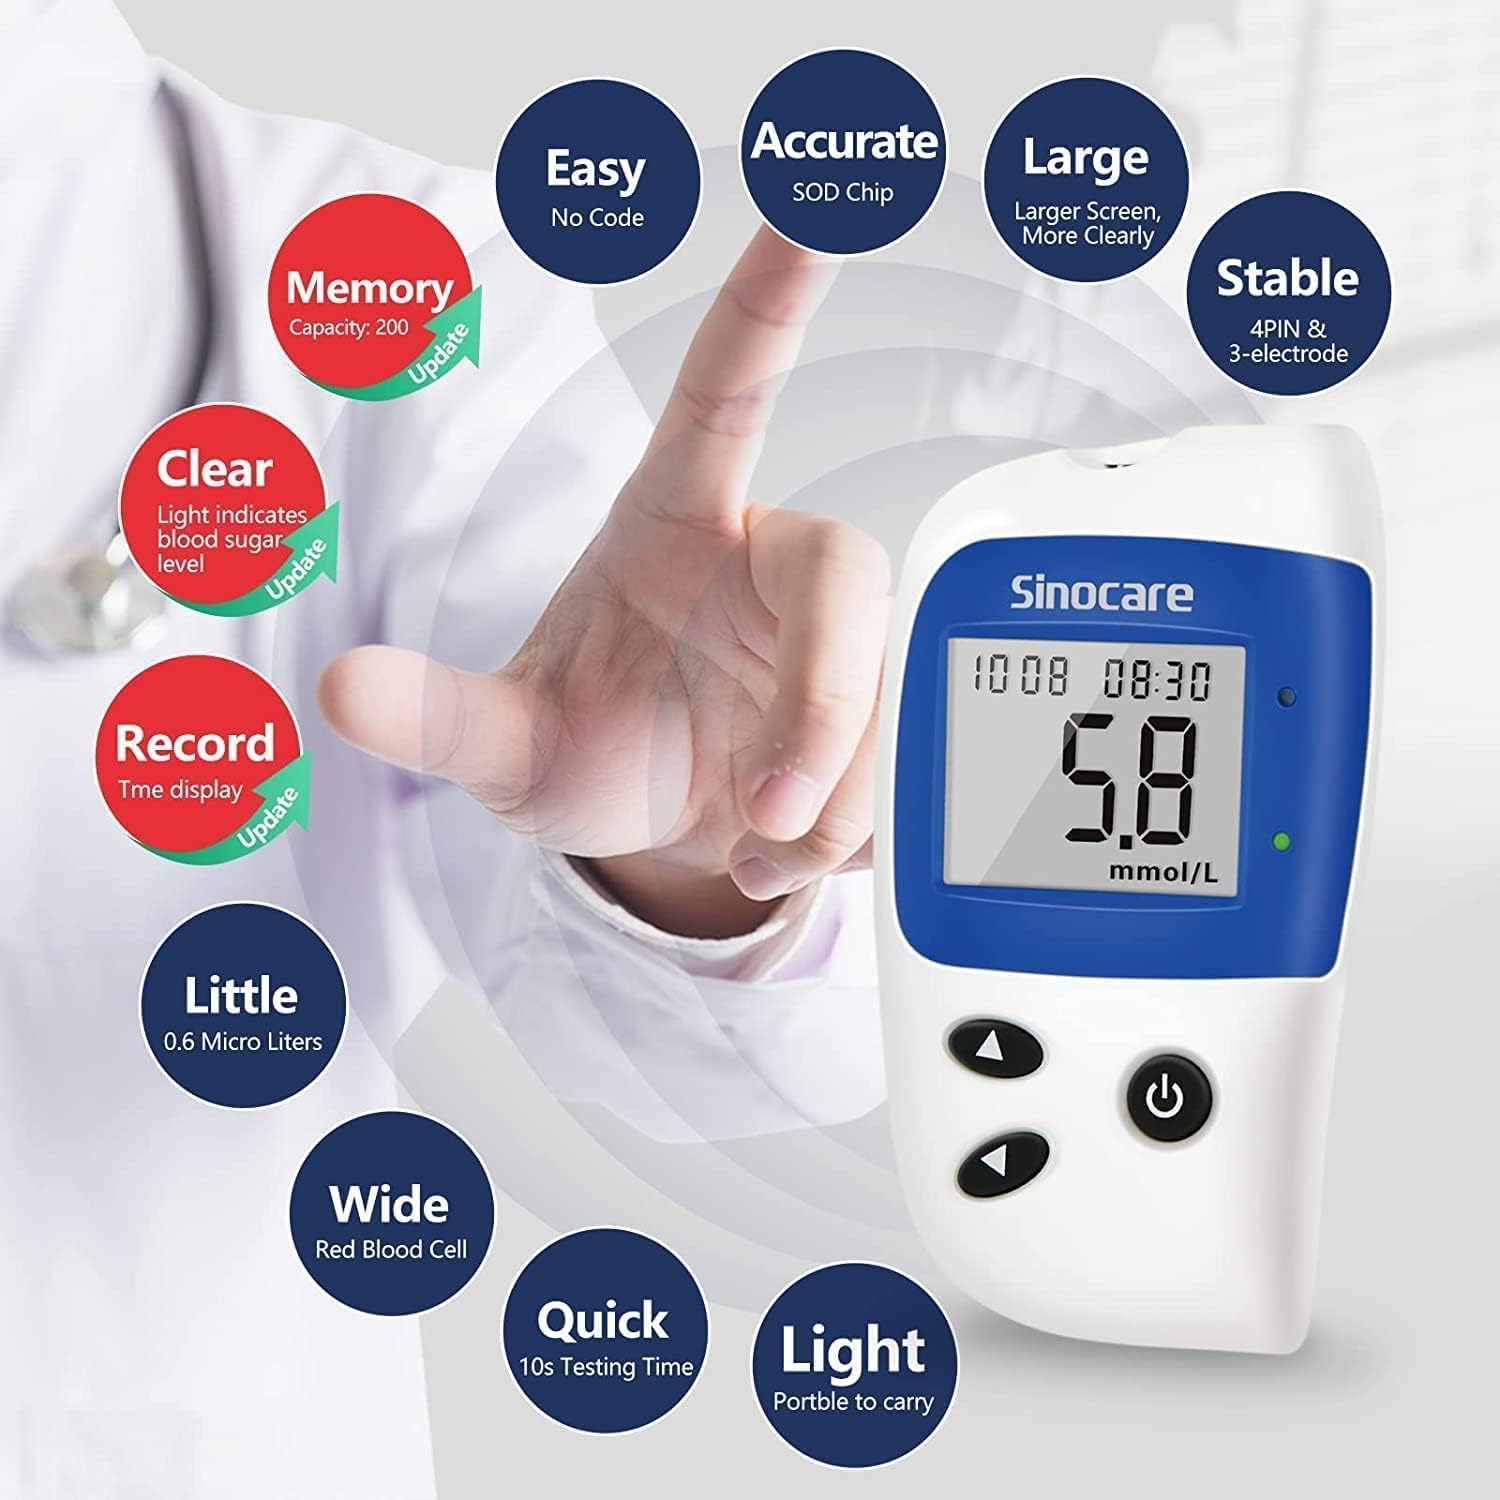
Infographic detailing the key features of the sinocare Safe-Accu2 meter: Easy (No Code), Accurate (SOD Chip), Large (Larger Screen), Stable (4PIN & 3-electrode), Clear (Light indicates blood sugar level), Record (Time display), Little (0.6 Micro Liters sample), Wide (Red Blood Cell), Quick (10s Testing Time), Light (Portable to carry).
4.2. Lancing Device
The lancing device is designed for comfortable and almost painless blood sample collection. It allows for adjustable depth settings to suit different skin types.
4.3. Test Strips
The sinocare Safe-Accu2 test strips are 'no-code' strips, meaning they do not require manual coding or calibration, simplifying the testing process. They require only a small blood sample volume.

Detailed diagram labeling the parts of the sinocare Safe-Accu2 meter (Strip Ejection Button, Battery Case, Device Unit, Date & Time display, Red Indicator Light, Green Indicator Light, Power Button, Time setting program, Search test results) and the lancing device (Rotate to Adjust Depth).
5. Getting Started (Setup)
5.1. Battery Installation
- Open the battery compartment cover on the back of the meter.
- Insert two AAA alkaline batteries, ensuring correct polarity (+/-).
- Close the battery compartment cover securely.
5.2. Setting Date and Time
- With the meter off, press and hold the Power Button (U) for 3 seconds to enter the setting mode.
- The year will flash. Use the arrow buttons (^ / v) to adjust the year. Press the Power Button to confirm and move to the next setting.
- Repeat this process for month, day, hour, and minute.
- Once all settings are confirmed, the meter will exit the setting mode.
5.3. Preparing the Lancing Device
- Unscrew the cap of the lancing device.
- Insert a new sterile lancet firmly into the lancet holder.
- Twist off the protective cap of the lancet.
- Replace the lancing device cap.
- Adjust the penetration depth by rotating the cap. Start with a lower setting (e.g., 2-3) and increase if needed to get a sufficient blood sample.
- Pull back the cocking barrel until it clicks, indicating it is ready to use.
5.4. Preparing the Test Strip
- Ensure your hands are clean and dry.
- Remove a test strip from the vial. Immediately close the vial cap tightly to protect the remaining strips from moisture.
- Insert the test strip into the test strip port of the meter in the direction of the arrows. The meter will turn on automatically and display a blood drop symbol, indicating it is ready for a blood sample.
6. Performing a Blood Glucose Test
- Prepare the puncture site: Choose a clean, dry fingertip. You may massage the finger to increase blood flow.
- Obtain a blood sample: Place the lancing device firmly against the prepared site and press the release button.
- Form a blood drop: Gently squeeze the finger until a small, round drop of blood forms. Do not smear the blood.
- Apply blood to the test strip: Touch the tip of the test strip to the blood drop. The blood will be drawn into the strip automatically. Do not apply blood to the top of the strip.
- Wait for results: The meter will begin counting down (10 seconds). After the countdown, your blood glucose result will appear on the display.
- Interpret indicator lights: The meter features a light prompt system:
- Red Light: Indicates blood sugar level is ≤3.9mmol/L (low blood sugar) or ≥13.9mmol/L (high blood sugar). Further diagnosis may be needed.
- Green Light: Indicates blood sugar level is between 3.9mmol/L and 7mmol/L (normal blood sugar).
- Dispose of used materials: Eject the used test strip using the strip ejection button. Dispose of the used lancet and test strip in a sharps container.

Image demonstrating the humanized design features: one-click disposal of test strips, painless lancing device with adjustable depth, and the small blood sample size (size of a sesame seed).

Visual guide on warm tips for blood sampling: correct blood sampling segment, test strip socket segment, showing examples of plenty of blood vs. insufficient blood volume, and a reminder to use test strips within their valid time (six months after opening).
7. Memory Function
The sinocare Safe-Accu2 meter can store up to 200 test results with date and time. This allows you to track your blood glucose trends over time.
7.1. Reviewing Stored Results
- With the meter off, press the Power Button (U) briefly to turn it on.
- Press the Power Button again to enter the memory review mode. The most recent result will be displayed.
- Use the arrow buttons (^ / v) to scroll through previous test results.
- The meter can also display average data for 7, 14, and 30 days. Continue pressing the Power Button to cycle through these average views.
8. Care and Maintenance
8.1. Cleaning the Meter
- Wipe the meter's exterior with a soft, damp cloth. Do not use harsh chemicals or abrasive cleaners.
- Do not immerse the meter in water or any other liquid.
- Keep the test strip port clean and free of dust or debris.
8.2. Storage
- Store the meter and test strips in their original packaging in a cool, dry place, away from direct sunlight and extreme temperatures.
- Test strips should be stored at temperatures between 10°C and 35°C (50°F and 95°F) and used within six months after opening the vial.
- Always keep the test strip vial cap tightly closed.
8.3. Disposal
- Dispose of used lancets and test strips in an approved sharps container immediately after use.
- Consult your local regulations for proper disposal of electronic devices and batteries.
9. Troubleshooting
| Problem | Possible Cause | Solution |
|---|---|---|
| Meter does not turn on. | Dead or incorrectly inserted batteries. | Check battery polarity or replace batteries. |
| Error message (e.g., E-1, E-2). | Insufficient blood sample, used/damaged strip, or temperature out of range. | Repeat test with a new strip and sufficient blood. Ensure operating conditions are met. Refer to manual for specific error codes. |
| Inaccurate results. | Expired or improperly stored test strips, dirty meter, or incorrect testing procedure. | Check strip expiry and storage. Clean meter. Review testing steps carefully. Perform a control solution test if available. |
| Lancing device not working. | Not cocked, or lancet not inserted correctly. | Pull back the cocking barrel until it clicks. Ensure lancet is fully inserted. |
10. Technical Specifications
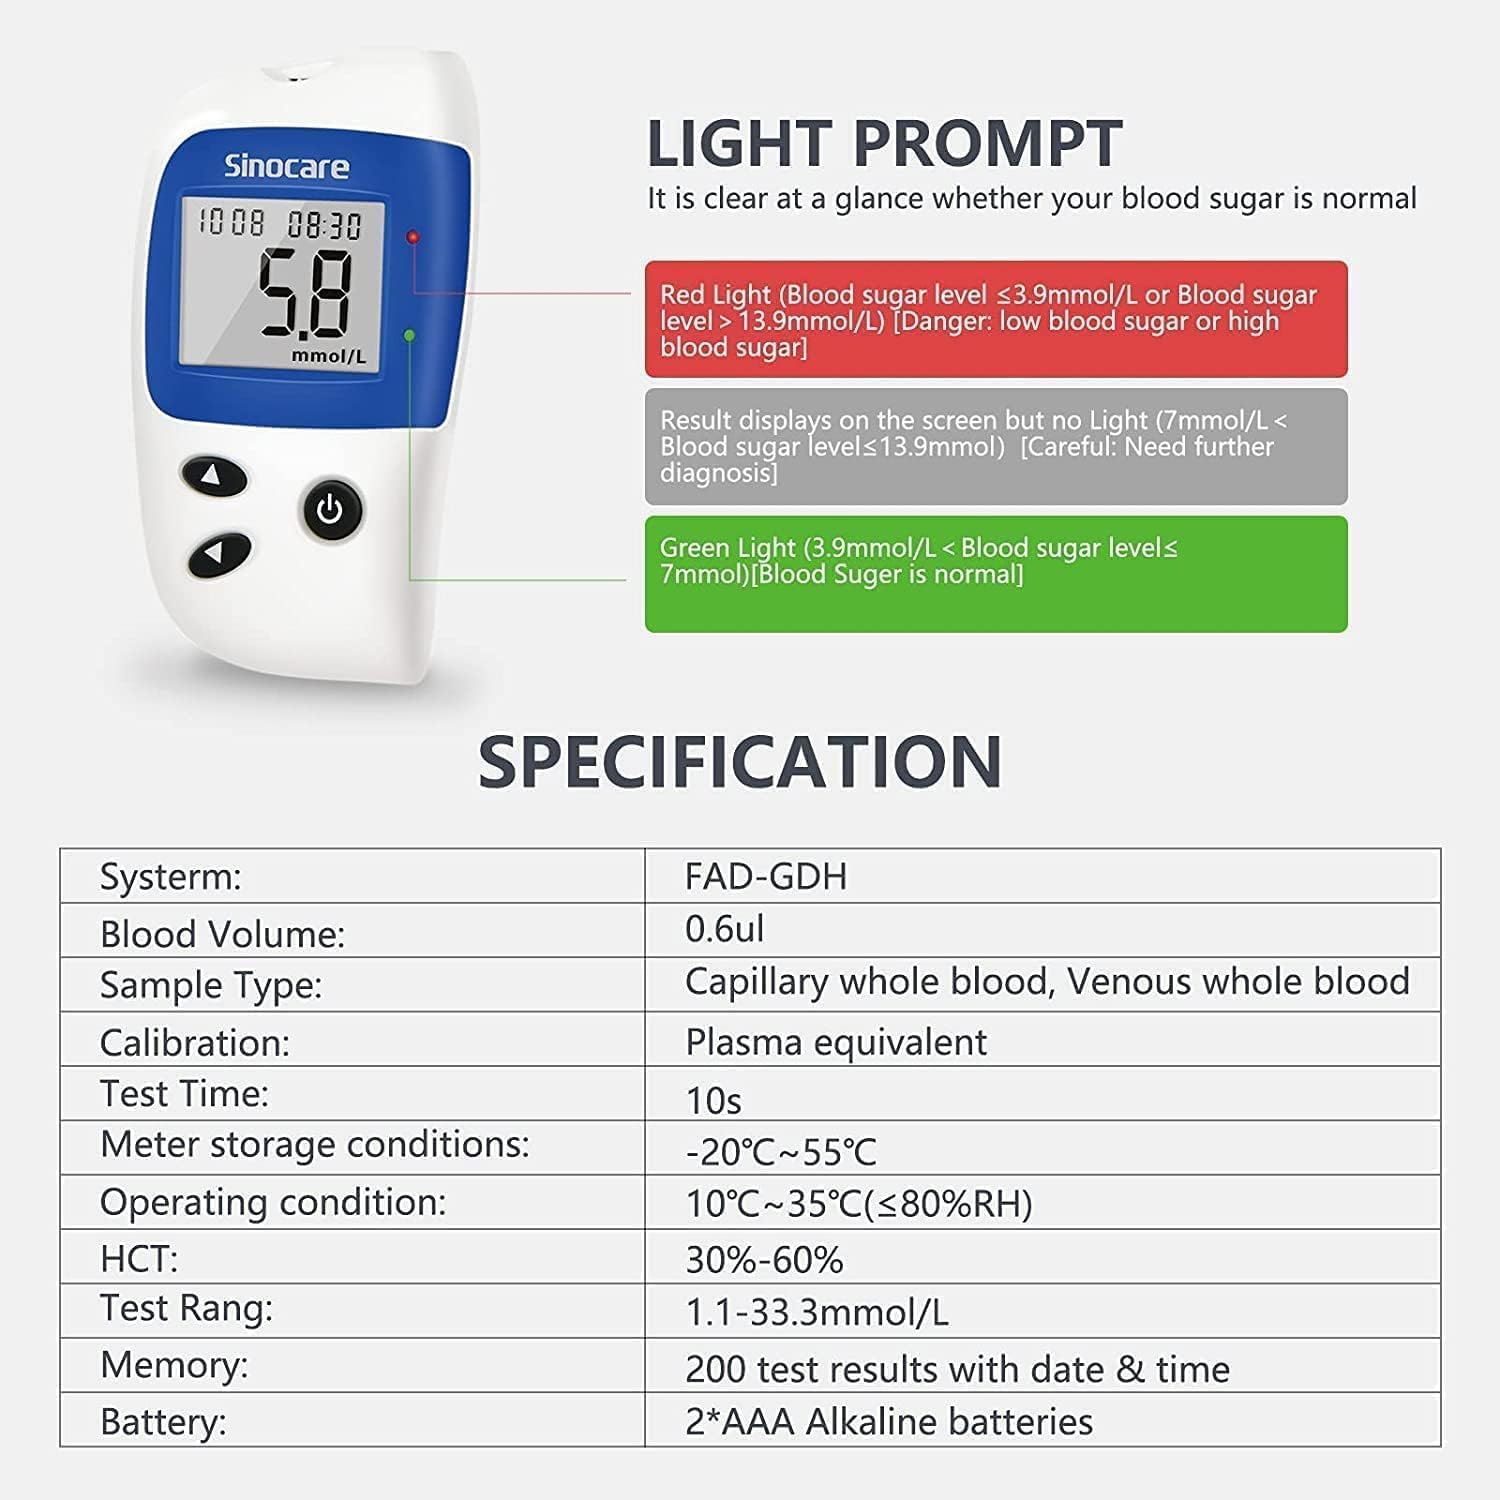
Image explaining the light prompt system (Red for low/high blood sugar, Green for normal) and a table of technical specifications for the sinocare Safe-Accu2 meter.
| Parameter | Value |
|---|---|
| System | FAD-GDH |
| Blood Volume | 0.6 µL |
| Sample Type | Capillary whole blood, Venous whole blood |
| Calibration | Plasma equivalent |
| Test Time | 10 seconds |
| Meter Storage Conditions | -20°C ~ 55°C (-4°F ~ 131°F) |
| Operating Condition | 10°C ~ 35°C (50°F ~ 95°F), ≤80%RH |
| HCT Range | 30% - 60% |
| Test Range | 1.1 - 33.3 mmol/L (20 - 600 mg/dL) |
| Memory Capacity | 200 test results with date & time |
| Battery Type | 2 * AAA Alkaline batteries |
11. Warranty and Customer Support
sinocare is committed to providing high-quality products and customer satisfaction. For any questions, concerns, or technical assistance regarding your Safe-Accu2 Blood Glucose Meter Kit, please contact sinocare customer support.
While specific warranty details are not provided in this manual, sinocare aims to offer 100% satisfactory after-sales service. For video user guides and additional support, please refer to the official sinocare resources.

Compatibility chart showing various sinocare glucose meters and their compatible test strips.
Ask a question about this manual
Ask about setup, troubleshooting, compatibility, parts, safety, or missing instructions. Manuals+ will review the question and use this page’s manual context to help answer it.