
1. Introduction
This manual provides essential instructions for the safe and efficient operation, setup, and maintenance of your LIKARVA Pneumatic Dot Peen Marking Machine. This machine is designed for precise and permanent marking on various metal surfaces, including nameplates, VIN codes, and chassis numbers. It utilizes a pneumatic marking pin to create clear and durable indentations.
2. Safety Instructions
Please read and understand all safety warnings and operating instructions before using this equipment. Failure to follow these instructions may result in serious injury or damage to the machine.
- Electrical Safety: Ensure the machine is connected to a grounded 110V 60Hz power outlet. Do not operate with wet hands or in damp conditions. Disconnect power before performing any maintenance or adjustments.
- Pneumatic Safety: Always ensure the air supply is disconnected and pressure is relieved before working on pneumatic components. Use appropriate air pressure (0.3-0.8 Mpa) as specified.
- Personal Protective Equipment (PPE): Wear safety glasses to protect against flying debris during marking.
- Work Area: Operate the machine in a well-ventilated area. Keep the work area clean and free of obstructions.
- Machine Operation: Keep hands and loose clothing away from the marking pin during operation. Do not attempt to bypass safety features.
3. Package Contents
Carefully unpack the machine and verify that all components are present and undamaged. If any items are missing or damaged, contact your supplier immediately.

Image: Overview of the LIKARVA Pneumatic Dot Peen Marking Machine and its included accessories.
- Marking Head Assembly
- Control Box
- Connection Cable (between head and control box)
- Barometer (Air Pressure Gauge)
- Air Duct (Hose)
- Marking Pin Assembly
- Spare Marking Pin
- Power Cord (110V)
- USB Mouse
4. Product Features
The LIKARVA Pneumatic Dot Peen Marking Machine offers advanced features for versatile and reliable marking operations:
- Adjustable Marking: Character size, spacing, and special symbols can be precisely adjusted.
- Automated Control: Supports man-machine dialogue, automatic serial number increment, and V|N number calculation and printing.
- Durable Marking Pin: Made from tungsten carbide with a hardness of HRC91°, ensuring clear marking and long lifespan. Equipped with a pure copper needle sleeve and piston needle.
- Stable Operation: Powerful electromagnets on the marking machine bracket allow for stable adsorption to the workpiece, ensuring consistent marking quality.
- Wide Compatibility: Operates with Windows XP, Win7, Win8, and Win10 operating systems.
- Flexible Marking Direction: Capable of marking at any angle and on arc surfaces.
- Multiple Input Methods: Supports manual input, barcode scanning, and reading from network internal databases.
- Diverse Content: Marks numbers (0-9), uppercase and lowercase letters (A-Z), Chinese characters, common symbols, and various graphics.
5. Technical Specifications
Refer to the table below for detailed technical specifications of the LIKARVA Pneumatic Dot Peen Marking Machine.
| Parameter | Value |
|---|---|
| Voltage | 110V 60Hz |
| Weight | 16.00 kg (35.3 lbs) |
| Dimensions (L x W x H) | 40.00 cm x 40.00 cm x 33.00 cm (15.75" x 15.75" x 13") |
| Printing Area | 140 x 40 mm |
| Printing Speed | 5-100 characters/minute |
| Printing Depth | 0.1-1 mm (material dependent) |
| Printing Direction | Any angle, arc |
| Power Consumption | ≤200W |
| Air Source Pressure | 0.3-0.8 Mpa |
| Operating System Compatibility | XP/Win7/Win8/Win10 |
6. Setup Guide
Follow these steps to set up your marking machine for initial use.
6.1 Unpacking and Inspection
Remove all components from the packaging. Inspect each part for any signs of damage during transit. Place the marking head and control box on a stable, level surface.
6.2 Connecting the Marking Head to Control Box
Connect the provided cable from the marking head to the corresponding port on the control box. Ensure the connection is secure.

Image: The marking head connected to the control box, ready for air and power connections.
6.3 Connecting Air Supply
Attach the air duct (hose) to the pneumatic inlet on the marking head. Connect the other end to your compressed air source. Ensure the barometer (air pressure gauge) is properly installed and visible. Adjust the air pressure to the recommended range of 0.3-0.8 Mpa.

Image: Detail of the air pressure gauge and pneumatic connection point.
6.4 Connecting Power
Plug the power cord into the control box and then into a grounded 110V 60Hz electrical outlet.

Image: The included 110V power cord.
6.5 Connecting Mouse
Connect the provided USB mouse to one of the USB ports on the control box. This will be used to navigate the machine's interface.

Image: Rear view of the control box, highlighting the connection ports.
7. Operating Instructions
This section outlines the general steps for operating your LIKARVA marking machine.
7.1 Powering On
Ensure all connections are secure. Press the power button on the control box. The internal system will boot up, and the display will show the operating interface.
7.2 Software Interface Overview
Navigate the software interface using the connected mouse. The interface allows you to create, edit, and manage marking tasks. Familiarize yourself with the main menu, input fields, and preview functions.
7.3 Inputting Marking Data
Use the software to input the desired marking content. This can include:
- Numbers (0-9)
- Uppercase and lowercase letters (A-Z)
- Chinese characters
- Common symbols
- Various graphic files
The machine supports manual input, barcode scanning, and data retrieval from network databases.
7.4 Adjusting Marking Parameters
Within the software, adjust parameters such as:
- Character Size: Set the height and width of the characters.
- Character Spacing: Adjust the distance between characters.
- Printing Depth: This is influenced by air pressure and marking pin settings. Experiment on scrap material to achieve desired depth (0.1-1mm).
- Printing Speed: Adjust between 5-100 characters/minute based on material and desired quality.
- Printing Direction: Configure for straight lines, arcs, or any angle.
7.5 Positioning Workpiece
Place the material to be marked under the marking head. The machine's bracket features powerful electromagnets to securely hold the workpiece in place, ensuring stability during the marking process.

Image: Examples of precise marking on various metal surfaces.
7.6 Starting the Marking Process
Once all parameters are set and the workpiece is positioned, initiate the marking process through the software interface. Monitor the machine during operation.
8. Maintenance
Regular maintenance ensures the longevity and optimal performance of your marking machine.
8.1 Cleaning
Periodically clean the marking head, control box, and surrounding areas. Use a soft, dry cloth. Avoid using harsh chemicals or abrasive materials that could damage the surfaces or internal components. Ensure no metal dust or debris accumulates around the marking pin.
8.2 Marking Pin Inspection and Replacement
Inspect the marking pin regularly for wear or damage. A worn pin can lead to inconsistent or poor marking quality. To replace the marking pin:
- Disconnect Power: Turn off and unplug the machine.
- Relieve Air Pressure: Disconnect the air supply and ensure no residual pressure.
- Remove Old Pin: Carefully unscrew or detach the marking pin assembly.
- Install New Pin: Insert the new marking pin assembly and secure it. Ensure it is properly seated.
- Test: Reconnect power and air, then perform a test mark on scrap material to verify proper function.
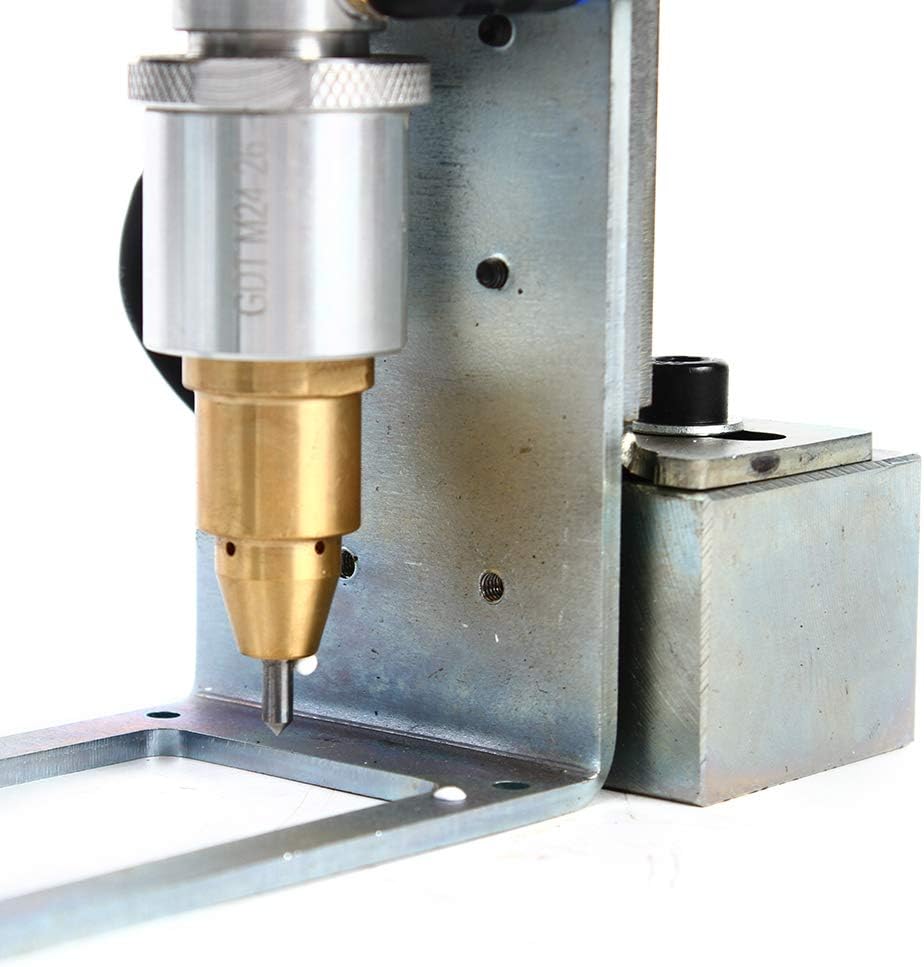
Image: Detail of the marking pin assembly.
8.3 Air System Check
Regularly check the air hose for leaks or damage. Ensure the air filter (if present in your setup) is clean to prevent contaminants from entering the pneumatic system.
9. Troubleshooting
This section provides solutions to common issues you might encounter.
| Problem | Possible Cause | Solution |
|---|---|---|
| Machine does not power on | No power supply; Loose power cord; Faulty power button | Check power outlet and circuit breaker; Ensure power cord is securely connected; Contact support if power button is unresponsive. |
| No marking output | No air supply; Low air pressure; Worn marking pin; Software error | Check air compressor and connections; Adjust air pressure to 0.3-0.8 Mpa; Inspect and replace marking pin if worn; Restart software and machine. |
| Poor marking quality (faint, inconsistent) | Incorrect air pressure; Worn marking pin; Improper workpiece positioning; Incorrect software settings | Verify air pressure; Replace marking pin; Ensure workpiece is stable and flat; Adjust printing depth, speed, or character settings in software. |
| Air pressure gauge shows no reading or low pressure | Air compressor off; Air hose leak; Regulator malfunction | Turn on air compressor; Check air hoses for damage and secure connections; Inspect air regulator. |
If you encounter issues not listed here or if the suggested solutions do not resolve the problem, please contact LIKARVA customer support for further assistance.
10. Warranty and Support
Specific warranty details for the LIKARVA Pneumatic Dot Peen Marking Machine are not provided in this document. For information regarding warranty coverage, technical support, or service, please refer to the documentation included with your purchase or contact LIKARVA customer service directly. Ensure you have your product model and purchase date available when contacting support.