1. Introduction
This manual provides instructions for the installation, operation, and maintenance of your ALEKO DG18PARSSLAC1500 18x6 Paris Single Sliding Driveway Gate with Opener Kit. This galvanized steel gate system is designed for convenient and secure access control for your property. It features a robust 4-point welded construction for stability and a powder-coated finish for corrosion resistance.

Figure 1: ALEKO 18x6 Paris Single Sliding Driveway Gate installed.
2. Safety Information
Always prioritize safety during installation and operation. This gate system includes safety features such as an emergency release key for power failures and stop/reverse functionality with photocell sensors to detect obstructions. Ensure all safety devices are correctly installed and tested before regular use. Keep the gate area clear of people and objects during operation.
3. Package Contents
Verify that all components listed below are present in your package.
- 2 x Gate Panels
- 3 x Gate Posts
- 1 x Side Frame Extension Bracket
- 2 x 12-inch Side Rollers
- 2 x 4-inch V-Groove Gate Wheels for V-Profile Tracks
- 4 x 6-foot V-Tracks
- 1 x Gate Opener AC1400NOR
- 1 x Smart Gate Opener
- 2 x Photocell Sensors
- 1 x Wired Push Button
- 1 x Metal Box for Keypad
- 1 x Wireless Keypad

Figure 2: Gate opener and control accessories.
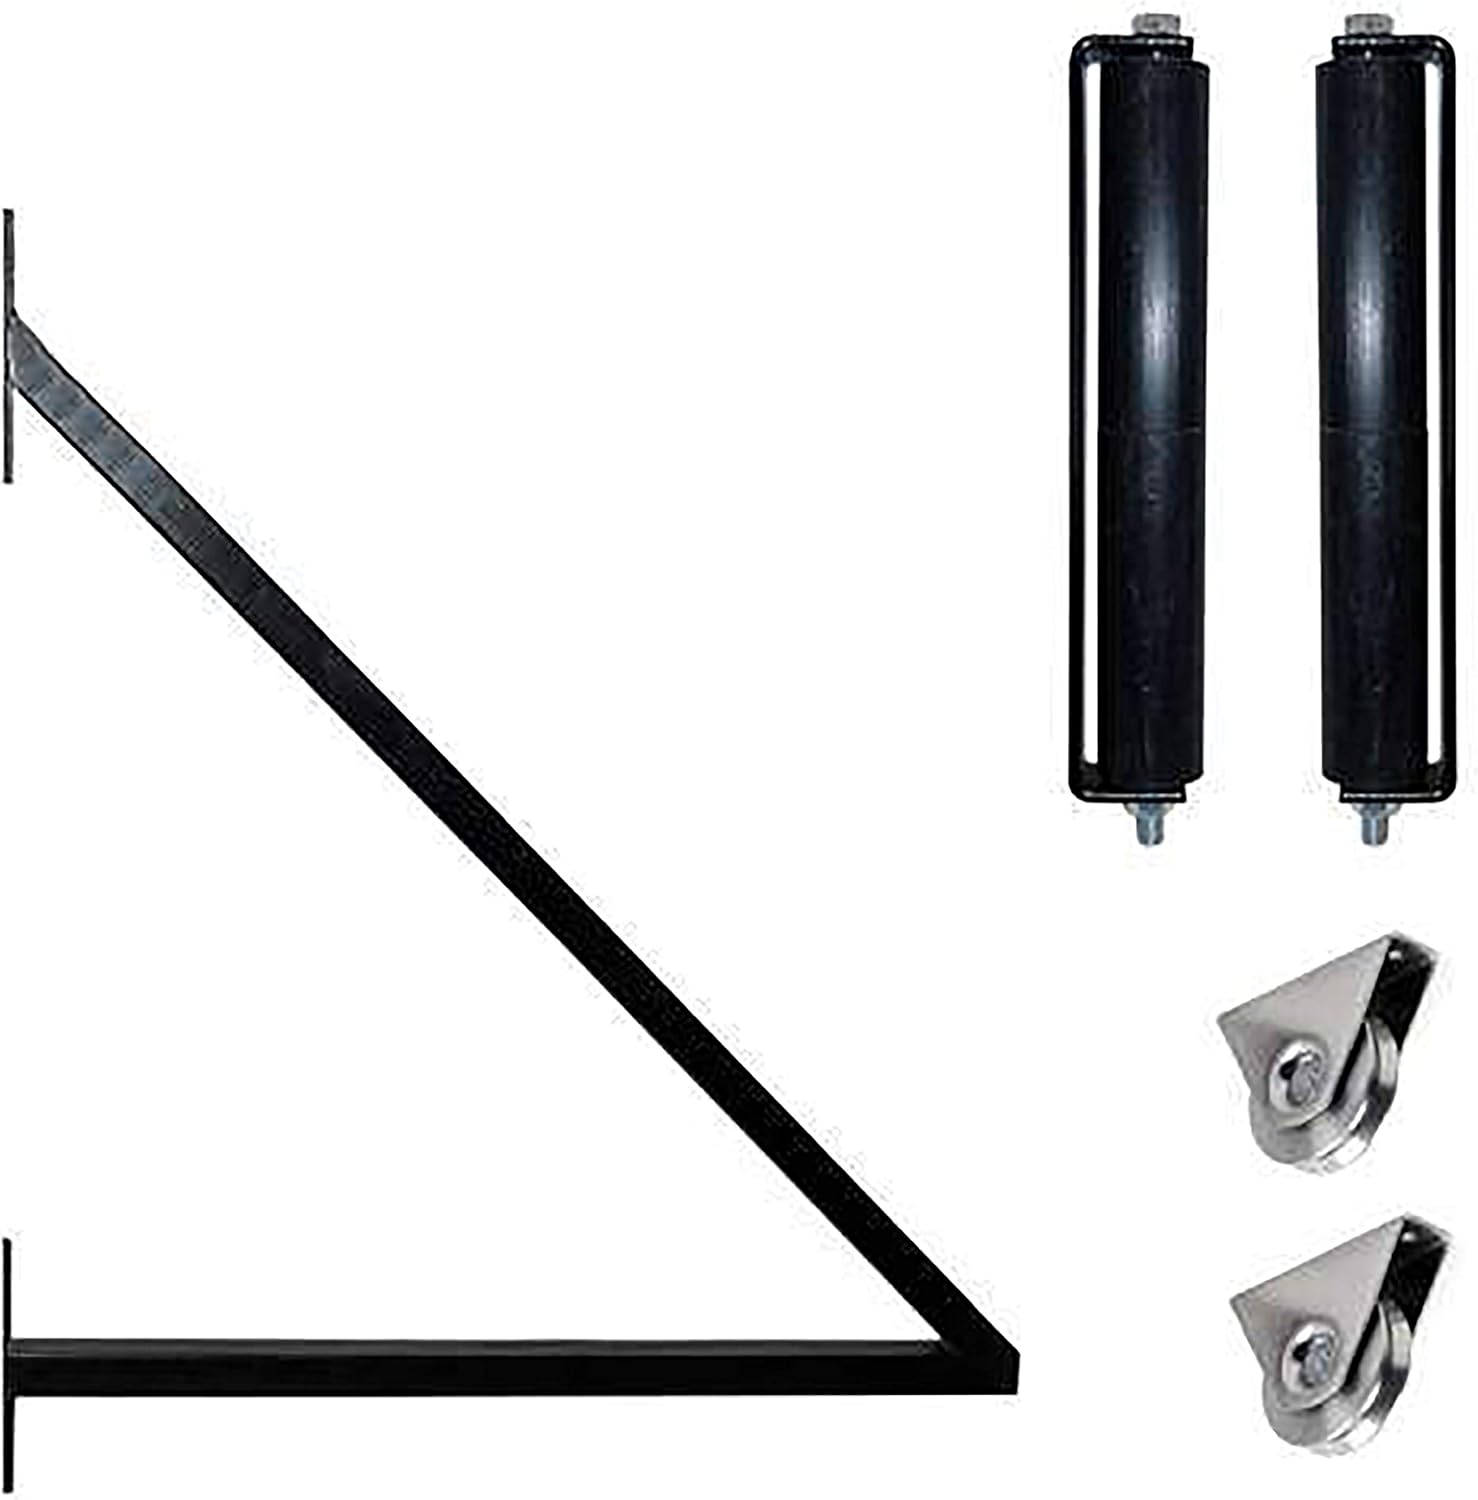
Figure 3: Side frame extension, rollers, and V-groove wheels.
4. Setup and Installation
Installation of the ALEKO sliding driveway gate requires careful attention to detail. It is recommended to consult a professional for installation if you are not experienced with similar projects.
4.1 Component Overview
Refer to the diagram below for a visual representation of the gate system components and their general placement.

Figure 4: Sliding Gate System Component Diagram.
4.2 Gate Assembly
- Install the 3 gate posts securely in the ground according to your site plan.
- Assemble the two gate panels and attach them to the posts.
- Mount the side frame extension bracket. Refer to the dimensions for proper placement.
- Install the 6-foot V-tracks along the gate's path.
- Attach the 4-inch V-groove gate wheels to the gate panels, ensuring they align with the V-tracks.
- Install the 12-inch side rollers to guide the gate smoothly.

Figure 5: Side Frame Extension Bracket Dimensions.
4.3 Opener and Sensor Installation
- Mount the Gate Opener AC1400NOR according to its specific manual (not included in this document).
- Connect the Smart Gate Opener module.
- Install the two photocell sensors to ensure obstruction detection.
- Mount the wired push button and the metal box for the wireless keypad.
- Pair the wireless keypad with the gate opener.
For detailed wiring and programming instructions for the gate opener and smart module, please refer to the separate manuals provided with those specific components.
5. Operating Instructions
Your ALEKO sliding gate system offers multiple ways to operate the gate.
5.1 Remote and Keypad Operation
- Use the provided wireless keypad or remote controls to open and close the gate.
- Ensure a clear line of sight to the gate for optimal remote performance.
5.2 Smart Home Integration
The included Smart Gate Opener is compatible with Smart Home systems and both iOS and Android mobile devices.
- Download the relevant application for your smartphone (iOS or Android).
- Follow the app's instructions to connect and configure your Smart Gate Opener.
- You can then control and monitor your gate remotely.

Figure 6: Smart Gate Opener with mobile app interface.
5.3 Emergency Release
In case of a power failure, use the emergency release key to manually operate the gate. Refer to the gate opener's specific manual for the exact procedure.
6. Maintenance
Regular maintenance ensures the longevity and optimal performance of your ALEKO gate system.
- Cleaning: Periodically clean the gate panels with mild soap and water to remove dirt and debris. The powder-coated finish helps prevent rust, cracking, peeling, and chipping, but regular cleaning will maintain its appearance.
- Inspection: Regularly inspect the V-tracks, wheels, and rollers for any obstructions, wear, or damage. Ensure the gate moves freely and smoothly.
- Lubrication: Lubricate moving parts such as wheels and hinges as recommended by the gate opener's manual.
- Sensor Check: Test the photocell sensors regularly to ensure they detect obstructions and trigger the stop/reverse function correctly.
- Structural Integrity: Check the gate posts and frame for any signs of loosening or damage. The galvanized steel construction provides strength and corrosion resistance.

Figure 7: Detail of Paris style gate design.
7. Troubleshooting
If you encounter issues with your gate system, consider the following common troubleshooting steps. For specific issues related to the gate opener, refer to its dedicated manual.
- Gate Not Moving:
- Check power supply to the gate opener.
- Ensure no obstructions are blocking the gate's path or the photocell sensors.
- Verify remote control batteries and programming.
- Gate Stops Mid-Operation:
- Check for obstructions in the gate's path.
- Inspect V-tracks and wheels for debris or damage.
- Ensure photocell sensors are clean and aligned.
- Unresponsive Controls:
- Check batteries in wireless remotes/keypad.
- Verify the smart gate opener's connection to your network and mobile device.
8. Specifications
| Feature | Detail |
|---|---|
| Brand | ALEKO |
| Model Number | DG18PARSSLAC1500 |
| Product Dimensions (W x H) | 18 feet (width) x 6 feet (height) |
| Material | Alloy Steel, Metal (Galvanized Steel) |
| Color/Style | Paris W/Opener (Black, Paris Style) |
| Mounting Type | Hardware Mount |
| Closure Type | Automatic |
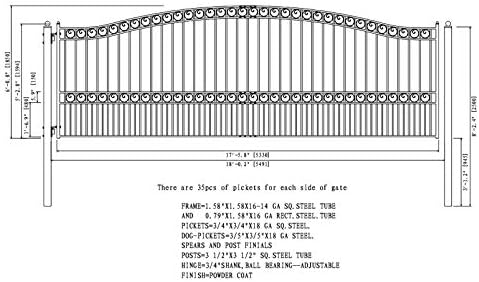
Figure 8: Gate technical drawing with dimensions.
9. Warranty and Support
This product is offered by ALEKO Products.
- Returns: 90-day free returns, refund/replacement policy.
- Customer Support: For assistance, please contact ALEKO Products customer support.
10. Product Video Overview
Video 1: An overview of ALEKO driveway gates, highlighting material quality and design options.