1. Introduction
This manual provides detailed instructions for the installation, operation, and maintenance of your TGDGAMER T-240MM ARGB Liquid CPU Water Cooling System. Please read this manual thoroughly before installation to ensure proper setup and optimal performance. This system is designed to efficiently cool your CPU while offering customizable Addressable RGB (ARGB) lighting and a temperature display.

Figure 1: TGDGAMER T-240MM ARGB Liquid CPU Water Cooling System. This image shows the complete liquid cooler unit with its radiator, two fans, and the CPU block with an integrated temperature display.
2. Product Features
- Addressable RGB (ARGB) Sync: The fans and pump feature ARGB lighting that can synchronize with compatible motherboards via a 5V 3-pin interface. This allows for customizable lighting effects through motherboard software such as Aura Sync, Gigabyte RGB FUSION, and MSI Mystic Light Sync.
- Enhanced Cooling Performance: Equipped with an efficient cold plate, a spraying copper bottom, a proprietary pump, and fans optimized for static pressure, this system ensures excellent heat transfer from the CPU.
- Wide Compatibility: Supports a broad range of Intel sockets including LGA 1700/1200/1366/2011/115X, and AMD sockets including AM5/AM4/AM3+/AM3/FA2+/FM2.
- PWM Smart Control: The fans support Pulse Width Modulation (PWM), allowing their speed to automatically adjust between 800-1800 RPM based on CPU temperature. This optimizes cooling efficiency while minimizing noise.
- Integrated Temperature Display: The CPU block features a digital display showing the temperature of the contact surface between the CPU and the water cooling unit.
3. Package Contents
Please verify that all components are present and in good condition before proceeding with installation. If any parts are missing or damaged, contact customer support.
- 1x TGDGAMER T-240MM Liquid CPU Cooler (Radiator, Pump/CPU Block, and two 120mm ARGB PWM Fans pre-attached)
- Intel Mounting Bracket and Backplate
- AMD Mounting Bracket (Note: No AMD backplate is included in the package. The AMD installation requires the original bracket provided with your motherboard.)
- Mounting Screws and Standoffs for Intel and AMD sockets
- Thermal Paste
- Fan and ARGB Cables
- User Manual

Figure 2: Included mounting hardware for Intel and AMD platforms. This image displays various screws, standoffs, and brackets for different CPU sockets, along with a tube of thermal paste and connection cables.
4. Safety Information
- Always disconnect power from your computer before installation or maintenance.
- Handle components with care to avoid damage.
- Avoid touching the fan blades while they are spinning.
- Ensure proper grounding to prevent electrostatic discharge (ESD) damage to components.
- Keep the product away from liquids and extreme temperatures.
- Do not attempt to open or modify the liquid cooler unit, as this may void the warranty and cause damage.
5. Installation Guide
5.1. Preparation
- Power off your computer and disconnect all cables.
- Open your computer case.
- Remove any existing CPU cooler. Clean the CPU surface thoroughly to remove old thermal paste.
- Determine the appropriate mounting hardware for your CPU socket (Intel or AMD).
5.2. Radiator and Fan Installation
Mount the radiator and fans to an available fan mount in your computer case (e.g., top, front, or rear). Ensure proper airflow direction (intake or exhaust) based on your case's cooling design.

Figure 3: High-density heat sink radiator with two ARGB fans. This image highlights the radiator's design for efficient heat dissipation and the fans that provide airflow.
5.3. CPU Block Installation (Intel)
- Install the Intel backplate behind the motherboard, aligning the holes with the CPU socket.
- Screw in the appropriate Intel standoffs into the backplate from the front of the motherboard.
- Apply a small amount of thermal paste to the center of your CPU.
- Place the Intel mounting bracket onto the CPU block.
- Carefully place the CPU block onto the CPU, aligning the holes with the standoffs.
- Secure the CPU block with the provided thumb screws, tightening them in a diagonal pattern until snug.
5.4. CPU Block Installation (AMD)
Important Note: The AMD installation requires the original backplate and mounting clips provided with your motherboard. The TGDGAMER T-240MM package does not include an AMD backplate.
- Ensure the original AMD backplate is installed behind your motherboard.
- Attach the AMD mounting clips to the CPU block.
- Apply a small amount of thermal paste to the center of your CPU.
- Hook one side of the AMD mounting clips onto the motherboard's retention bracket.
- Press down on the CPU block and hook the other side of the mounting clips onto the motherboard's retention bracket.
- Secure the CPU block by tightening the screws on the mounting clips evenly.

Figure 4: Compatibility overview for Intel and AMD sockets. This image lists the supported Intel LGA and AMD AM/FM series sockets, emphasizing the requirement for the original motherboard bracket for AMD installations.
5.5. Cable Connections
- Fan Power: Connect the 4-pin PWM fan cables from the radiator fans to the CPU_FAN or SYS_FAN headers on your motherboard.
- Pump Power: Connect the pump's power cable to a dedicated AIO_PUMP or CPU_OPT header on your motherboard. If these are unavailable, use a SYS_FAN header and ensure it is set to run at full speed in the BIOS.
- ARGB Lighting: Connect the 3-pin 5V ARGB cable from the pump and fans to a compatible 3-pin 5V ARGB header on your motherboard. Do not connect to a 12V RGB header, as this will damage the LEDs.
- Temperature Display: Connect the temperature display cable (if separate) to an available USB 2.0 header on your motherboard.

Figure 5: Diagram showing the connection of the 5V 3-pin ARGB cable to a motherboard header for lighting synchronization.

Figure 6: Illustration of the 4-pin PWM fan connection to the CPU_FAN header, enabling dynamic speed adjustment.
6. Operating Instructions
6.1. Initial Power On
After completing the installation, close your computer case and reconnect all external cables. Power on your computer. The fans and pump should start, and the ARGB lighting should illuminate. The temperature display on the CPU block will show the current temperature.
6.2. ARGB Lighting Control
If connected to a compatible motherboard's 5V 3-pin ARGB header, you can control the lighting effects using your motherboard's RGB software (e.g., ASUS Aura Sync, Gigabyte RGB FUSION, MSI Mystic Light Sync). Refer to your motherboard manual for specific software instructions.
Video 1: Demonstration of the water cooling display and various ARGB lighting effects within a PC build. This video showcases the dynamic color changes and patterns achievable with the cooler's lighting.
6.3. Temperature Display
The display on the CPU block shows the temperature of the contact surface between the CPU and the water cooler. Note: This displayed temperature is not the CPU core temperature. There is a natural temperature difference between the internal CPU core temperature and the external contact surface temperature. This display provides a general indication of the cooler's performance.

Figure 7: Explanation of the temperature display on the CPU block. This image clarifies that the displayed temperature is the contact surface temperature, not the internal CPU core temperature.
7. Maintenance
- Dust Removal: Periodically clean the radiator fins and fan blades with compressed air to prevent dust buildup, which can impede cooling performance. Ensure fans are not spinning during cleaning.
- Visual Inspection: Regularly check the tubing and connections for any signs of leaks or damage.
- Coolant: This is a closed-loop liquid cooling system and does not require user-added coolant. Do not attempt to open the unit to add or replace coolant.
8. Troubleshooting
- No Power/Fans Not Spinning:
- Check all power connections to the motherboard and power supply.
- Ensure the pump and fan cables are securely connected to the correct headers.
- Verify fan speed settings in your motherboard's BIOS/UEFI.
- High CPU Temperatures:
- Confirm the CPU block is properly seated on the CPU with adequate thermal paste.
- Check that the pump is running (you may hear a faint hum or feel vibrations in the tubes).
- Ensure fans are spinning and oriented correctly for optimal airflow.
- Clean any dust buildup on the radiator fins.
- ARGB Lighting Not Working/Incorrect Colors:
- Verify the 3-pin 5V ARGB cable is connected to a compatible 5V ARGB header, not a 12V RGB header.
- Check connections for looseness.
- Ensure your motherboard's RGB software is installed and configured correctly.
- Restart your computer.
- Temperature Display Not Working:
- Ensure the display's USB 2.0 header cable is securely connected to the motherboard.
- Check for any software or driver requirements (refer to product page or manufacturer website if applicable).
9. Specifications
| Model Number | T-240 |
| Product Dimensions | 14.5"L x 5.6"W x 9"H (36.83cm L x 14.22cm W x 22.86cm H) |
| Weight | 4.1 Pounds (1.86 kg) |
| Manufacturer | TGDGAMER |
| Power Connector Type | 3-Pin (Pump), 4-Pin (Fans) |
| Voltage | 5 Volts (ARGB), 12 Volts (Fans/Pump) |
| Cooling Method | Water |
| Compatible Devices | Desktop PCs |
| Noise Level | 23 Decibels (dB) |
| Material | Aluminum, Copper, Plastic |
| Maximum Rotational Speed | 1800 RPM |
| Air Flow Capacity | 71.05 Cubic Feet Per Minute (CFM) |
| CPU Socket Compatibility | Intel: LGA 1700/1200/1366/2011/115X AMD: AM5/AM4/AM3+/AM3/FA2+/FM2 |
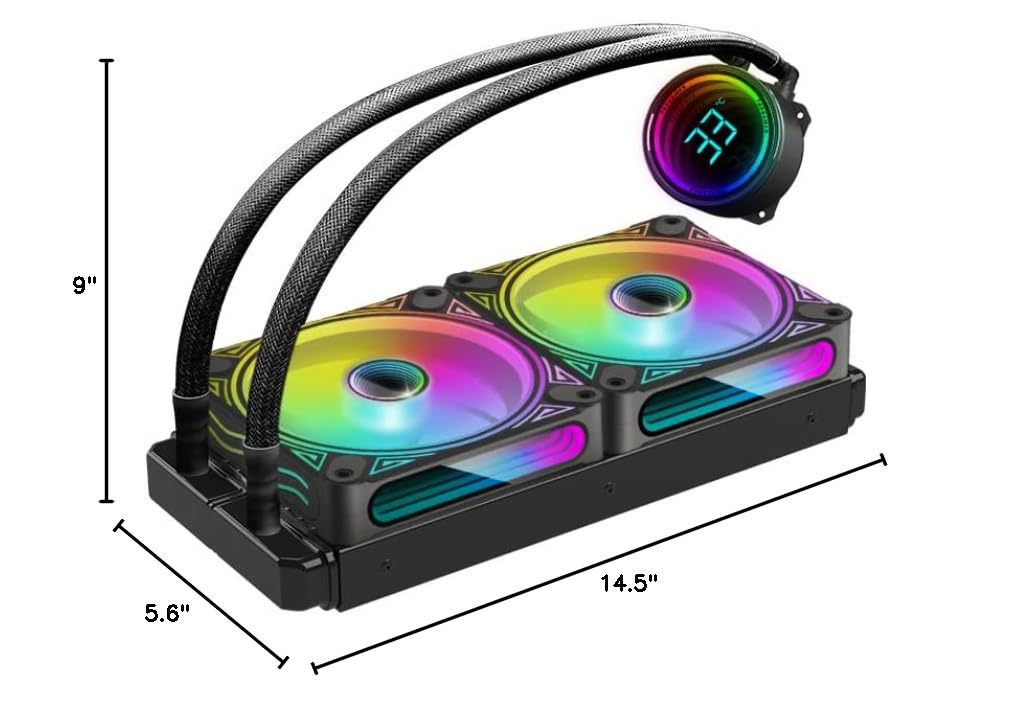
Figure 8: Dimensional drawing of the TGDGAMER T-240MM liquid cooler, showing its length, width, and height.
10. Warranty and Support
TGDGAMER products are manufactured to high-quality standards. For warranty information, technical support, or assistance with any issues not covered in this manual, please refer to the official TGDGAMER website or contact their customer service department. Keep your proof of purchase for warranty claims.