1. Introduction
This manual provides detailed instructions for the installation, operation, and maintenance of your GIISSMO USB C Hub USB 3.0 Dual HDMI VGA Adapter. Please read this manual thoroughly before using the product to ensure proper functionality and to avoid any potential issues. This docking station is designed to expand your laptop's connectivity, enabling dual or triple monitor setups, high-speed data transfer, and power delivery.
2. Product Overview
The GIISSMO USB C Hub is an 8-in-1 docking station that converts a single USB-C or USB-A port into multiple connectivity options. It supports dual or triple external monitors, power delivery, and various USB peripherals.

Image 2.1: The GIISSMO USB C Hub with its connected cables and adapters, illustrating its versatile connectivity options.
Key Features:
- Triple Display Output: Connect up to three external monitors via two HDMI ports and one VGA port.
- 8-in-1 Connectivity: Includes 2 HDMI, 1 VGA, 4 USB 2.0, and 1 PD 3.0 port.
- Power Delivery 3.0: Supports up to 100W power input for laptop charging (85W output).
- USB 2.0 Ports: Four USB 2.0 ports for connecting peripherals like keyboards and mice, with data transfer speeds up to 480Mbps.
- Hybrid 2-in-1 USB-C to USB 3.0 Cable: Ensures compatibility with both USB-C and USB-A host devices.
- Wide Compatibility: Works with MacBook Pro/Air (M1/M2), Dell, HP, Lenovo, Surface, Chromebook, and other Thunderbolt 3/4 or USB 3.0 laptops running macOS (10.6 or higher), Windows (XP, 7 or higher), Chrome OS, and Android.

Image 2.2: Detailed diagram showcasing the 8-in-1 ports of the GIISSMO docking station, including USB-C PD, HDMI 1 (1080P@60Hz), HDMI 2 (4K@30Hz), VGA (1080P@60Hz), and four USB 2.0 ports.
3. Setup and Driver Installation
Before using the GIISSMO USB C Hub, it is essential to install the necessary drivers for proper functionality, especially for display output. The docking station requires the 'Siliconmotion' driver, also known as 'InstantView'.
General Installation Steps:
- Connect the GIISSMO USB C Hub to your computer's USB-C or USB-A port using the provided hybrid cable.
- Connect your external monitors to the HDMI and/or VGA ports on the docking station.
- Connect your laptop's power adapter to the PD 3.0 port on the docking station for pass-through charging (optional).
- Proceed with the driver installation steps specific to your operating system below.

Image 3.1: Visual guide for connecting the docking station and installing the required driver for multi-monitor setup.
Driver Installation for macOS:
For macOS users, especially those with M1/M2 chips, driver installation is crucial for display functionality.

Image 3.2: Overview of the driver installation process for macOS, highlighting the need for the InstantView driver.
- Step 1: Connect the hub to your Mac. Open 'This PC' (or Finder on Mac) and locate the 'GISDISPLAY' disk. Open the disk and run 'macOS InstantView.app'.

Image 3.3: Locating and opening the macOS InstantView application from the GISDISPLAY disk.
- Step 2: Run InstantView and grant System Permissions. When prompted, click 'Open System Settings' to allow screen recording.

Image 3.4: Granting screen recording permissions for InstantView in macOS System Settings.
- Step 3: In System Settings, navigate to 'Privacy & Security' > 'Screen Recording'. Click the lock icon to make changes, enter your password, and enable 'macOS InstantView'.

Image 3.5: Enabling InstantView in macOS Privacy & Security settings after unlocking with administrator credentials.
- Step 4: After enabling, restart InstantView if prompted. You can then choose between 'Mirrored Display' or 'Extended Mode' within the InstantView application.

Image 3.6: InstantView interface allowing selection of display mode after successful driver installation.
Driver Installation for Windows:
For Windows users, the driver installation process is similar.

Image 3.7: Overview of the driver installation process for Windows, highlighting the need for the InstantView driver.
- Step 1: Connect the hub to your Windows computer. Open 'This PC' and locate the 'GISDISPLAY' disk. Open the disk and run 'Windows InstantView.exe'.

Image 3.8: Locating and running the Windows InstantView executable from the GISDISPLAY drive.
- Step 2: Follow the on-screen prompts to install the driver. Once installed, the InstantView application will launch. You can then choose between 'Mirror Mode' or 'Extended Display'.

Image 3.9: InstantView interface in Windows allowing selection of display mode after successful driver installation.
4. Operating Instructions
Display Modes for macOS/M1/M2:
The GIISSMO USB C Hub supports both Extend Mode and Mirror Mode for macOS devices, including those with M1/M2 chips. Note that HDMI 1 and VGA share the same video signal, as do HDMI 2 and VGA. You can use HDMI 1 & HDMI 2, or HDMI 2 & VGA to extend your display.
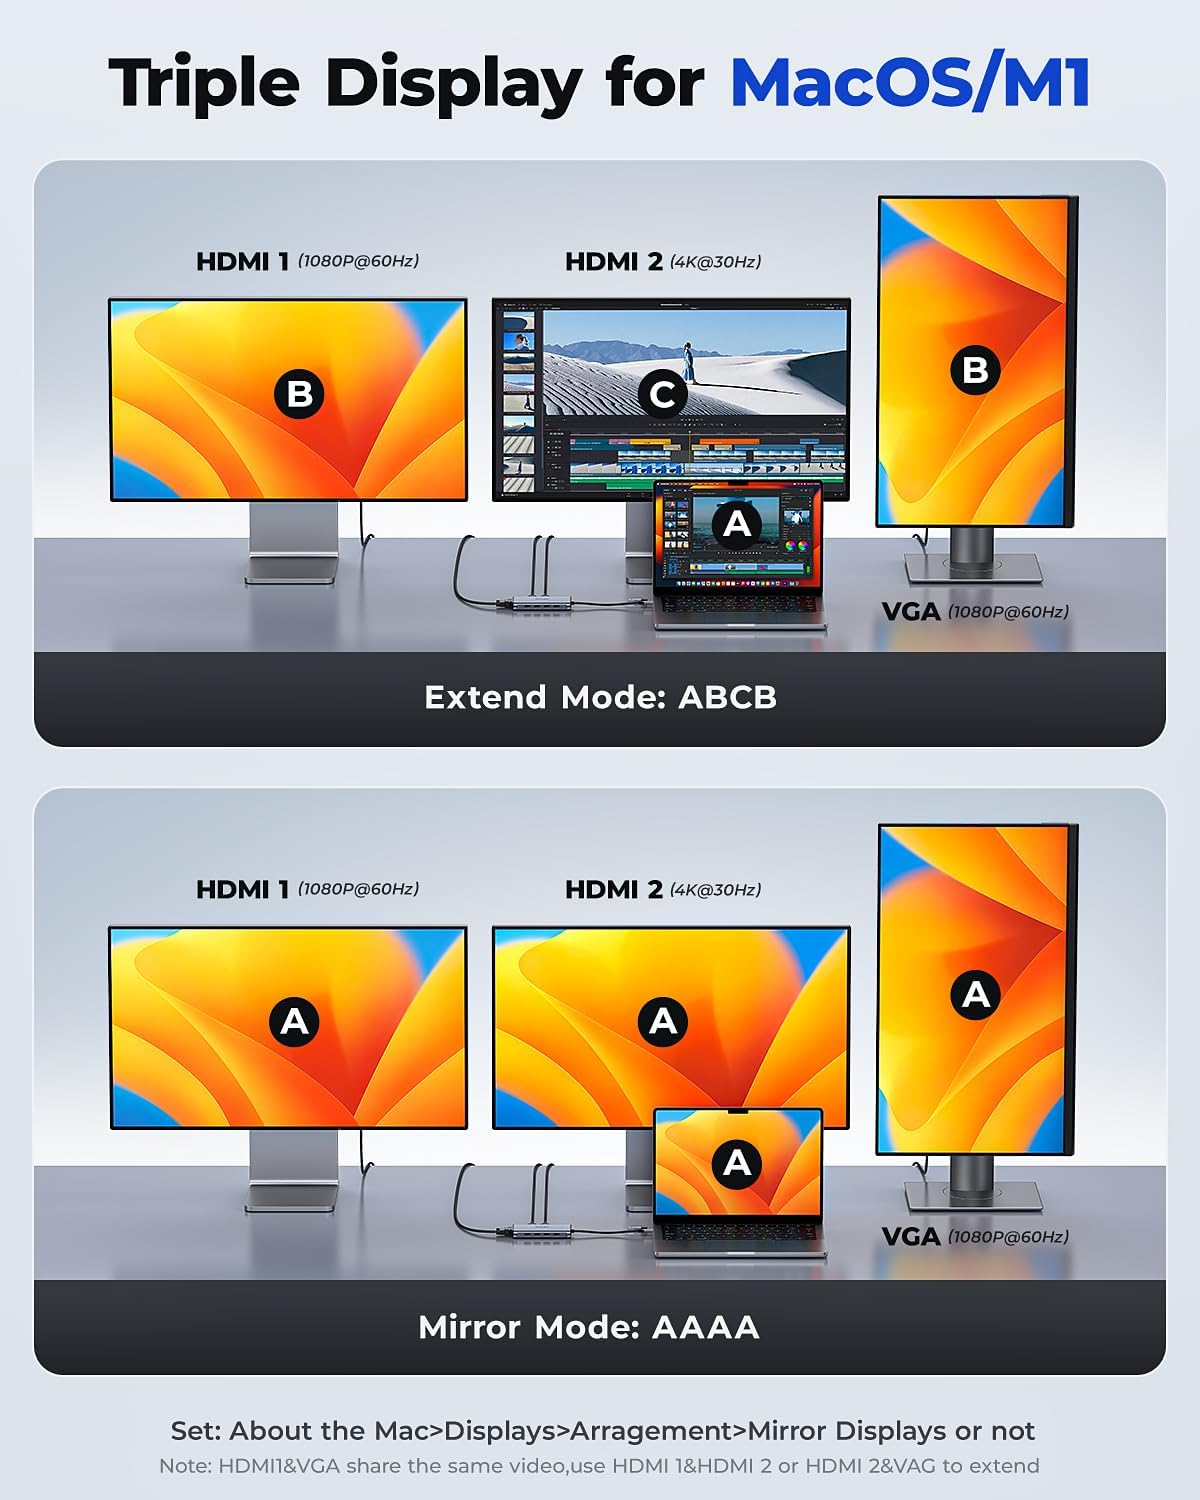
Image 4.1: Visual representation of Extend Mode (ABCB) and Mirror Mode (AAAA) for triple display setups on macOS/M1 devices. Adjust settings via Mac's 'Displays' preferences.
- Extend Mode (ABCB): Your laptop screen (A) extends to HDMI 1 (B), HDMI 2 (C), and VGA (B). This allows for multiple independent workspaces.
- Mirror Mode (AAAA): Your laptop screen (A) is duplicated across all connected external displays (HDMI 1, HDMI 2, VGA).
To configure display settings on macOS, go to System Settings > Displays > Arrangement. Here you can drag and drop displays to arrange them, and select 'Mirror Displays' if desired.
Display Modes for Windows:
For Windows operating systems, the docking station supports various extended and mirrored display configurations. Note that HDMI 1 and VGA share the same video signal, as do HDMI 2 and VGA. You can use HDMI 1 & HDMI 2, or HDMI 2 & VGA to extend your display.

Image 4.2: Visual representation of Extend Mode (ABCB) and various Mirror Modes (AABA, ABAB) for triple display setups on Windows. Adjust settings via 'Intel Graphics Setting' or Windows Display Settings.
- Extend Mode (ABCB): Your laptop screen (A) extends to HDMI 1 (B), HDMI 2 (C), and VGA (B).
- Mirror Mode (AABA, ABAB): Your laptop screen (A) can be mirrored to specific external displays, or all displays can show the same content.
To configure display settings on Windows, right-click on the desktop and select 'Display settings' or 'Intel Graphics Setting' (if applicable). You can then arrange displays, change resolution, and select 'Extend these displays' or 'Duplicate these displays'.
Power Delivery Pass-Through Charging:
The docking station features a PD 3.0 port that allows you to charge your laptop while using the hub. Connect your laptop's original power adapter to the PD port on the docking station. The hub supports up to 100W power input, providing up to 85W output to your laptop.
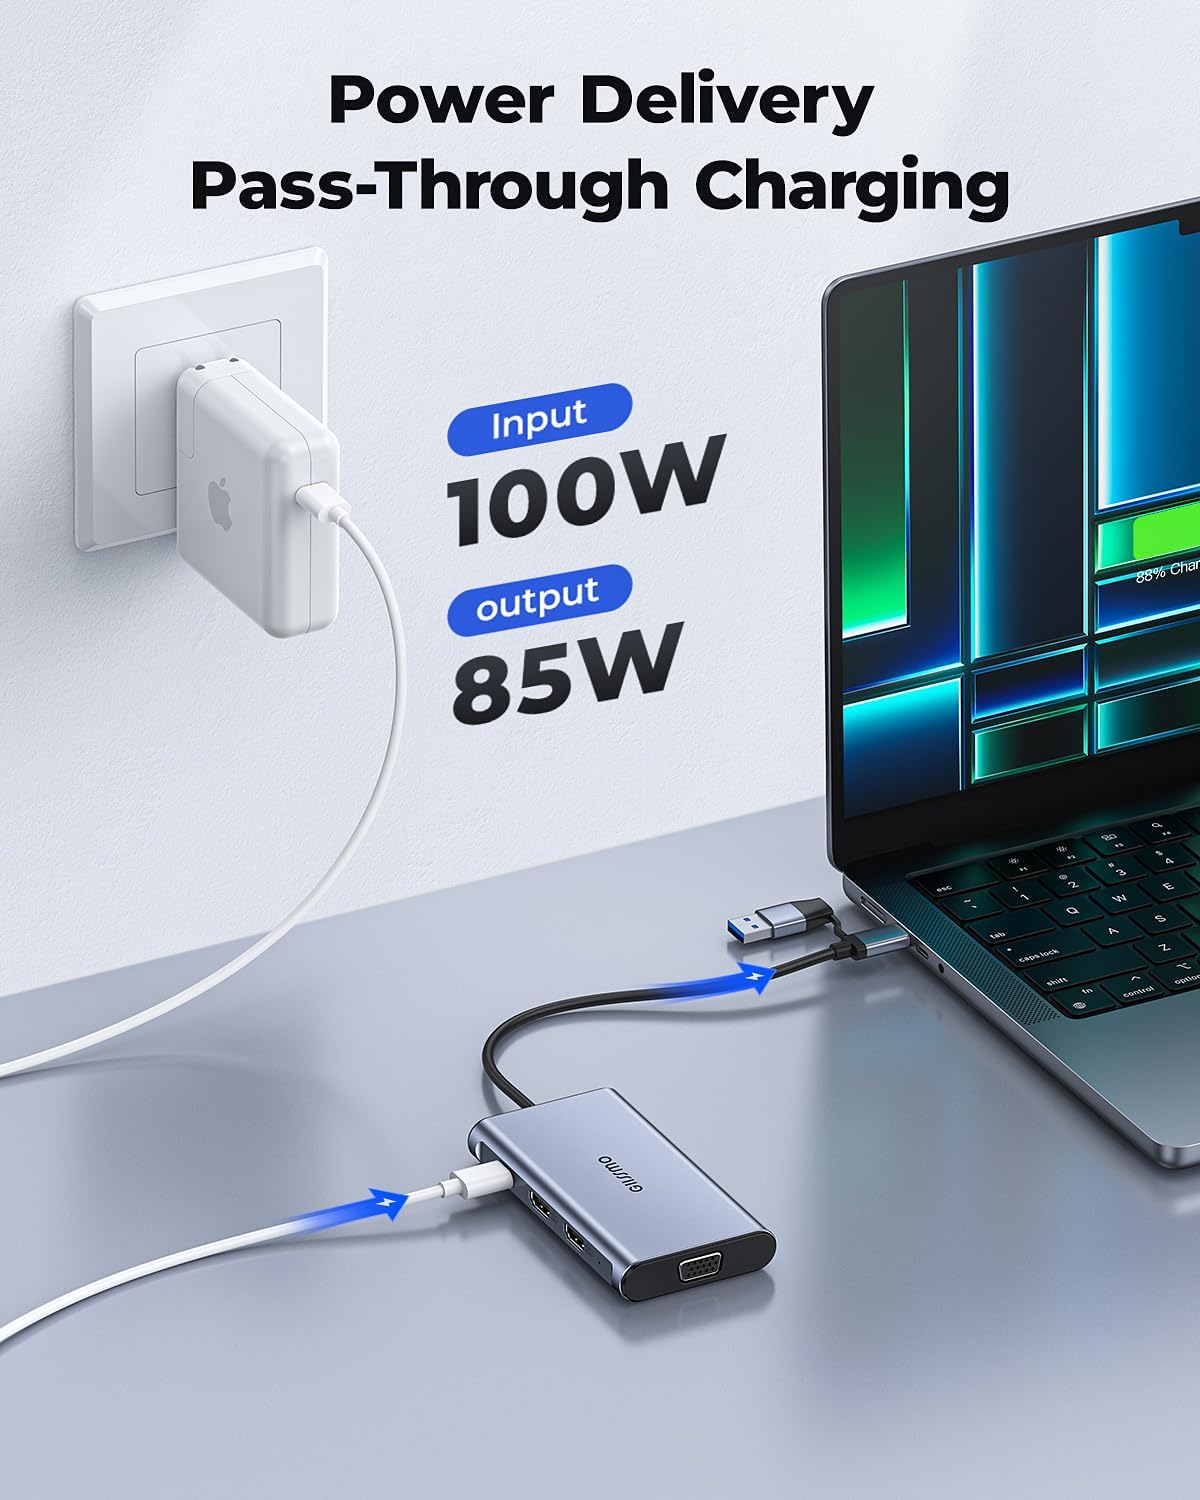
Image 4.3: Illustration of the power delivery function, showing 100W input to the hub and 85W output to the laptop for charging.
USB 2.0 Data Transfer:
The four USB 2.0 ports are suitable for connecting low-bandwidth devices such as wireless mice, keyboards, and USB flash drives. They support data transfer speeds up to 480Mbps.
5. Specifications
| Feature | Detail |
|---|---|
| Model | USB C Hub USB 3.0 Dual HDMI VGA Adapter |
| Input Port | Hybrid 2-in-1 USB-C to USB 3.0 |
| HDMI 1 Output | 1080P@60Hz |
| HDMI 2 Output | 4K@30Hz |
| VGA Output | 1080P@60Hz |
| USB Ports | 4 x USB 2.0 (up to 480Mbps) |
| Power Delivery (PD) Port | PD 3.0, 100W input (85W output) |
| Compatible Operating Systems | macOS (10.6+), Windows (XP, 7+), Chrome OS, Android |
| Dimensions | 7.01 x 4.72 x 0.83 inches |
| Item Weight | 5.6 ounces |
6. Troubleshooting
- No Display Output:
- Ensure the required 'InstantView' driver is installed correctly for your operating system.
- Verify that all cables (USB-C/A to hub, HDMI/VGA to monitors) are securely connected.
- Check your computer's display settings to ensure external monitors are detected and configured for 'Extend' or 'Duplicate' mode.
- Try connecting one monitor at a time to isolate the issue.
- Restart your computer and reconnect the docking station.
- Flickering or Unstable Display:
- Ensure your display cables are of good quality and not excessively long.
- Check for driver updates for your graphics card and the InstantView driver.
- Reduce the resolution or refresh rate of the external displays to see if stability improves.
- Laptop Not Charging:
- Ensure your original laptop power adapter is connected to the PD port on the docking station.
- Verify that your laptop supports charging via USB-C Power Delivery.
- Check the power adapter and USB-C cable for damage.
- USB Peripherals Not Working:
- Ensure the USB devices are properly plugged into the USB 2.0 ports.
- Try connecting the USB device directly to your laptop to confirm it functions independently.
- Some high-power USB devices may require direct connection or an external power source.
7. Maintenance
- Keep the docking station in a dry environment, away from direct sunlight and extreme temperatures.
- Avoid dropping or subjecting the device to strong impacts.
- Clean the device with a soft, dry cloth. Do not use liquid cleaners or solvents.
- Ensure proper ventilation around the docking station to prevent overheating.
8. Warranty and Support
GIISSMO products are designed for reliability and performance. If you encounter any issues or have questions regarding your GIISSMO USB C Hub, please refer to the troubleshooting section of this manual or contact GIISSMO customer support. Specific warranty details may vary by region and purchase location. Please retain your proof of purchase for warranty claims.
For further assistance, please visit the official GIISSMO website or contact their customer service.