Important Safety Information
Please read this manual carefully before installation and operation. Failure to follow instructions may result in product damage, property damage, or personal injury. Installation should be performed by a qualified electrician in accordance with local electrical codes.
- Always disconnect power at the circuit breaker before installing or servicing the thermostat.
- Do not expose the thermostat to water or excessive humidity.
- Ensure all wiring connections are secure and correct to prevent short circuits or electrical hazards.
- This thermostat is designed for AC95-240V systems. Verify your system voltage before installation.
Product Overview
The Pomya Digital Thermostat (Model Pomyansgbuikp28-11) is an ultra-thin, accurate temperature control device designed for boiler heating systems. It features an LED display for clear information, capacitive touch buttons for easy interaction, and programmable scheduling to optimize energy efficiency.

Figure 1: Front angled view of the Pomya Digital Thermostat, showcasing its sleek design and LED display.
Its slim 13mm panel integrates seamlessly with various wall types and is compatible with standard 86mm rectangle recessed boxes and 60mm European recessed boxes. The thermostat maintains strict temperature accuracy of ±1°C and includes a power-off memory function to save all settings.
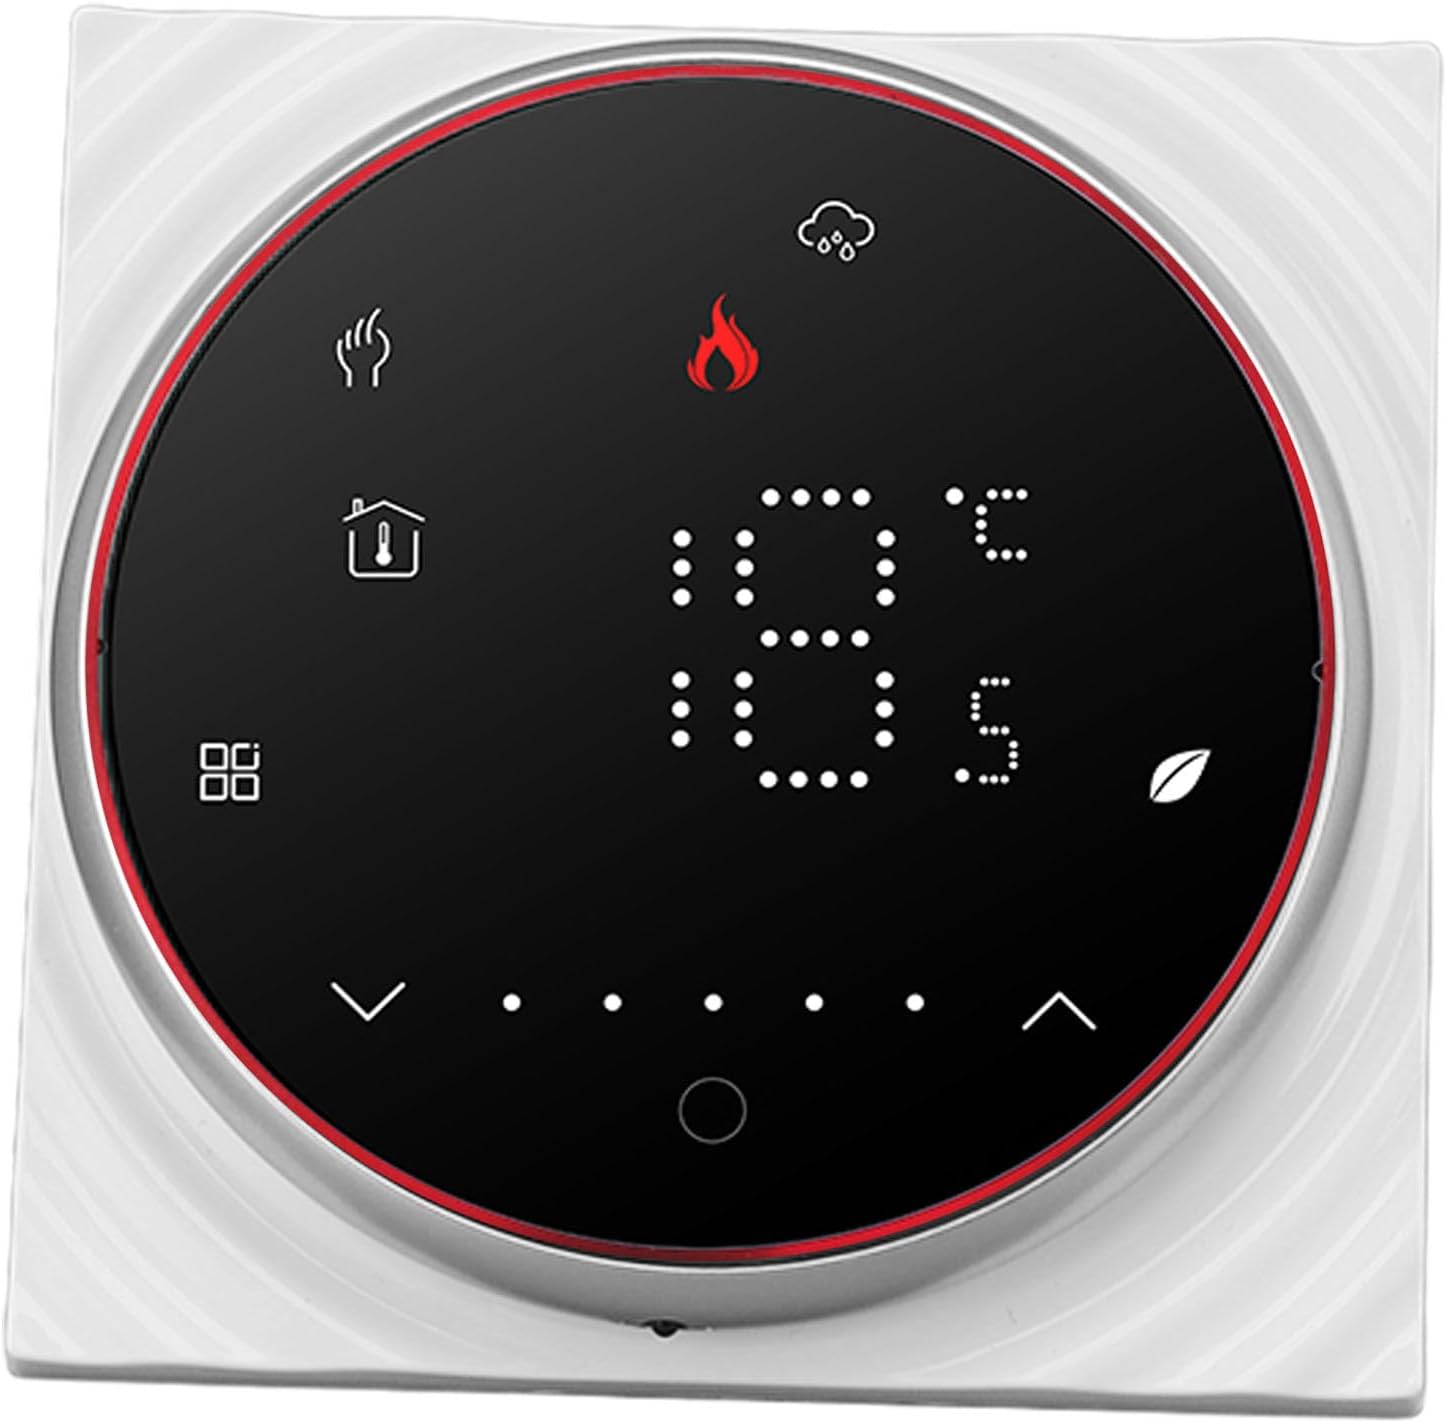
Figure 2: Side view illustrating the ultra-thin profile of the thermostat, designed for minimal protrusion from the wall.
Specifications
| Feature | Specification |
|---|---|
| Model Name | Pomyansgbuikp28-11 |
| Voltage | AC95-240V |
| Current | 5A |
| Sensor | NTC3950, 10K |
| Temperature Tolerance | ±1°C |
| Temperature Control Range | 5 to 35°C |
| Room Temperature Range | 5 to 99°C |
| Display Temperature Range | 5 to 99°C |
| Operation Environment Temperature | 0 to 45°C |
| Operating Ambient Humidity | 5 to 95% RH (non-condensing) |
| Storage Temperature | -10 to 45°C |
| Mounting Recessed Box | 86x86mm or Conventional European recessed box |
| Terminal | 2 x 1.5 mm² or 1 x 2.5 mm² |
| Rating | IP20 |
| Button Type | Capacitive Touch Button |
| Item Weight | 200 Grams (7.1 ounces) |
Installation
This product is suitable for installation in a standard 86mm rectangle recessed box or a 60mm European recessed box. Follow these steps carefully:
- Turn off the main power: Before beginning any electrical work, ensure the main power supply to the heating system and the installation area is completely disconnected at the circuit breaker.
- Separate the installation panel: Gently rotate the display screen frame to separate it from the main installation panel. This will expose the mounting holes and wiring terminals.
- Connect wiring: Refer to the wiring diagram below. Connect the live (L) and neutral (N) wires from your AC95-240V power supply to the corresponding terminals. Connect the boiler heating system wires to the appropriate output terminals (e.g., Dry Contact 1 and 2). If an external NTC sensor is used, connect it to the NTC terminals.

Figure 3: Detailed wiring diagram for connecting the thermostat to the power supply and boiler heating system.
- Mount the installation panel: Secure the installation panel to the recessed box using the provided screws. Ensure it is firmly attached and flush with the wall.

Figure 4: Side view of the thermostat showing the mounting bracket and screw holes for secure installation.
- Attach the display unit: Carefully reattach the display screen frame to the installed panel, ensuring it clicks securely into place.
- Restore power: Once installation is complete and all connections are verified, restore power at the circuit breaker. The thermostat display should illuminate.
Operation
The thermostat features an intuitive LED display and capacitive touch buttons for easy control of your heating system.

Figure 5: Front view of the thermostat display, showing current temperature and operational icons.
Basic Controls:
- Power On/Off: Press the power icon (usually a circle with a vertical line) to turn the thermostat on or off.
- Temperature Adjustment: Use the up (∧) and down (∨) arrow icons to increase or decrease the desired temperature setting.
- Mode Selection: Press the mode icon (often represented by a flame for heating) to cycle through available operating modes (e.g., Heating, Manual, Program).
Programmable Schedule (5+1+1):
The thermostat supports a 5+1+1 programmable schedule, allowing you to set different temperature profiles for weekdays (5 days), Saturday (1 day), and Sunday (1 day), with up to 6 time periods per day. This feature helps in energy saving by adjusting heating based on your daily routine.
- Enter Program Mode: Press and hold the program icon (often represented by a calendar or clock) to enter the programming settings.
- Set Time Periods: Use the up/down arrows to adjust the start time and desired temperature for each of the 6 periods.
- Select Day Group: Navigate between weekday, Saturday, and Sunday settings.
- Save Settings: Confirm your settings, usually by pressing the program icon again or waiting for a timeout.
Refer to the on-screen prompts and icons for specific navigation within the programming menu.
Maintenance
The Pomya Digital Thermostat requires minimal maintenance to ensure optimal performance and longevity.
- Cleaning: Periodically wipe the display and exterior with a soft, dry cloth. Do not use abrasive cleaners, solvents, or spray directly onto the thermostat.
- Avoid Obstructions: Ensure that no furniture, curtains, or other objects block the thermostat, as this can affect its ability to accurately sense room temperature.
- Power Cycling: If the thermostat becomes unresponsive, try turning off the main power at the circuit breaker for a few minutes, then restore power.
Troubleshooting
If you encounter issues with your thermostat, refer to the following common problems and solutions:
| Problem | Possible Cause | Solution |
|---|---|---|
| Thermostat display is blank | No power, loose wiring, circuit breaker tripped. | Check circuit breaker. Verify wiring connections. Ensure main power is on. |
| Heating system not responding | Incorrect wiring, thermostat in wrong mode, temperature setting too low. | Verify wiring. Switch to Heating or Manual mode. Increase desired temperature. |
| Inaccurate temperature reading | Thermostat location, blocked sensor. | Ensure thermostat is not in direct sunlight or near heat sources/drafts. Clear any obstructions. |
| Programmable schedule not working | Thermostat not in program mode, incorrect schedule settings. | Ensure thermostat is set to Program mode. Recheck schedule times and temperatures. |
| Touch buttons unresponsive | Temporary software glitch, dirty screen. | Power cycle the thermostat. Clean the screen with a soft, dry cloth. |
If the problem persists after attempting these solutions, please contact customer support.
Warranty Information
This Pomya Digital Thermostat is covered by a standard manufacturer's warranty against defects in materials and workmanship. The warranty period typically begins from the date of purchase. Please retain your proof of purchase for warranty claims.
The warranty does not cover damage caused by improper installation, misuse, unauthorized modifications, accidents, or natural disasters. For specific warranty terms and conditions, please refer to the documentation included with your product or contact customer support.
Customer Support
For technical assistance, troubleshooting guidance, or warranty inquiries, please contact Pomya customer support through the following channels:
- Email: support@pomya.com
- Website: Visit the official Pomya website for FAQs and additional resources.
- Phone: Refer to your product packaging for regional support numbers.
When contacting support, please have your product model number (Pomyansgbuikp28-11) and purchase date available.


