Merax Queen Murphy Bed
Merax Queen Size Murphy Bed Instruction Manual
Model: Queen Murphy Bed
1. Introduction
Thank you for choosing the Merax Queen Size Murphy Bed. This manual provides essential information for the safe assembly, operation, and maintenance of your new wall bed. Designed for versatility and space-saving, this Murphy bed transforms any room into a comfortable sleeping area while offering a stylish cabinet and integrated seating when folded. Please read these instructions carefully before beginning assembly and retain them for future reference.

Image 1.1: Merax Queen Size Murphy Bed in its folded cabinet configuration, featuring integrated cushions.
2. Safety Information
- Two-Person Assembly: This product requires at least two adults for safe assembly and installation. Do not attempt to assemble alone.
- Wall Mounting: The Murphy bed must be securely mounted to a sturdy wall to prevent tipping. Use appropriate hardware for your wall type. Consult a professional if unsure.
- Weight Capacity: Do not exceed the recommended weight capacity for the bed. Refer to the specifications section for details.
- Mattress Requirements: Use only a queen-size mattress with a maximum thickness of 8 inches. Thicker mattresses may prevent proper folding or cause damage.
- Clearance: Ensure adequate clearance around the bed when opening and closing to avoid injury or damage to furniture.
- Children and Pets: Keep children and pets away from the bed during operation. Never allow them to play on or around the bed mechanism.
- Regular Inspection: Periodically check all fasteners and connections to ensure they are tight and secure. Tighten as necessary.
- Avoid Obstructions: Do not place objects on the bed frame or within the cabinet that could obstruct the folding mechanism.
3. Setup and Assembly
Before beginning, ensure you have all parts and tools as listed in your product packaging. It is recommended to assemble this product on carpets to effectively reduce friction damage between the board and the ground. For detailed visual guidance, please refer to the official installation video below.
3.1. Assembly Video Guide
Video 3.1: Official Murphy Wall Bed Installation Video. This video provides a step-by-step guide for assembling your Murphy bed, including sorting parts, connecting panels, and securing the frame.
3.2. General Assembly Steps
- Unpack and Sort: Carefully unpack all components. Identify and sort all plates and hardware according to the provided parts list. Place parts in organized bins to prevent loss and simplify the process.
- Prepare Base Panels: Connect the base panels (e.g., plates 28, 31, 33) using the specified screws (e.g., part J). Ensure all connections are secure.
- Assemble Side Panels: Attach the side panels (e.g., plates 23, 24) to the base structure, using wooden plugs (part M) and screws (part J) to form the main cabinet structure.
- Install Bed Frame Supports: Secure the bed frame supports (e.g., plates 14, 15, 25, 26) to the cabinet sides using screws (parts E, P).
- Assemble Bed Frame: Connect the various metal frame components (e.g., plates 1, 2, 3, 4, 5, 6, 7, 8, 9, 10) using screws (parts A, C, G). Ensure all connections are tight.
- Attach Bed Frame to Cabinet: Carefully lift and attach the assembled bed frame to the cabinet structure. Secure it using the specified hardware (e.g., parts D, G).
- Install Gas Struts: Attach the gas struts (part S) to the bed frame and cabinet, ensuring they are correctly oriented for smooth operation.
- Install Support Legs: Attach the support legs (e.g., plates 11, 12, 13) to the bed frame using screws (parts A, B, F, H, I).
- Install Decorative Panels: Attach any decorative panels (e.g., plates 18, 19, 20, 21, 22) to the bed frame using wooden plugs (part L) and screws (parts A, O, R).
- Final Tightening: Once all components are in place, please tighten all bolts using an Allen wrench until this step.
- Wall Anchoring: Securely anchor the entire unit to a sturdy wall using the provided wall mounting brackets (e.g., parts U1, U2) and screws. This is a critical safety step.
- Mattress Placement: Place your queen-size mattress (max 8-inch thickness) onto the bed frame. Use the provided straps to secure the mattress and prevent it from slipping off when the bed is folded.

Image 3.2: The internal metal bed frame fully extended, ready for mattress placement.
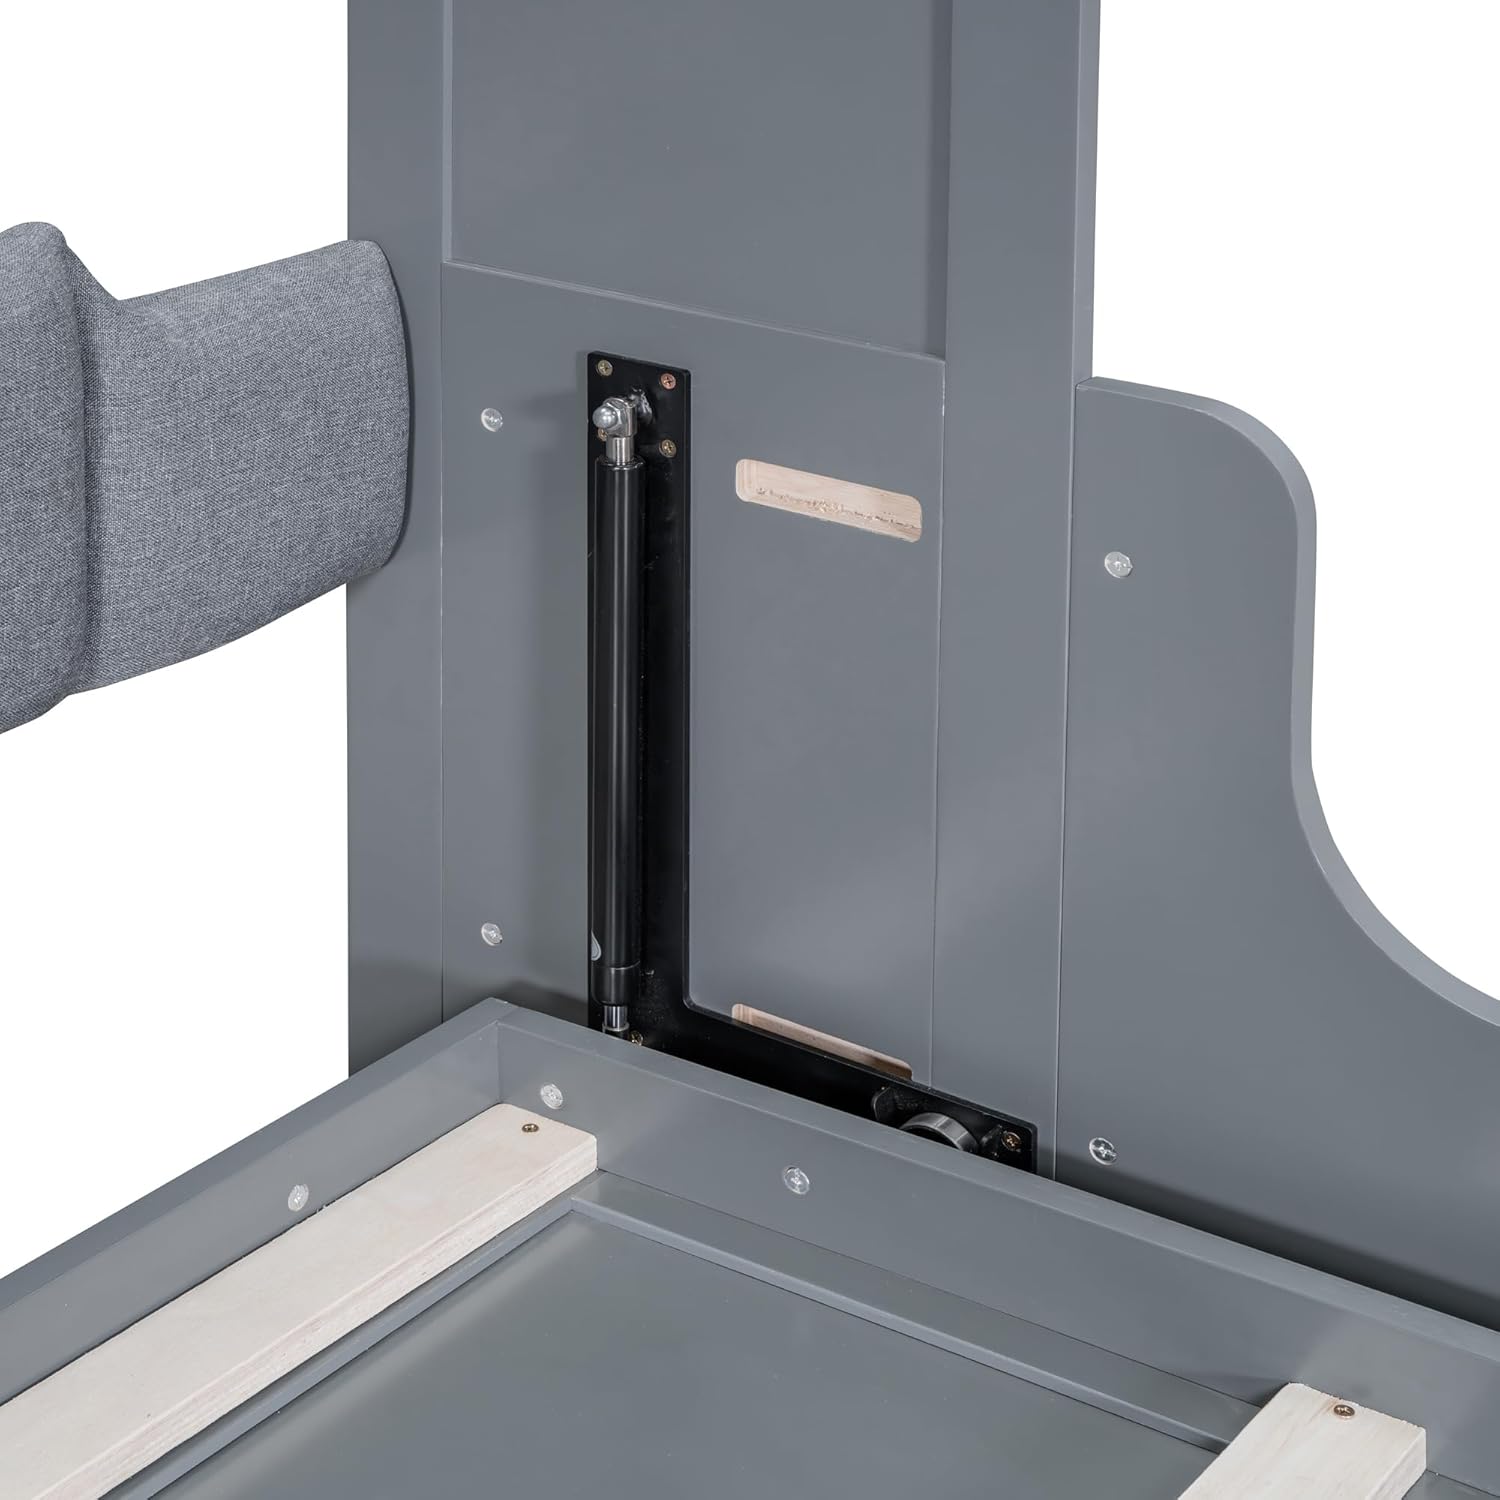
Image 3.3: Detail of the dual piston metal folding mechanism, ensuring smooth operation.
4. Operating Instructions
The Merax Queen Size Murphy Bed is designed for user-friendly operation, allowing for quick transformation between a bed and a cabinet with integrated seating. Always ensure the area around the bed is clear before operating.
4.1. Opening the Bed
- Unlock Latches: Locate and release the door latches at the top of the cabinet.
- Lower Front Panel: Gently pull the top front panel of the cabinet downwards. The dual piston mechanism will assist in a smooth, controlled descent.
- Extend Support Legs: As the bed lowers, the support legs will automatically extend. Ensure they are fully deployed and stable.
- Unfold Mattress: If the mattress is folded, gently unfold it to lay flat on the bed frame.

Image 4.1: The Murphy bed fully extended, showcasing its queen-size sleeping area.
4.2. Closing the Bed
- Clear Bed: Remove all bedding, pillows, and other items from the mattress.
- Fold Mattress: If applicable, fold the mattress into its stored position. Ensure the mattress straps are secure to prevent movement.
- Retract Support Legs: Gently lift the bed frame. The support legs will retract as the bed rises.
- Lift Bed Board: Continue to lift the bed board until it is fully upright and secured by the door latches. The dual piston mechanism will assist in lifting.
- Engage Latches: Press the door latches to prevent the bed frame from slipping off.

Image 4.2: The Murphy bed in its compact cabinet form, with the integrated sofa cushions visible.
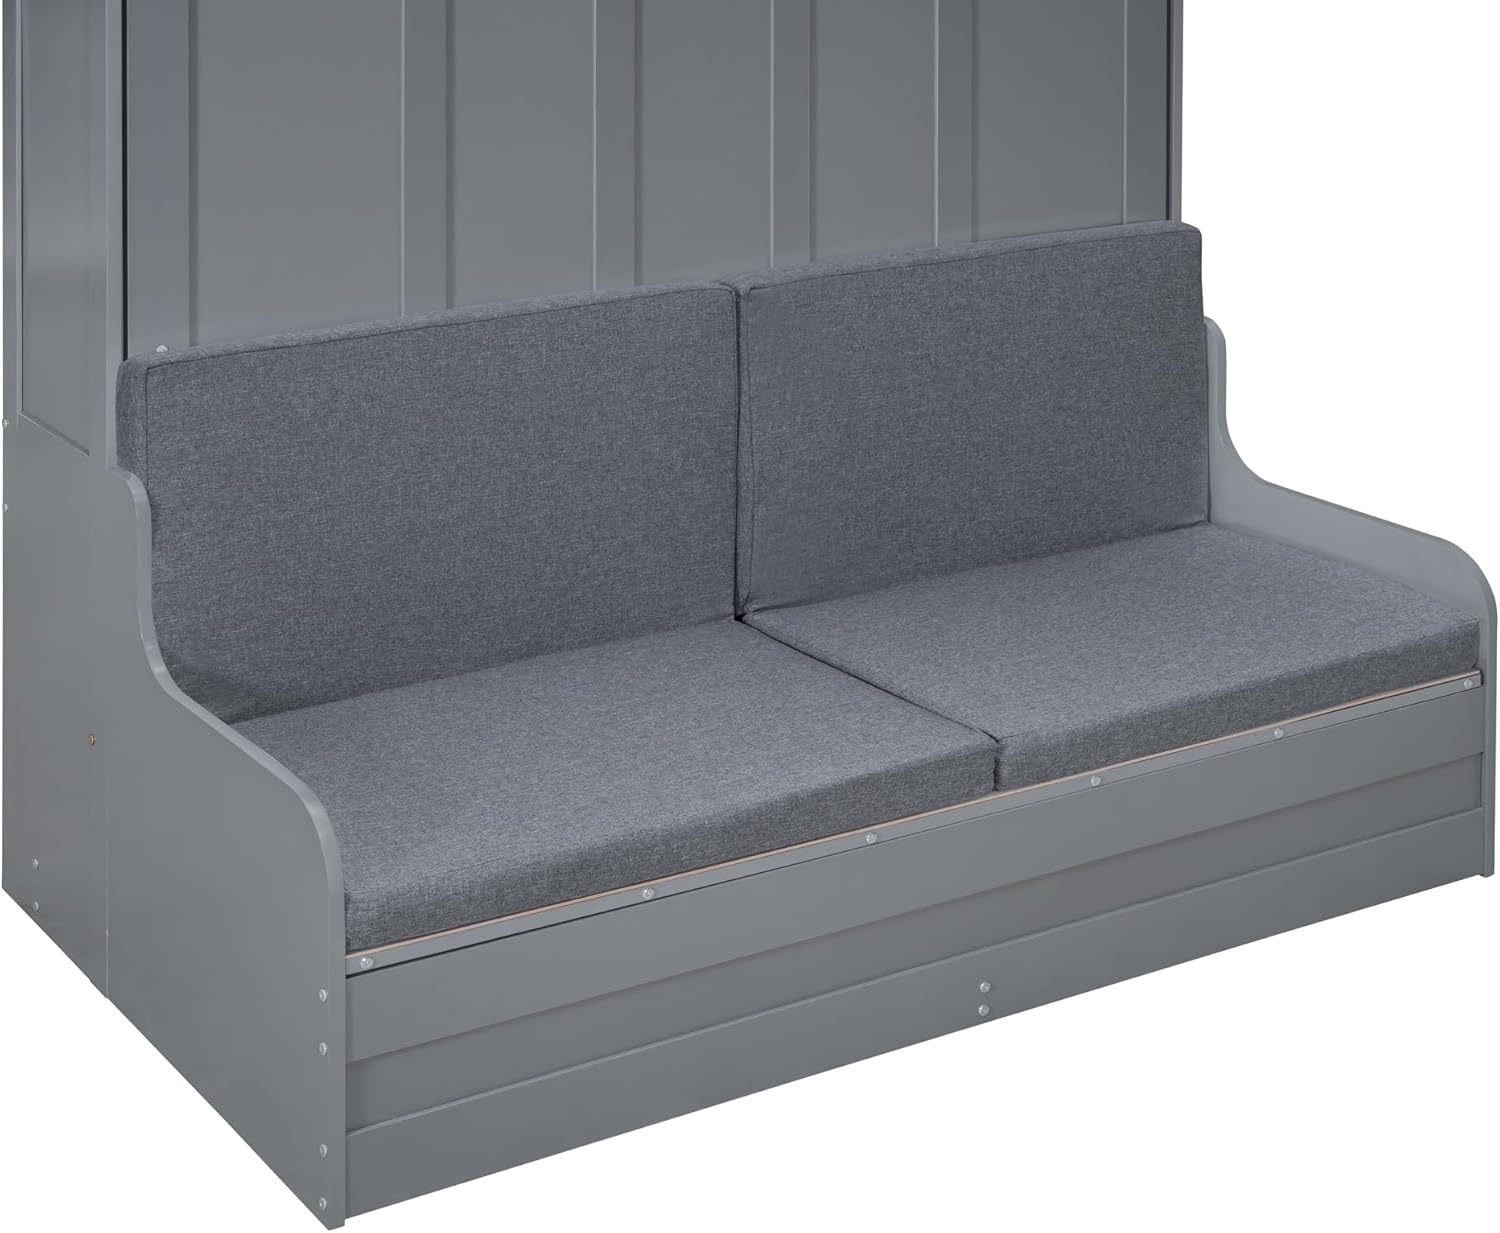
Image 4.3: Detailed view of the comfortable, foldable cushions that form the seating area when the bed is stored.
4.3. Display Video Guide
Video 4.4: Official Murphy Wall Bed Display Video. This video demonstrates the smooth transition of the Murphy bed from its cabinet form to a fully extended bed and back.
5. Maintenance
- Cleaning: Wipe surfaces with a damp cloth. Avoid harsh chemicals or abrasive cleaners that may damage the finish.
- Hardware Check: Periodically inspect all screws, bolts, and connections. Tighten any loose hardware to ensure stability and safety.
- Mechanism Inspection: Check the dual piston folding mechanism for any signs of wear or damage. If any issues are observed, discontinue use and contact customer support.
- Cushion Care: The integrated cushions can be spot cleaned as needed. Refer to the fabric care instructions for specific cleaning methods.
6. Troubleshooting
| Problem | Possible Cause | Solution |
|---|---|---|
| Bed is difficult to open or close. | Loose or improperly installed gas struts; obstructions; incorrect mattress size. | Check gas strut installation and connections. Ensure no items are obstructing the mechanism. Verify mattress thickness (max 8 inches). |
| Bed feels unstable or wobbly. | Loose fasteners; improper wall mounting. | Tighten all screws and bolts. Re-check wall mounting to ensure it is secure to a sturdy wall. |
| Parts are missing or damaged during assembly. | Manufacturing or packaging error. | Contact Merax customer support immediately for replacement parts. |
| Mattress slips when bed is folded. | Mattress not secured; straps are loose. | Ensure the mattress is properly secured with the provided straps. Tighten straps if necessary. |
7. Specifications
- Size: Queen
- Product Dimensions (Extended): 81.5"L x 66.4"W x 87.4"H
- Material: Wood (Laminated MDF and Plywood)
- Color: Gray (with Cushion)
- Special Feature: Folding or Space-Saving Mechanisms, Integrated Cushion
- Compatible Mattress Size: Queen (Maximum 8-inch thickness)
- Assembly Required: Yes
- Product Care Instructions: Wipe with Damp Cloth
- Manufacturer: Merax
- UPC: 196986738164
- ASIN: B0CVVS2JBC

Image 7.1: Dimensional diagram of the Merax Queen Size Murphy Bed, showing key measurements in inches.
8. Warranty and Support
For any questions regarding assembly, missing parts, or product issues, please contact Merax customer support. While specific warranty details are not provided in this manual, please refer to your purchase documentation or the retailer's website for applicable warranty information.
Contact Information: Please refer to the contact details provided with your purchase or on the official Merax website.