LUCKWIND LW-22
LUCKWIND 24-Inch Bathroom Vanity with Sink Combo Instruction Manual
Model: LW-22
1. Introduction
Thank you for purchasing the LUCKWIND 24-Inch Bathroom Vanity with Sink Combo. This manual provides essential information for the safe assembly, installation, operation, and maintenance of your new vanity. Please read these instructions thoroughly before beginning assembly and retain them for future reference.
This vanity features a durable engineered wood cabinet with a black wood grain finish, a ceramic sink, a matte black faucet, and a built-in power socket for convenience. The design includes soft-closing doors and a metal frame base with an additional storage shelf.
2. Important Safety Information
WARNING: Failure to follow these safety instructions could result in injury or property damage.
- Always unplug and turn off power before assembly or maintenance, especially when dealing with electrical components.
- Use appropriate safety gear, such as gloves and eye protection, when handling heavy or sharp objects during assembly.
- Keep electrical components, including the built-in power socket, away from water and excessive moisture. Ensure proper grounding.
- Be cautious of pinch points when operating the cabinet doors.
- Always follow manufacturer's instructions for safe installation and use of all components.
- Ensure the vanity is installed on a stable, level surface to prevent tipping.
3. Package Contents
Your LUCKWIND bathroom vanity is shipped in two separate boxes, which may arrive on different dates. Please verify all components are present before beginning assembly.

Image: Illustration of the two packages, indicating that the sink basin and cabinet are shipped separately.
Box 1 (Cabinet)
- 1x Cabinet Assembly
- 1x Instruction Manual
- Hardware for Cabinet Assembly
Box 2 (Sink & Faucet)
- 1x Ceramic Sink Basin
- 1x Matte Black Faucet
- 1x Drain Assembly
- Hardware for Sink and Faucet Installation (including hot/chilling water pipes)
4. Product Specifications
| Feature | Specification |
|---|---|
| Brand | LUCKWIND |
| Model Number | LW-22 |
| Product Dimensions (L x W x H) | 17.7 x 23.6 x 33.5 inches |
| Item Weight | 68.2 pounds |
| Material | Engineered Wood (Cabinet), Ceramic (Sink), Metal (Frame) |
| Color | Black |
| Number of Shelves | 1 (bottom shelf) |
| Special Feature | Stain Resistant (Sink), Built-in Power Socket |
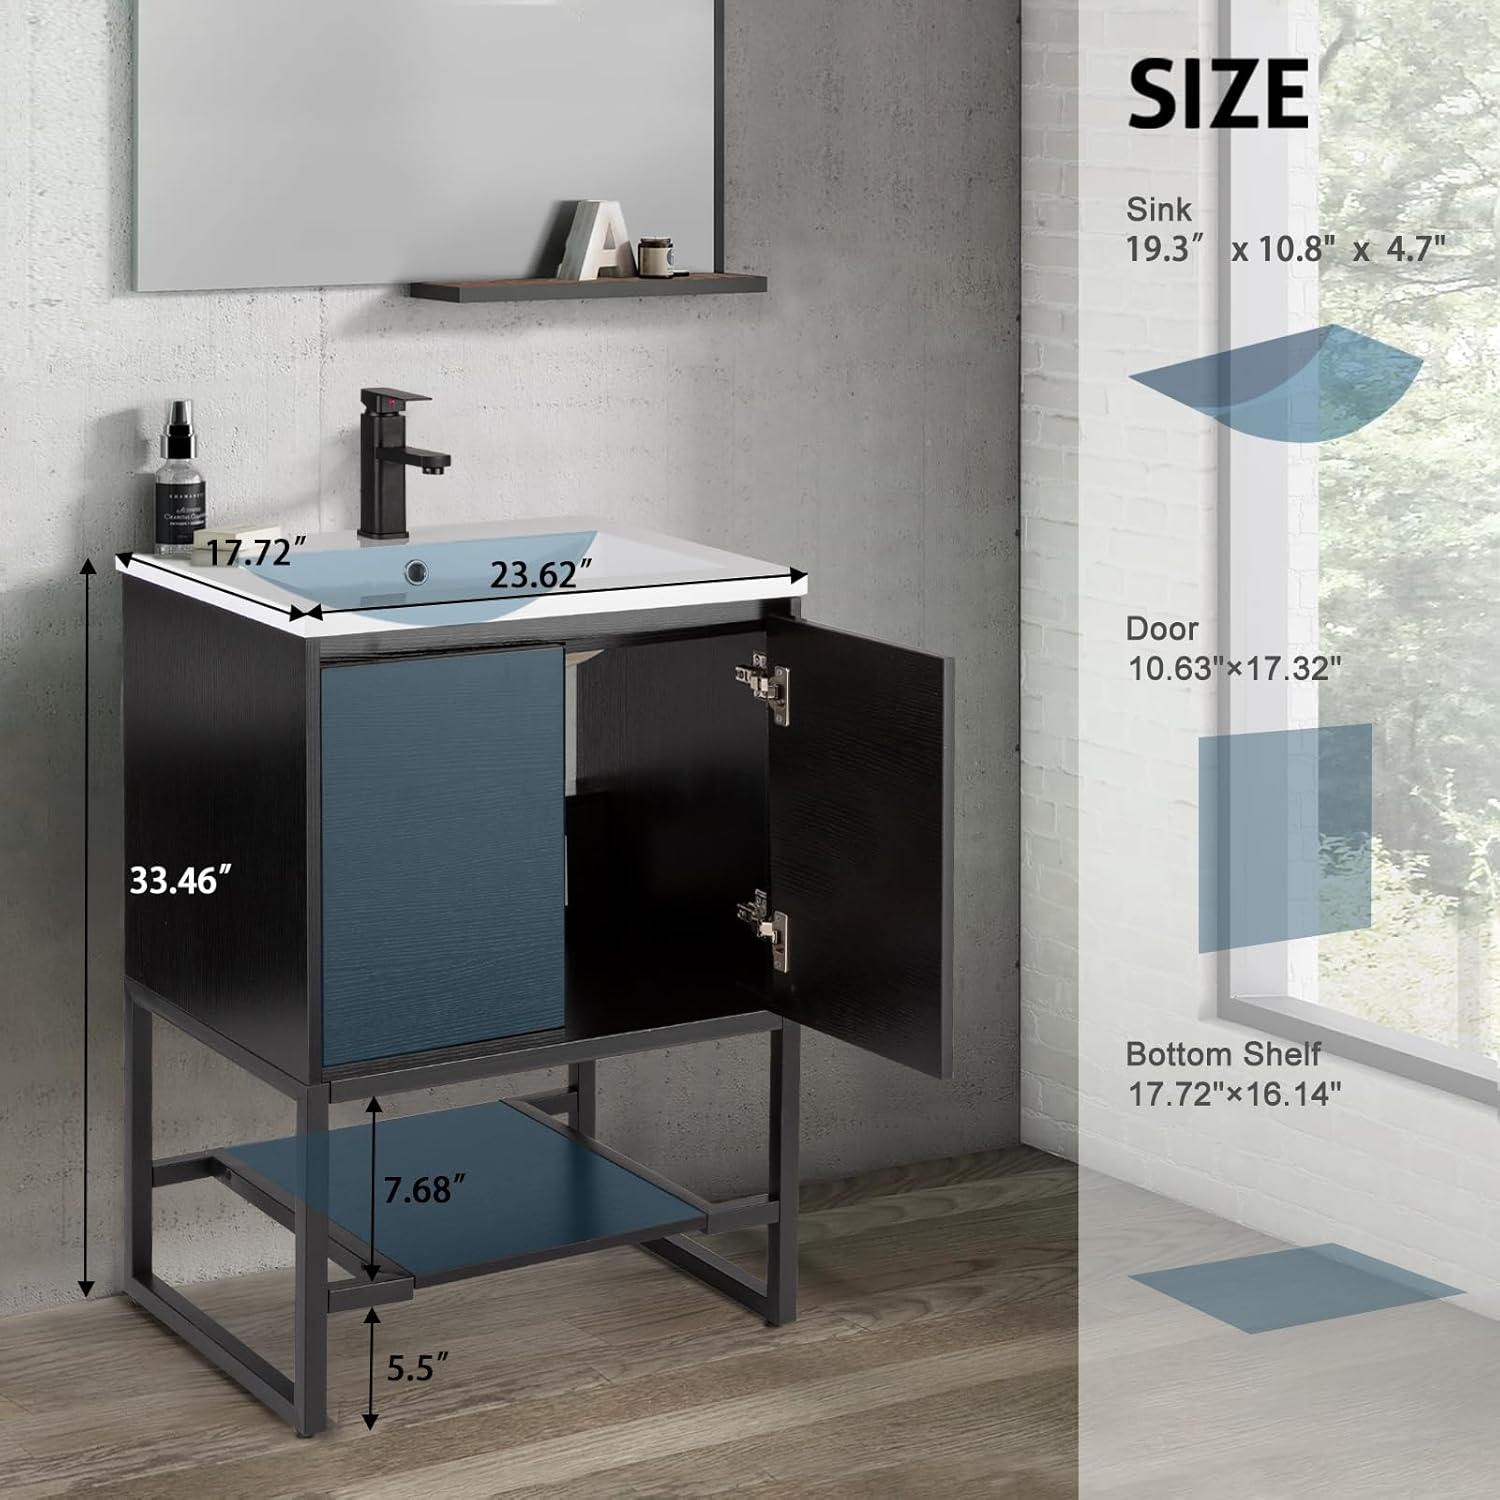
Image: Detailed dimensions of the vanity components.
5. Assembly Instructions
Full assembly of the LUCKWIND bathroom vanity is required. Please ensure you have all components from both packages before starting. Refer to the detailed assembly manual included in Box 1 for step-by-step instructions and diagrams.
General Assembly Steps:
- Unpack and Identify Parts: Carefully unpack all components from both boxes. Lay them out and compare with the parts list in the included manual to ensure nothing is missing or damaged.
- Assemble the Cabinet Frame: Follow the manual to assemble the main cabinet structure using the provided hardware.
- Attach Metal Base: Secure the square tube metal base to the cabinet. Ensure it is stable and level.
- Install Bottom Shelf: Place the bottom shelf onto the metal base for additional storage.
- Install Doors: Attach the cabinet doors using the soft-closing hinges. Adjust hinges as needed for proper alignment.
- Install Sink Basin: Carefully place the ceramic sink basin onto the cabinet top. Seal as per manual instructions to prevent water leakage.
- Install Faucet and Drain: Mount the matte black faucet and install the drain assembly according to the manual. Connect hot and cold water supply lines.
- Connect Power Socket: Ensure the built-in power socket is properly connected and grounded by a qualified electrician if necessary, following all local electrical codes.

Image: Details of soft-close hinges, metal legs, and the bottom shelf.
6. Operating Instructions
6.1. Built-in Power Socket
The vanity is equipped with a UL-certified power socket located within the cabinet space. This feature includes:
- Two 3-pin electrical outlets
- Two USB charging ports
- One overload protection switch
The power cord length is 1.5 meters. To use, simply plug your devices into the appropriate outlets. The overload protection switch will automatically trip if the connected devices draw too much power, preventing damage. Reset the switch if it trips.

Image: Close-up of the built-in power socket.
6.2. Faucet Operation
The included matte black faucet provides both hot and cold water. Operate the single lever handle to control water flow and temperature. Move the handle left for hot water, right for cold water, and up/down for flow intensity.

Image: Ceramic sink and matte black faucet.
6.3. Soft-Closing Doors
The cabinet doors are equipped with high-quality adjustable soft-closing hinges. These hinges prevent the doors from slamming shut, allowing them to close gently and quietly. To close, simply push the door lightly, and the mechanism will engage.
7. Maintenance
7.1. Cleaning the Cabinet and Frame
- Wipe the engineered wood cabinet surfaces and metal frame with a damp cloth.
- Avoid using abrasive cleaners, harsh chemicals, or solvents, as these can damage the finish.
- Promptly wipe away any spills to prevent moisture damage.
7.2. Cleaning the Ceramic Sink
- The ceramic sink is stain-resistant and easy to clean. Use mild soap and water with a soft cloth or sponge.
- For tougher stains, a non-abrasive bathroom cleaner can be used. Rinse thoroughly after cleaning.
- Avoid dropping heavy or sharp objects into the sink to prevent chipping or cracking.
7.3. Faucet Care
- Clean the matte black faucet with a soft, damp cloth.
- Do not use abrasive cleaners, polishes, or waxes, as these can damage the finish.
8. Troubleshooting
8.1. Water Leaks
- Issue: Water leaking from faucet connections or drain.
- Solution: Check all plumbing connections for tightness. Ensure Teflon tape or plumber's putty was used correctly during installation. If leaks persist, consult a qualified plumber.
8.2. Cabinet Doors Not Closing Properly
- Issue: Doors are misaligned or do not close smoothly.
- Solution: Adjust the soft-closing hinges. Most hinges have screws that allow for vertical, horizontal, and depth adjustments. Refer to the assembly manual for specific hinge adjustment instructions.
8.3. Power Socket Not Working
- Issue: Devices plugged into the built-in socket do not receive power.
- Solution: Check if the overload protection switch has tripped. Press the reset button on the socket. Ensure the vanity's main power cord is securely plugged into a functional wall outlet. If the issue persists, consult a qualified electrician.
9. Warranty and Customer Support
LUCKWIND is committed to providing high-quality products. For specific warranty information regarding your vanity, please refer to the documentation included with your purchase or contact LUCKWIND customer service directly.
If you encounter any issues during assembly, installation, or operation that are not covered in this manual, or if you require replacement parts, please contact LUCKWIND customer support:
- Website: Visit the LUCKWIND Store on Amazon
- Contact: Refer to the contact information provided in your product packaging or on the official LUCKWIND website.
Ask a question about this manual
Ask about setup, troubleshooting, compatibility, parts, safety, or missing instructions. Manuals+ will review the question and use this page’s manual context to help answer it.