1. Introduction
Thank you for choosing the Redlemon Laser Meter N40. This device is designed for precise and efficient measurement of length, altitude, area, and volume. It features a 40-meter range, the ability to store up to 99 records, and two reference points for versatile use. This manual provides detailed instructions for safe and effective operation of your laser meter.
2. Safety Information
Warning: This product emits a Class 2 laser. Avoid direct eye exposure to the laser beam. Do not stare into the beam or view directly with optical instruments. Always operate the device responsibly.
- Do not attempt to modify or disassemble the device.
- Keep the device out of reach of children.
- Do not use the device in explosive environments.
- Ensure the measurement surface is clear and stable for accurate readings.
3. Package Contents
Please check that all items are present in your package:
- Redlemon Laser Meter N40
- 2 x "AAA" Alkaline Batteries
- Warranty Sheet
4. Product Overview
Familiarize yourself with the components and controls of your Redlemon Laser Meter N40.

Image 4.1: Device Buttons and Controls
This image shows the Redlemon Laser Meter N40 with its control buttons labeled. Key buttons include the function change button, laser activation/measurement button, measurement reference point change button, record viewing button, and power on/off/clear button. A bubble level is also visible.

Image 4.2: Display Indicators
This image highlights the various indicators on the Redlemon Laser Meter N40's display. These include area/volume measurement icon, measurement record icon, reference point indicator, battery status, measurement unit (m), first/maximum display line, second/minimum display line, and main/final measurement display line.
5. Setup
5.1 Battery Installation
- Locate the battery compartment cover on the back of the device.
- Slide or unclip the cover to open it.
- Insert the two "AAA" alkaline batteries, ensuring correct polarity (+/-).
- Close the battery compartment cover securely.
5.2 Power On/Off
- To power on: Press the MEAS button ().
- To power off: Press and hold the Power/Clear button () for a few seconds, or the device will automatically turn off after a period of inactivity to conserve battery life.
6. Operating Instructions
The Redlemon Laser Meter N40 offers various measurement functions. Use the Function Change button () to cycle through different modes.

Image 6.1: Device Capabilities Overview
This image illustrates the Redlemon Laser Meter N40's ability to measure length, altitude, area, and volume, highlighting its 40-meter range, 99-record storage, and portable design.
6.1 Changing Measurement Reference Points
The device allows you to choose the measurement reference point: from the front edge or the rear edge of the meter. Press the Reference Point Change button () to toggle between these options. An icon on the display will indicate the selected reference point.

Image 6.2: Front and Rear Reference Points
This image demonstrates the two available measurement reference points: the front edge and the rear edge of the laser meter. The laser beam originates from the top of the device, and the measurement can be calculated from either the front or back of the device body.
6.2 Single Distance Measurement (Length/Altitude)
- Ensure the device is in single distance measurement mode (usually the default or indicated by a single line icon).
- Point the laser at the target surface.
- Press the MEAS button () to activate the laser.
- Press the MEAS button again to take the measurement. The result will be displayed on the screen.

Image 6.3: Laser Beam in Operation
This image shows the Redlemon Laser Meter N40 emitting a red laser beam, demonstrating its capability to measure distances up to 40 meters. The display shows measurement readings.
6.3 Area Measurement
- Press the Function Change button until the area measurement icon (typically a square) appears on the display.
- Take the first measurement (e.g., length) by pressing MEAS.
- Take the second measurement (e.g., width) by pressing MEAS again.
- The device will automatically calculate and display the area.
6.4 Volume Measurement
- Press the Function Change button until the volume measurement icon (typically a cube) appears on the display.
- Take the first measurement (e.g., length) by pressing MEAS.
- Take the second measurement (e.g., width) by pressing MEAS.
- Take the third measurement (e.g., height) by pressing MEAS.
- The device will automatically calculate and display the volume.

Image 6.4: Measurement Applications
This image provides visual examples of how the laser meter can be used to measure distances, calculate volume, calculate area, and perform measurements using two reference points in various room settings.
6.5 Storing and Recalling Records
The Redlemon Laser Meter N40 can store up to 99 measurement records.
- Storing: Measurements are automatically stored after each successful reading.
- Recalling: Press the Record Viewing button () to browse through stored records. Use the function change or measure buttons to navigate if applicable (refer to device display for specific navigation).
- Clearing: To clear the current display or exit a function, press the Power/Clear button (). To clear all records, consult the device's on-screen menu if available, or refer to the specific instructions for your model.
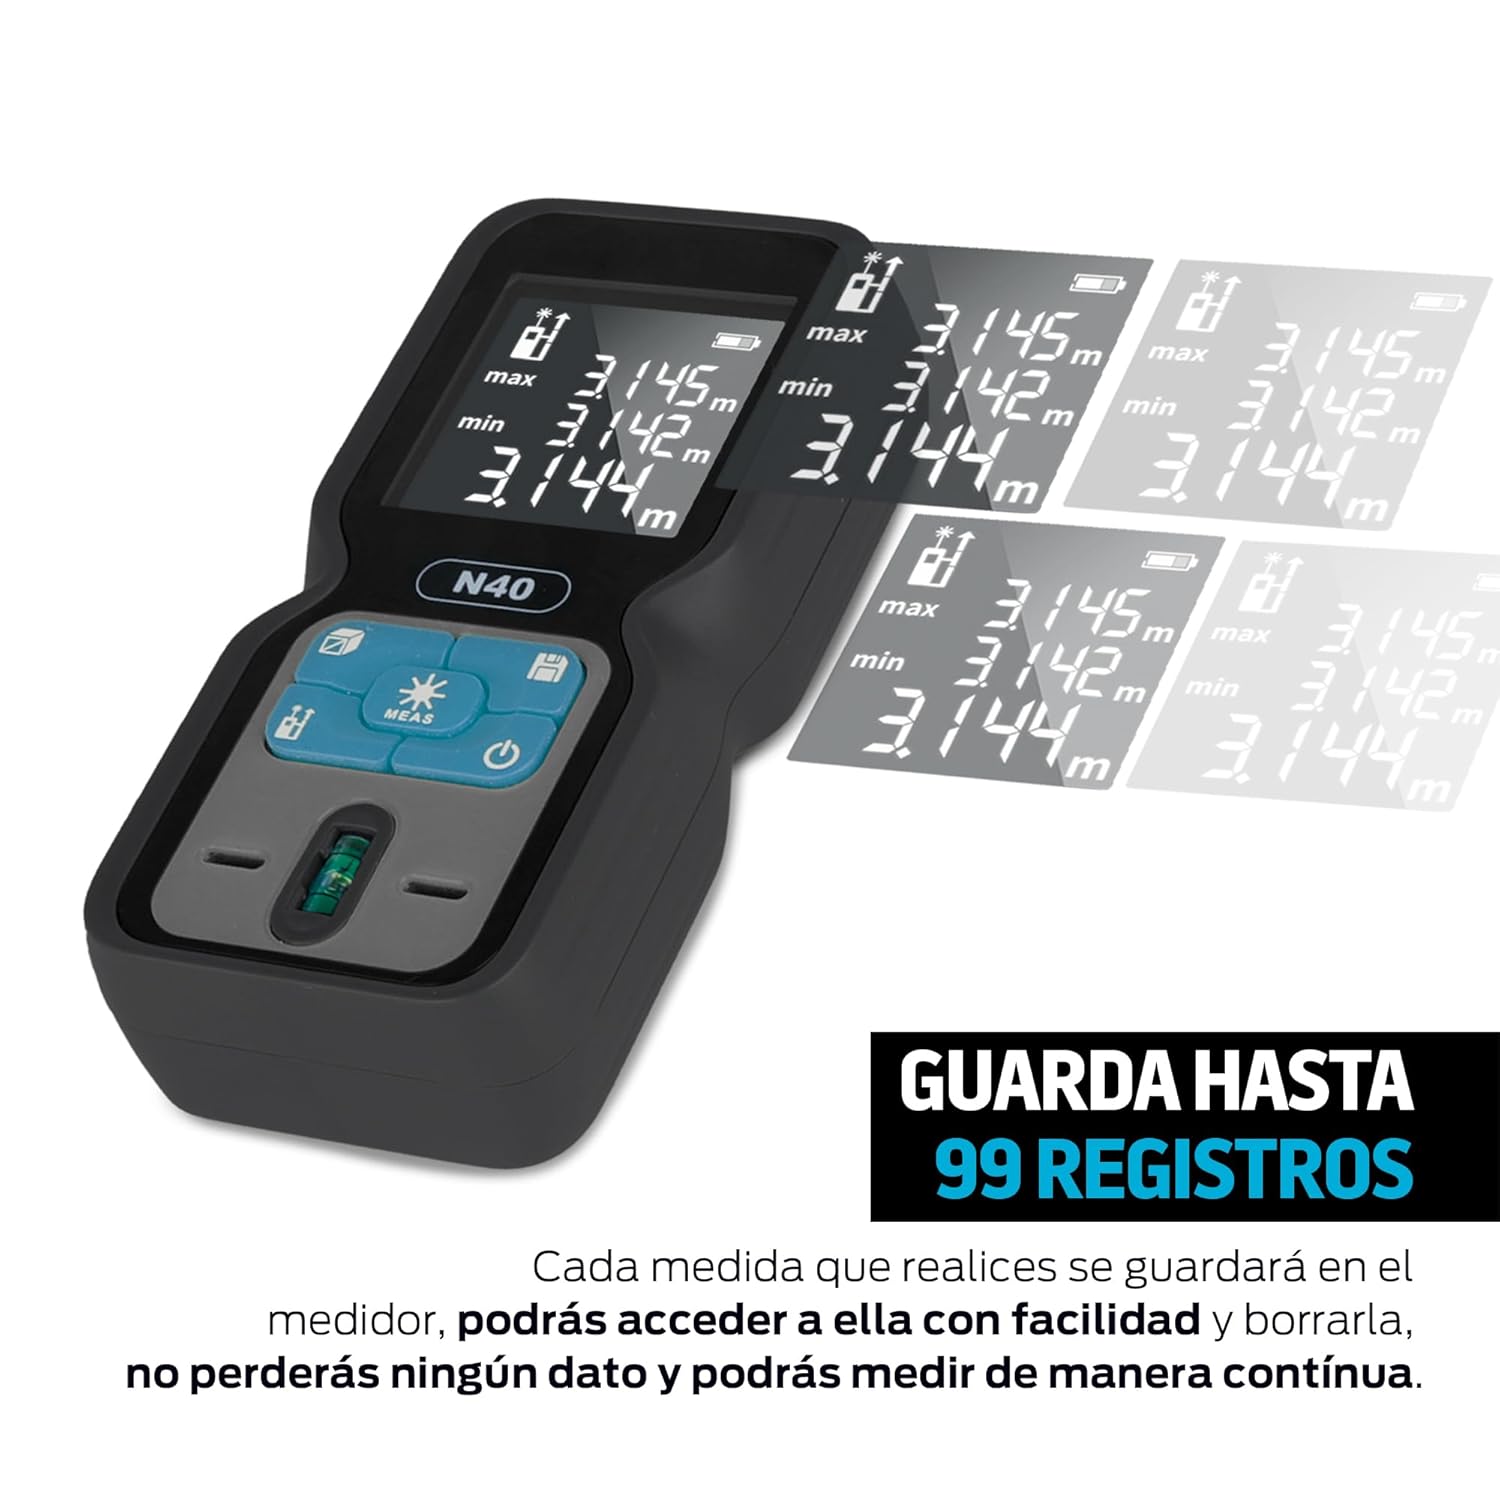
Image 6.5: Stored Records Display
This image shows the Redlemon Laser Meter N40's display with multiple measurement records visible, demonstrating its capacity to store up to 99 readings for later review.
7. Maintenance
- Cleaning: Use a soft, damp cloth to clean the device. Do not use abrasive cleaners or solvents.
- Storage: Store the device in a cool, dry place when not in use. Remove batteries if storing for extended periods to prevent leakage.
- Battery Replacement: Replace batteries when the low battery indicator appears on the display.
8. Troubleshooting
| Problem | Possible Cause | Solution |
|---|---|---|
| Device does not turn on. | Batteries are dead or incorrectly inserted. | Check battery polarity or replace with new batteries. |
| Inaccurate measurements. | Unstable surface, obstruction, or strong ambient light. | Ensure a stable measurement point. Clear obstructions. Avoid direct sunlight or use a target plate in bright conditions. |
| Laser beam not visible. | Strong ambient light or laser is off. | Move to a less brightly lit area. Press the MEAS button to activate the laser. |
| Cannot store records. | Memory full or incorrect operation. | Check if memory is full. Refer to the manual for clearing records if needed. |
9. Specifications
| Feature | Detail |
|---|---|
| Brand | Redlemon |
| Model Number | 83680 |
| Measuring Range | Up to 40 meters |
| Measurement Units | Meters |
| Record Storage | Up to 99 records |
| Material | ABS Plastic and Rubber |
| Color | Black |
| Dimensions (LxWxH) | 11 cm x 5 cm x 3 cm |
| Weight (with batteries) | 178 Grams |
| Batteries | 2 x "AAA" Alkaline Batteries |
| Automatic Shut-off | Yes (laser and device) |
10. Warranty and Support
Warranty: This product comes with a 100-day warranty directly from Redlemon. Please refer to the included Warranty Sheet for full terms and conditions.
Customer Support: For any questions, complaints, or suggestions regarding your Redlemon Laser Meter N40, please contact Redlemon customer support. Support services are provided from Mexico.
Contact information is typically found on the warranty sheet or the manufacturer's official website.


