
1. Introduction
This manual provides essential information for the safe and efficient operation, maintenance, and troubleshooting of your XtremepowerUS 13.0HP Horizontal Gas-Powered 3-Cylinder Air Compressor. Please read this manual thoroughly before operating the unit to ensure proper usage and to prevent potential hazards. Keep this manual for future reference.
2. Safety Information
WARNING: Failure to follow these safety instructions may result in serious injury or death.
- Always wear appropriate personal protective equipment (PPE), including eye protection, hearing protection, and gloves, when operating or servicing the compressor.
- Ensure the compressor is placed on a stable, level surface before operation.
- Do not operate the compressor in an enclosed or poorly ventilated area due to exhaust fumes from the gasoline engine.
- Keep hands, feet, and clothing away from moving parts, such as the flywheel and belt, during operation. The compressor features a protective belt guard; ensure it is always in place.
- Never exceed the maximum operating pressure of any air tool or accessory.
- Before performing any maintenance or service, ensure the engine is off, the spark plug wire is disconnected, and all air pressure has been released from the tank.
- Gasoline is highly flammable. Refuel in a well-ventilated area with the engine off and cool. Avoid spilling fuel.
- Regularly inspect the air tank for rust or damage. Do not use a damaged air tank.

3. Product Overview
The XtremepowerUS 13.0HP Horizontal Gas-Powered 3-Cylinder Air Compressor is designed for demanding applications in workshops, construction sites, and service truck mounts. It features a robust cast-iron pump and a 30-gallon tank, providing reliable compressed air for various tools and machinery.
Key Features:
- Multiple Applications: Suitable for chemical industry, light industry, food processing, health, textile, machinery, electronics, mining, construction, and scientific research.
- Truck Bed Mounting: Designed for easy mounting in trucks or service vehicles, ideal for mobile operations.
- Solid Cast-Iron Pump: Features a two-stage, cast-iron industrial air compressor pump with individual removable cylinders for smoother, cooler operation and simplified maintenance.
- High-Efficiency Cylinders: Maintains rigid tolerances for high efficiency and reduces inter-stage temperature for maximum performance and durability.


4. Setup
Proper setup is crucial for the safe and effective operation of your air compressor.
4.1 Unpacking and Inspection
- Carefully remove the compressor from its packaging.
- Inspect the unit for any signs of shipping damage. Report any damage to the carrier immediately.
- Ensure all components listed in the packing list are present.
4.2 Placement and Mounting
- Position the compressor on a firm, level surface capable of supporting its weight.
- If mounting onto a truck bed or service vehicle, ensure the mounting hardware is appropriate for the weight and vibration of the unit. Secure the compressor firmly to prevent movement during transport and operation.
- Allow adequate clearance around the compressor for ventilation and access to controls and maintenance points.
4.3 Initial Oil Fill
CRITICAL: The compressor is shipped without oil in the pump. You MUST fill the pump with appropriate compressor oil before the first use. Refer to the oil fill cap or dipstick for the correct oil type and fill level.
- Locate the oil fill plug/dipstick on the compressor pump.
- Add compressor oil until the level reaches the indicated mark on the dipstick or sight glass. Do not overfill.
4.4 Fueling the Engine
- Ensure the engine is off and cool before adding gasoline.
- Use fresh, unleaded gasoline. Refer to the engine manual for specific fuel requirements.
- Fill the fuel tank, being careful not to overfill. Secure the fuel cap tightly.
5. Operating Instructions
Follow these steps for safe and effective operation of your air compressor.
5.1 Pre-Operation Checklist
- Check engine oil level.
- Check compressor pump oil level.
- Ensure fuel tank is adequately filled.
- Inspect air filter for cleanliness.
- Verify all connections are secure and there are no visible leaks.
- Ensure the belt guard is properly installed.
5.2 Starting the Engine
- Turn the fuel valve to the 'ON' position.
- If the engine is cold, apply choke as needed.
- Turn the engine switch to the 'ON' or 'START' position.
- Pull the recoil starter handle firmly until the engine starts. Alternatively, if equipped with electric start, turn the key to the 'START' position.
- Once the engine starts, gradually open the choke (if used).


5.3 Building Air Pressure
- Allow the engine to warm up for a few minutes.
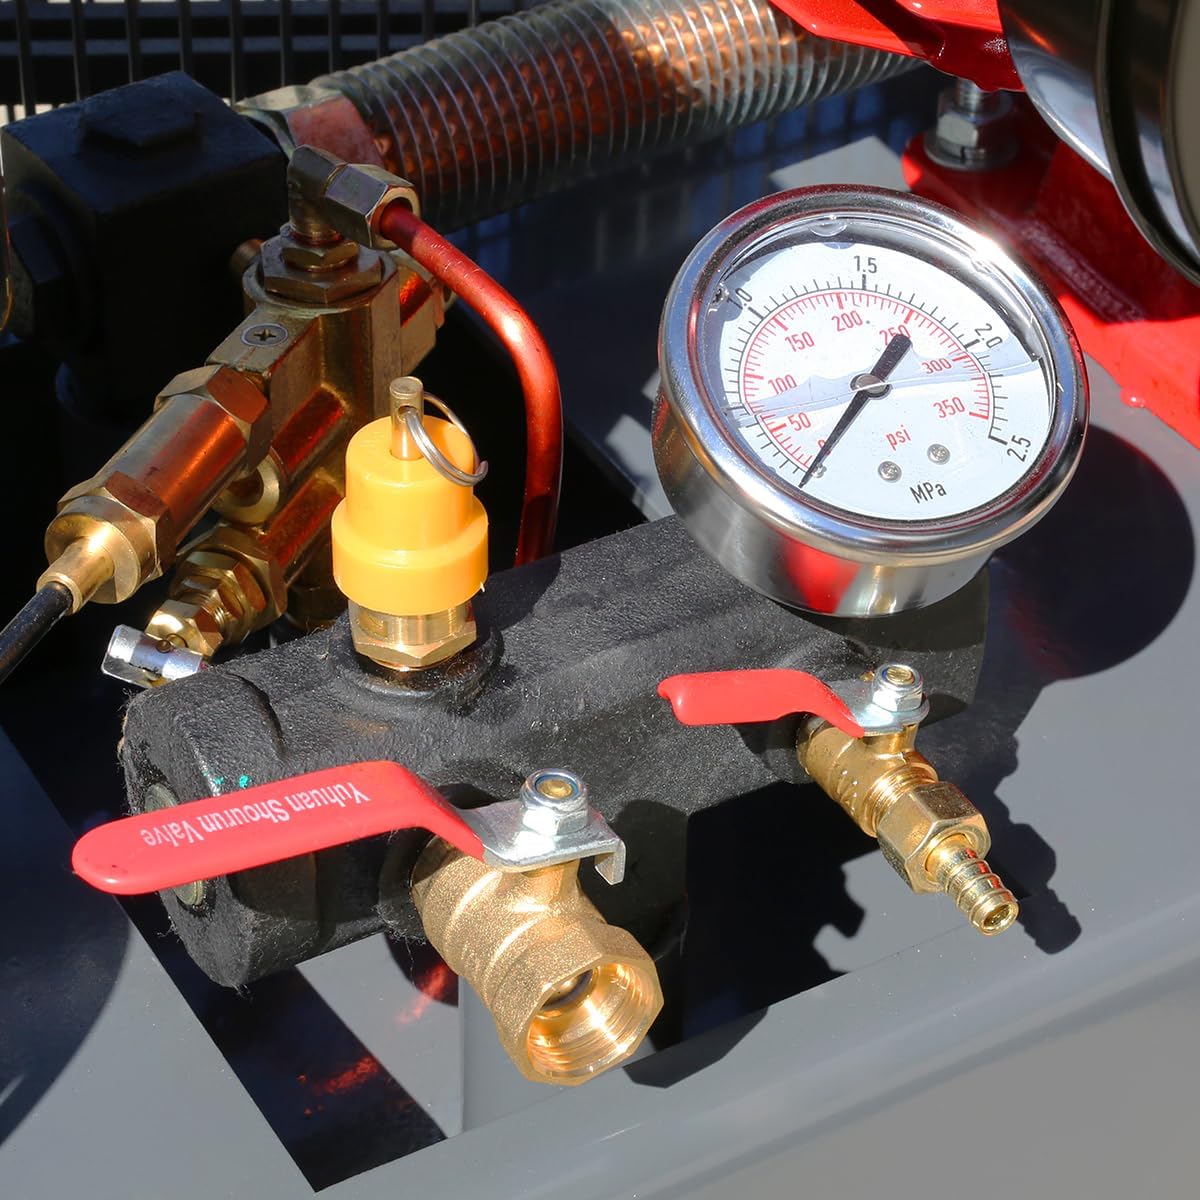
- The compressor will begin to build pressure in the tank. Monitor the pressure gauge.
- The engine will automatically idle down or shut off once the maximum pressure is reached, depending on the model's pressure switch settings.
5.4 Using Compressed Air
- Connect your air tool or hose to the air outlet.
- Adjust the regulator (if present) to the desired operating pressure for your tool.
- When air pressure drops below the cut-in pressure, the engine will automatically restart to replenish the tank.
5.5 Shutting Down
- Turn off the engine switch.
- Turn the fuel valve to the 'OFF' position.
- Open the air outlet valves or use an air tool to release all pressure from the tank.
- Drain any accumulated moisture from the air tank using the drain valve located at the bottom of the tank.
6. Maintenance
Regular maintenance ensures the longevity and optimal performance of your air compressor.
6.1 Daily Maintenance
- Drain Air Tank: Open the drain valve at the bottom of the tank to release accumulated moisture. This prevents rust and corrosion.
- Check Oil Levels: Verify both engine oil and compressor pump oil levels are within the recommended range.
- Inspect for Leaks: Check all air lines, fittings, and connections for any signs of air leaks.
6.2 Weekly/Monthly Maintenance
- Clean Air Filter: Remove and clean the engine and compressor air filters. Replace if damaged or excessively dirty.
- Inspect Belt: Check the drive belt for wear, cracks, or proper tension. Adjust or replace as necessary.
- Check Fasteners: Ensure all nuts, bolts, and screws are tight.
6.3 Annual Maintenance
- Change Engine Oil: Replace the engine oil according to the engine manufacturer's recommendations.
- Change Compressor Pump Oil: Replace the compressor pump oil.
- Inspect Safety Valve: Periodically test the safety relief valve by pulling its ring. Air should release. If it sticks or does not release, replace it.
- Spark Plug: Inspect and clean or replace the spark plug.
7. Troubleshooting
This section provides solutions to common issues you might encounter.
7.1 Engine Will Not Start
- No Fuel: Check fuel level and ensure fuel valve is open.
- Engine Switch Off: Ensure the engine switch is in the 'ON' or 'START' position.
- Choke: Adjust choke for cold starting.
- Spark Plug: Inspect spark plug for fouling or damage.
7.2 Compressor Not Building Pressure
- Air Leaks: Check all fittings, hoses, and valves for leaks. Tighten or replace as needed.
- Check Valve: A faulty check valve can prevent pressure buildup.
- Pump Issues: Worn piston rings or cylinder damage can reduce compression.
- Pulley/Belt: Ensure the drive belt is properly tensioned and the pulley is securely attached to the shaft. A loose pulley on a tapered shaft may require careful seating and tightening.
7.3 Excessive Noise or Vibration
- Loose Components: Check for loose bolts or mounting hardware.
- Worn Bearings: Engine or pump bearings may be worn.
- Unbalanced Flywheel: A damaged or improperly installed flywheel can cause vibration.
8. Specifications
| Feature | Specification |
|---|---|
| Brand | XtremepowerUS |
| Model Name | Gas-Powered Horizontal Air Compressor |
| Model Number | 65150-1 |
| Power Source | Gasoline |
| Motor Horsepower | 13 Horsepower |
| Tank Capacity | 30 Gallons |
| Air Flow Capacity | 35 Cubic Feet Per Minute (CFM) |
| Item Weight | 392 Pounds |
| Material | Aluminum, Cast Iron, Metal |
| Color | Grey |
| Package Dimensions | 50 x 40.5 x 21.5 inches |
9. Warranty and Support
For warranty information, please refer to the documentation included with your purchase or contact XtremepowerUS customer support. Keep your proof of purchase for any warranty claims.
If you require technical assistance or have questions not covered in this manual, please contact XtremepowerUS customer service. Contact details can typically be found on the product packaging or the official XtremepowerUS website.