
Introduction
This manual provides essential information for the safe and efficient operation of your Ingco 10 Bar/10A Automatic Pump Control Pressure Gauge. This device is designed to automate the starting and stopping of a water pump based on water flow and pressure changes. It ensures a constant pressure in the pipeline and a consistent water flow speed, making it suitable for various applications including household, garden, and greenhouse use.
Please read this manual thoroughly before installation and operation to ensure proper use and to prevent damage to the unit or injury.
Safety Information
Always observe the following safety precautions to reduce the risk of injury or damage:
- Ensure the power supply matches the specifications of the pump control unit (10A).
- Disconnect power before performing any installation, maintenance, or repair work.
- Installation should be performed by a qualified professional if you are unsure about electrical or plumbing connections.
- Do not operate the unit if it is damaged or appears to be malfunctioning.
- Protect the unit from freezing temperatures.
- Ensure all connections are watertight to prevent leaks and electrical hazards.
- Keep children and unauthorized personnel away from the installation area.
Product Overview
The Ingco Automatic Pump Control Pressure Gauge integrates several functions to manage your water pump efficiently. Key components include the pressure gauge, power input/output terminals, and control electronics.
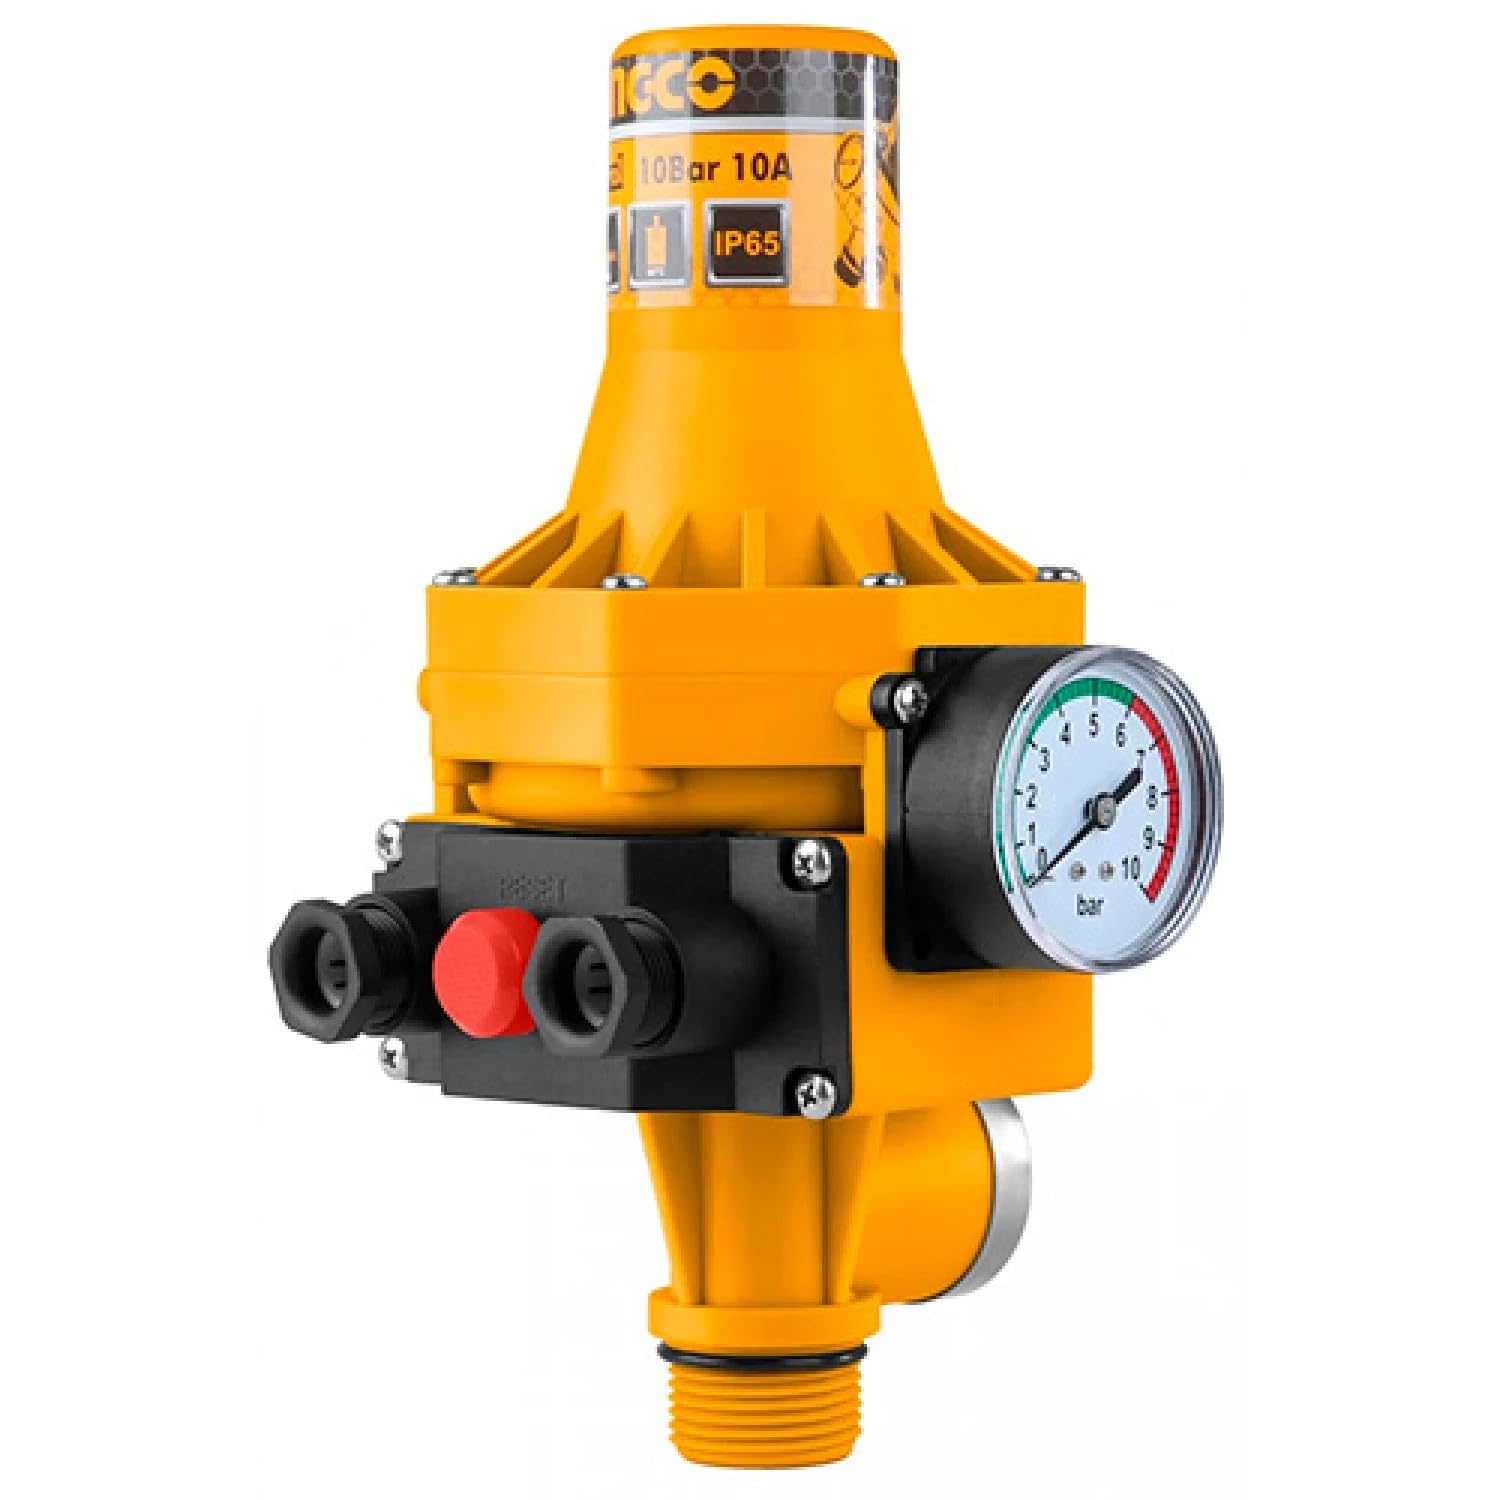
Figure 1: Ingco 10 Bar/10A Automatic Pump Control Pressure Gauge. This image shows the overall unit with its yellow and black casing, integrated pressure gauge, and electrical connections.
Key Components:
- Pressure Gauge: Displays the current system pressure in Bar.
- Power Indicator: (If applicable, typically an LED) Indicates power status.
- Run Indicator: (If applicable, typically an LED) Indicates when the pump is operating.
- Failure/Dry Run Indicator: (If applicable, typically an LED) Alerts to issues like dry running.
- Reset Button: Used to restart the unit after a fault or power interruption.
- Inlet/Outlet Ports: Threaded connections for water pipes.

Figure 2: Close-up view of the integrated pressure gauge, showing readings from 0 to 10 Bar with colored zones indicating typical operating ranges.
Setup and Installation
Follow these steps for proper installation of the pump control unit:
- Mounting: Install the pump control unit vertically, ensuring the flow direction arrow on the unit matches the water flow. Mount it securely to a wall or stable surface using appropriate fasteners.
- Water Connections: Connect the pump outlet to the inlet of the control unit and the system's main pipe to the outlet of the control unit. Ensure all threaded connections are sealed with PTFE tape or suitable sealant to prevent leaks.
- Electrical Connections:
- Connect the power supply cable to the designated input terminals (L, N, E).
- Connect the pump's power cable to the designated output terminals (L', N', E').
- Ensure all electrical connections are tight and properly insulated. Refer to the wiring diagram on the unit or in the packaging for specific terminal identification.
- Priming the Pump: Before powering on, ensure the pump is properly primed according to its manufacturer's instructions. The control unit requires water flow to operate correctly.

Figure 3: Front view of the pump control unit, highlighting the water inlet and outlet ports and the electrical connection points.

Figure 4: Side view of the pump control unit, illustrating the location of the electrical wiring terminals and cable glands for secure connections.
Operating Instructions
The Ingco Automatic Pump Control is designed for simple, automated operation:
- Power On: Once installation is complete and verified, connect the unit to the main power supply. The power indicator light should illuminate.
- Initial Start-up: Open a water tap in your system. The pump control unit will detect the pressure drop and automatically start the pump. The run indicator light should illuminate.
- Automatic Operation:
- When a water valve is opened, the pressure in the system drops, and the control unit automatically powers on the pump.
- When all water valves are closed, the pressure in the system rises, and the control unit automatically powers off the pump after a short delay.
- The unit maintains a constant pressure and water flow speed within the pipeline.
- Dry Run Protection: If the water source runs dry, the unit will detect the lack of water flow and automatically shut off the pump to prevent damage. The failure/dry run indicator will illuminate.
- Resetting: After a dry run or power interruption, press the 'Reset' button to restart the unit. Ensure the water source is available before resetting.
Maintenance
The Ingco Automatic Pump Control requires minimal maintenance. Regular checks ensure optimal performance and longevity:
- Regular Inspection: Periodically check the unit for any visible damage, loose connections, or signs of leakage.
- Cleaning: Keep the exterior of the unit clean and free from dust and debris. Use a soft, damp cloth for cleaning; do not use abrasive cleaners or solvents.
- Winterization: In areas prone to freezing, disconnect the unit and drain all water to prevent damage from ice expansion. Store in a dry, frost-free location.
- Pressure Gauge Check: Ensure the pressure gauge is functioning correctly and providing accurate readings.
Troubleshooting
If you encounter issues with your pump control unit, refer to the table below for common problems and solutions:
| Problem | Possible Cause | Solution |
|---|---|---|
| Pump does not start when tap is opened. | No power supply; Dry run protection activated; Low water pressure at inlet; Faulty wiring. | Check power connection; Press 'Reset' button; Ensure adequate water supply to pump; Verify electrical connections. |
| Pump does not stop when tap is closed. | Leak in the system; Faulty check valve in pump; Control unit malfunction. | Check for and repair leaks; Inspect pump's check valve; Contact support if unit is faulty. |
| Pump cycles on and off frequently. | Small leak in the system; Insufficient water supply; Air in the system. | Check for and repair minor leaks; Ensure stable water supply; Bleed air from the system. |
| Dry run indicator is on. | No water supply to pump. | Ensure water source is available and pump is primed; Press 'Reset' button. |
Specifications
Technical specifications for the Ingco 10 Bar/10A Automatic Pump Control Pressure Gauge:
| Feature | Specification |
|---|---|
| Model Number | 17374 |
| Maximum Current | 10A |
| Maximum Working Pressure | 10 Bar |
| Start Pressure Range | 1 to 1.5 Bar |
| Power Source | Corded Electric |
| Material | Metallic (Stainless Steel/Cast Iron) |
| Color | Yellow/Black |
| Manufacturer | Ingco Inc. |
Warranty and Support
For warranty information, please refer to the documentation provided with your purchase or contact your retailer. Ingco products are designed for reliability and performance.
If you require technical assistance or have questions not covered in this manual, please contact Ingco customer support or your authorized service center. Keep your purchase receipt and model number (17374) handy for faster service.