1. Introduction
This manual provides instructions for the safe operation, maintenance, and troubleshooting of your FLEX 24V Brushless Cordless 1/2-Inch Hammer Drill Turbo Mode Kit, model FX1271T-2B. Please read this manual thoroughly before using the tool to ensure proper and safe operation.
The FLEX FX1271T-2B is a powerful 24V brushless cordless hammer drill designed for demanding drilling and driving applications. It features a 1/2-inch full-metal ratcheting chuck, two-speed settings, a Turbo Mode for increased speed, and an anti-kickback safety feature. This kit includes the drill, a 2.5Ah Lithium-Ion Battery, a 5.0Ah Lithium-Ion Battery, and a 160W Fast Charger.
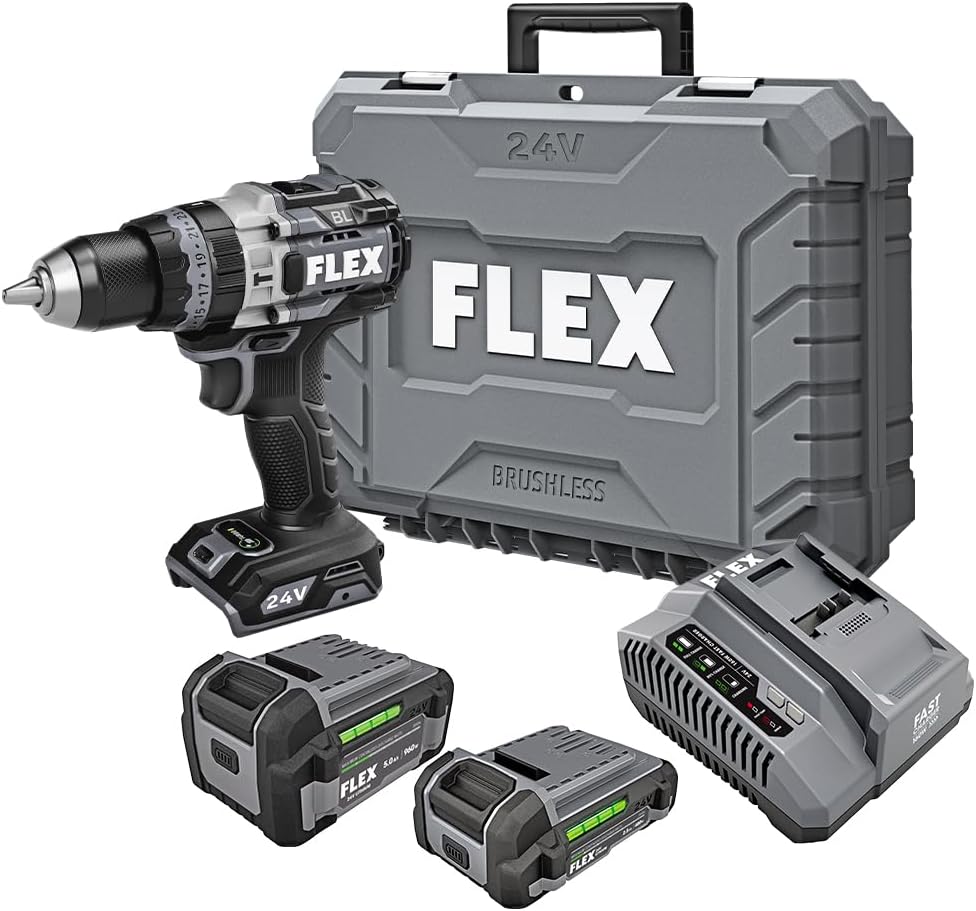
Figure 1: FLEX 24V Brushless Cordless 1/2-Inch Hammer Drill Kit (FX1271T-2B) including drill, two batteries, charger, and carrying case.
2. General Safety Instructions
WARNING: Read all safety warnings, instructions, illustrations, and specifications provided with this power tool. Failure to follow all instructions listed below may result in electric shock, fire, and/or serious injury.
2.1 Work Area Safety
- Keep work area clean and well lit. Cluttered or dark areas invite accidents.
- Do not operate power tools in explosive atmospheres, such as in the presence of flammable liquids, gases, or dust. Power tools create sparks which may ignite the dust or fumes.
- Keep children and bystanders away while operating a power tool. Distractions can cause you to lose control.
2.2 Electrical Safety
- Power tool plugs must match the outlet. Never modify the plug in any way. Do not use any adapter plugs with earthed (grounded) power tools. Unmodified plugs and matching outlets will reduce risk of electric shock.
- Avoid body contact with earthed or grounded surfaces, such as pipes, radiators, ranges, and refrigerators. There is an increased risk of electric shock if your body is earthed or grounded.
- Do not expose power tools to rain or wet conditions. Water entering a power tool will increase the risk of electric shock.
2.3 Personal Safety
- Always wear eye protection. Use safety glasses, goggles, or a face shield.
- Wear hearing protection when operating the tool for extended periods.
- Dress properly. Do not wear loose clothing or jewelry. Keep your hair and clothing away from moving parts.
- Stay alert, watch what you are doing, and use common sense when operating a power tool.
2.4 Tool Use and Care
- Do not force the power tool. Use the correct power tool for your application.
- Disconnect the battery pack from the power tool before making any adjustments, changing accessories, or storing power tools.
- Store idle power tools out of the reach of children and do not allow persons unfamiliar with the power tool or these instructions to operate the power tool.
- Maintain power tools and accessories. Check for misalignment or binding of moving parts, breakage of parts, and any other condition that may affect the power tool’s operation.
2.5 Battery Tool Use and Care
- Recharge only with the charger specified by the manufacturer. A charger that is suitable for one type of battery pack may create a risk of fire when used with another battery pack.
- Use power tools only with specifically designated battery packs. Use of any other battery packs may create a risk of injury and fire.
- When battery pack is not in use, keep it away from other metal objects, like paper clips, coins, keys, nails, screws or other small metal objects, that can make a connection from one terminal to another. Shorting the battery terminals together may cause burns or a fire.
- Under abusive conditions, liquid may be ejected from the battery; avoid contact. If contact accidentally occurs, flush with water. If liquid contacts eyes, additionally seek medical help. Liquid ejected from the battery may cause irritation or burns.
3. Components Included
Your FLEX 24V Brushless Cordless 1/2-Inch Hammer Drill Kit (FX1271T-2B) includes the following items:
- FLEX 24V Brushless Cordless 1/2-Inch Hammer Drill
- (1) FLEX 24V 2.5Ah Lithium-Ion Battery (FX0111-1)
- (1) FLEX 24V 5.0Ah Lithium-Ion Battery (FX0121-1)
- FLEX 160W Fast Charger
- Auxiliary Handle
- Carrying Case

Figure 2: The FLEX Advantage highlights the included 2.5Ah and 5.0Ah Lithium-Ion batteries, emphasizing their power, runtime, and fast charging capabilities.
4. Setup and Initial Use
4.1 Charging the Battery
- Connect the 160W Fast Charger to a standard power outlet.
- Slide the battery pack onto the charger until it clicks into place.
- The charger's indicator lights will show the charging status. A fully charged battery will be indicated by a solid green light.
- Once fully charged, remove the battery from the charger.
4.2 Installing the Battery
- Align the battery pack with the battery port on the base of the drill handle.
- Slide the battery into the port until it locks securely into place. Ensure it is fully seated to prevent accidental dislodgement during operation.
- To remove the battery, press the release button(s) on the sides of the battery pack and slide it out.
4.3 Attaching the Auxiliary Handle
For improved control and safety, especially during high-torque applications or hammer drilling, attach the auxiliary handle.
- Loosen the auxiliary handle clamp by rotating it counter-clockwise.
- Slide the handle over the front of the drill body, positioning it to your preferred angle.
- Tighten the clamp by rotating it clockwise until the handle is securely fastened.

Figure 3: The drill with the auxiliary handle attached, providing enhanced control and stability, particularly when the anti-kickback feature engages.
4.4 Installing Drill Bits or Accessories
- Ensure the drill is off and the battery is removed for safety.
- Grip the rear collar of the 1/2-inch full-metal ratcheting chuck and rotate the front collar counter-clockwise to open the chuck jaws.
- Insert the drill bit or accessory fully into the chuck jaws.
- Rotate the front collar clockwise to tighten the chuck jaws firmly around the bit. The ratcheting mechanism will provide an audible click when securely tightened.
- Gently pull on the bit to ensure it is properly secured.

Figure 4: Detail of the 1/2-inch full-metal ratcheting chuck, designed for secure bit retention and durability.
5. Operating Instructions
5.1 Powering On/Off and Speed Control
- Trigger Switch: Squeeze the trigger switch to turn the drill on. Release it to turn the drill off.
- Variable Speed: The trigger switch is pressure-sensitive, allowing for variable speed control. Pressing the trigger further increases the speed.
- Forward/Reverse Selector: Located above the trigger, push the selector left for forward rotation (drilling/driving) and right for reverse rotation (removing screws). Center position locks the trigger for safety.
5.2 Gear Selection (2-Speed)
The drill features a 2-speed gearbox for optimal performance across various applications.
- Gear 1 (Low Speed, High Torque): Slide the gear selector switch to position '1'. Ideal for driving screws, drilling large holes, or applications requiring maximum torque.
- Gear 2 (High Speed, Lower Torque): Slide the gear selector switch to position '2'. Suitable for fast drilling of smaller holes in wood or metal.
NOTE: Always ensure the drill is stopped before changing gear settings to prevent damage to the gearbox.
5.3 Mode Selection (Drill, Drive, Hammer Drill)
Rotate the collar behind the chuck to select the desired operating mode:
- Drill Mode (Drill Icon): For drilling holes in wood, metal, and plastics.
- Drive Mode (Screw Icon): For driving screws. The clutch settings (numbered ring) allow you to adjust the torque to prevent over-driving screws or damaging materials.
- Hammer Drill Mode (Hammer Icon): For drilling into masonry, brick, and concrete. This mode combines rotary action with a hammering motion.
5.4 Turbo Mode
The Turbo Mode button, located on top of the drill, provides an immediate increase in speed for faster results when needed.
- Press the TURBO button during operation to engage maximum speed.
- Release the button to return to the previously selected speed setting.

Figure 5: The Turbo Mode button, when pressed, provides increased speed for rapid task completion.
5.5 Anti-Kickback Feature
The drill is equipped with an advanced anti-kickback braking technology. If the drill bit binds during operation, the system will detect the sudden rotational force and rapidly stop the motor to reduce the risk of kickback and potential injury.
5.6 Integrated LED Light
An LED light is integrated into the drill to illuminate the work area, improving visibility in dimly lit conditions. The light activates when the trigger is pressed.

Figure 6: The integrated LED light provides illumination for improved visibility in dark work environments.
5.7 Drilling into Masonry (Hammer Drill Mode)
When drilling into masonry, brick, or concrete:
- Select Hammer Drill Mode.
- Ensure the auxiliary handle is securely attached and held firmly with both hands.
- Use appropriate masonry drill bits.
- Apply steady, firm pressure to the drill, allowing the hammering action to break up the material.

Figure 7: The FLEX hammer drill in action, demonstrating its capability to drill into tough materials with 1,400 in-lbs of torque.
6. Maintenance
6.1 Cleaning
- Always disconnect the battery pack before performing any cleaning or maintenance.
- Use a soft brush or compressed air to clean dust and debris from the ventilation openings.
- Wipe the tool housing with a damp cloth. Do not use harsh chemicals or abrasive cleaners.
- Keep the chuck jaws clean and free of debris to ensure proper bit gripping.
6.2 Storage
- Store the tool, batteries, and charger in a cool, dry place, away from direct sunlight and moisture.
- Ensure batteries are partially charged (not fully depleted or fully charged for long-term storage) before storing.
- Store the tool in its carrying case to protect it from damage.
7. Troubleshooting
| Problem | Possible Cause | Solution |
|---|---|---|
| Drill does not start. | Battery not charged or improperly installed. Forward/Reverse selector in center (locked) position. | Charge battery and ensure it is securely installed. Move selector to forward or reverse position. |
| Loss of power during operation. | Battery charge is low. Overload protection activated. | Recharge the battery. Reduce pressure on the tool; allow it to cool down. |
| Bit slips in chuck. | Chuck not tightened sufficiently. Chuck jaws are dirty or worn. | Retighten chuck firmly. Clean chuck jaws. If problem persists, chuck may need replacement. |
| Excessive vibration or noise. | Damaged or bent drill bit. Loose components. | Replace drill bit. Check for loose screws or parts. If problem persists, discontinue use and contact service. |
8. Specifications
| Feature | Detail |
|---|---|
| Model Number | FX1271T-2B |
| Voltage | 24 Volts |
| Chuck Size | 1/2-Inch |
| Chuck Type | Full-Metal Ratcheting |
| Maximum Torque | 1400 Inch Pounds |
| Maximum Rotational Speed | 2500 RPM |
| Number of Speeds | 2 |
| Battery Capacity (Included) | 2.5 Ah, 5.0 Ah Lithium-Ion |
| Charger Type (Included) | 160W Fast Charger |
| Special Features | Turbo Mode, Anti-Kickback, LED Light, Brushless Motor |
| Item Weight | 15.37 pounds (Kit) |
| Product Dimensions | 7.2"L x 4"W x 10"H (Tool) |
| Drilling Capacity (Wood) | 2 Inches |
| Drilling Capacity (Metal) | 2 Inches |
9. Warranty and Support
9.1 FLEX Limited Lifetime Warranty
This FLEX tool is protected by the FLEX Limited Lifetime Warranty. To qualify for this warranty, you must register your new FLEX tool, battery, or charger within 30 days of purchase through December 31, 2025. Registration can be completed at registermyFLEX.com.
Please refer to the official FLEX website or your product packaging for full terms and conditions of the warranty.
9.2 Customer Support
For technical assistance, replacement parts, or warranty claims, please contact FLEX customer support. Contact information can typically be found on the FLEX official website or on your product packaging.
When contacting support, please have your model number (FX1271T-2B) and purchase date available.


