1. Introduction
This manual provides essential instructions for the safe and efficient operation, assembly, and maintenance of your Shop-Vac 5 Gallon 5.5 Peak HP Wet/Dry Vacuum and Dust Collector. Please read all instructions carefully before use to ensure proper functionality and to prevent injury or damage.
2. Safety Information
Always follow basic safety precautions when using this appliance to reduce the risk of fire, electric shock, or injury. Keep this manual for future reference.
- Do not leave the vacuum unattended when plugged in. Unplug from outlet when not in use and before servicing.
- Do not use with a damaged cord or plug. If the appliance is not working as it should, has been dropped, damaged, left outdoors, or dropped into water, return it to a service center.
- Do not pull or carry by cord, use cord as a handle, close a door on cord, or pull cord around sharp edges or corners. Do not run appliance over cord. Keep cord away from heated surfaces.
- Do not unplug by pulling on cord. To unplug, grasp the plug, not the cord.
- Do not handle plug or appliance with wet hands.
- Do not use to pick up flammable or combustible liquids, such as gasoline, or use in areas where they may be present.
- Do not pick up anything that is burning or smoking, such as cigarettes, matches, or hot ashes.
- Use extra care when cleaning on stairs.
- Do not use without filters in place.
- Turn off all controls before unplugging.
- This appliance is not intended for use by persons (including children) with reduced physical, sensory or mental capabilities, or lack of experience and knowledge, unless they have been given supervision or instruction concerning use of the appliance by a person responsible for their safety.
3. Package Contents
Verify that all items listed below are included in your package. If any parts are missing or damaged, please contact customer support.

Image: All components included with the Shop-Vac 5 Gallon 5.5 Peak HP Wet/Dry Vacuum and Dust Collector.
Package 1: 5 Gallon 5.5 Peak HP Wet/Dry Vacuum
- 5 Gallon 5.5 Peak HP Wet/Dry Vacuum Unit
- 18' x 1-1/4" Secure LockOn Hose
- 7' x 1-1/4" Secure LockOn Hose
- (3) Extension Wands
- (1) 10 In Wet/Dry Nozzle
- (1) Gulper Nozzle
- (1) Crevice Tool
- (1) Round Brush
- (1) Cartridge Filter
- (1) Foam Sleeve
- (1) Filter Bag
Package 2: Dust Collector
- (1) Dust Collector Unit
- (2) 90 Degree Elbows
- (1) 2' x 2-1/2" Hose
- (1) Metal Filter
4. Assembly and Setup
4.1 Wet/Dry Vacuum Assembly
Refer to the diagram below for component identification during assembly.

Image: Product details showing key components of the Shop-Vac Wet/Dry Vacuum.
- Unpack Components: Carefully remove all parts from the packaging.
- Attach Casters (if applicable): If your model includes casters, insert them into the slots on the bottom of the tank.
- Secure Power Head: Place the power head (motor unit) onto the collection tank, ensuring the latches align. Secure the latches on both sides to firmly attach the power head to the tank.
- Connect Hose: Insert the desired Secure LockOn Hose into the vacuum port on the front of the tank. Twist to secure the LockOn feature.
- Attach Accessories: Connect extension wands and desired nozzles (e.g., 10 In Wet/Dry Nozzle, Gulper Nozzle, Crevice Tool, Round Brush) to the end of the hose for specific cleaning tasks.
4.2 Dust Collector Setup
The dust collector is designed to be used with a 5-gallon bucket (sold separately) to pre-filter larger debris, extending the life of your vacuum's main filter.

Image: Step-by-step diagram for setting up the dust collector with a 5-gallon bucket.
- Prepare Bucket: Obtain a standard 5-gallon bucket. Ensure it is clean and empty.
- Place Dust Collector: Position the dust collector unit securely on top of the 5-gallon bucket. The rim of the dust collector should fit snugly over the bucket's opening.
- Install Metal Filter: Insert the metal filter into the designated opening on the underside of the dust collector, ensuring it is properly seated.
- Connect 2-1/2" Hose: Attach one end of the 2' x 2-1/2" hose to the inlet port of the dust collector.
- Attach 90 Degree Elbows: Connect the two 90-degree elbows to the other end of the 2-1/2" hose, forming a connection point for your vacuum hose.
- Connect Vacuum Hose: Attach your main vacuum hose (from the Shop-Vac unit) to the assembled 90-degree elbows. This creates a sealed system where debris first enters the dust collector before reaching the vacuum.
5. Operating Instructions
Your Shop-Vac Wet/Dry Vacuum is versatile for various cleaning tasks. Always ensure the correct filter is installed for the type of debris you are collecting.

Image: Demonstrating the use of the extra-long 18-foot hose for extended reach.
5.1 Dry Pickup
For dry debris, ensure the cartridge filter is installed and the foam sleeve is removed. A filter bag can also be used in conjunction with the cartridge filter for easier disposal of fine dust.
- Filter Check: Confirm the cartridge filter is clean and properly seated over the filter cage. If using, install a filter bag.
- Connect Hose & Tools: Attach the desired hose and cleaning tool (e.g., 10 In Wet/Dry Nozzle, Crevice Tool) for your task.
- Power On: Plug the vacuum into a suitable electrical outlet. Flip the ON/OFF switch to the 'ON' position.
- Vacuum: Begin vacuuming dry debris.
- Power Off: When finished, flip the ON/OFF switch to the 'OFF' position and unplug the unit.
5.2 Wet Pickup
For wet spills, remove the cartridge filter and filter bag, and install the foam sleeve over the filter cage. The foam sleeve protects the motor during wet operation.
- Filter Check: Remove the cartridge filter and filter bag. Install the foam sleeve over the filter cage.
- Connect Hose & Tools: Attach the desired hose and cleaning tool. The 10 In Wet/Dry Nozzle is often suitable for wet pickup.
- Power On: Plug the vacuum into a suitable electrical outlet. Flip the ON/OFF switch to the 'ON' position.
- Vacuum: Begin vacuuming liquids. The vacuum will automatically shut off when the tank is full.
- Empty Tank: When the vacuum stops, turn it off, unplug it, and empty the collection tank.
- Power Off: When finished, flip the ON/OFF switch to the 'OFF' position and unplug the unit.
5.3 Using the Dust Collector
When the dust collector is set up as described in Section 4.2, it acts as a pre-separator for your vacuum. This is particularly useful for collecting large volumes of sawdust, drywall dust, or other fine particles, preventing them from reaching your main vacuum filter and maintaining suction efficiency.
- Ensure Proper Connection: Verify that the dust collector is securely placed on a 5-gallon bucket and all hoses are tightly connected between the dust collector and your Shop-Vac.
- Power On: Turn on your Shop-Vac unit.
- Begin Collection: Use the hose connected to the dust collector's inlet to vacuum debris. Larger particles will be collected in the 5-gallon bucket, while finer dust will proceed to the Shop-Vac.
- Monitor Bucket: Periodically check the 5-gallon bucket and empty it as needed. This prevents the dust collector from becoming overloaded and ensures optimal performance.
6. Maintenance
Regular maintenance ensures the longevity and optimal performance of your Shop-Vac.
6.1 Filter Maintenance
Clean or replace filters regularly to maintain suction power and motor protection.
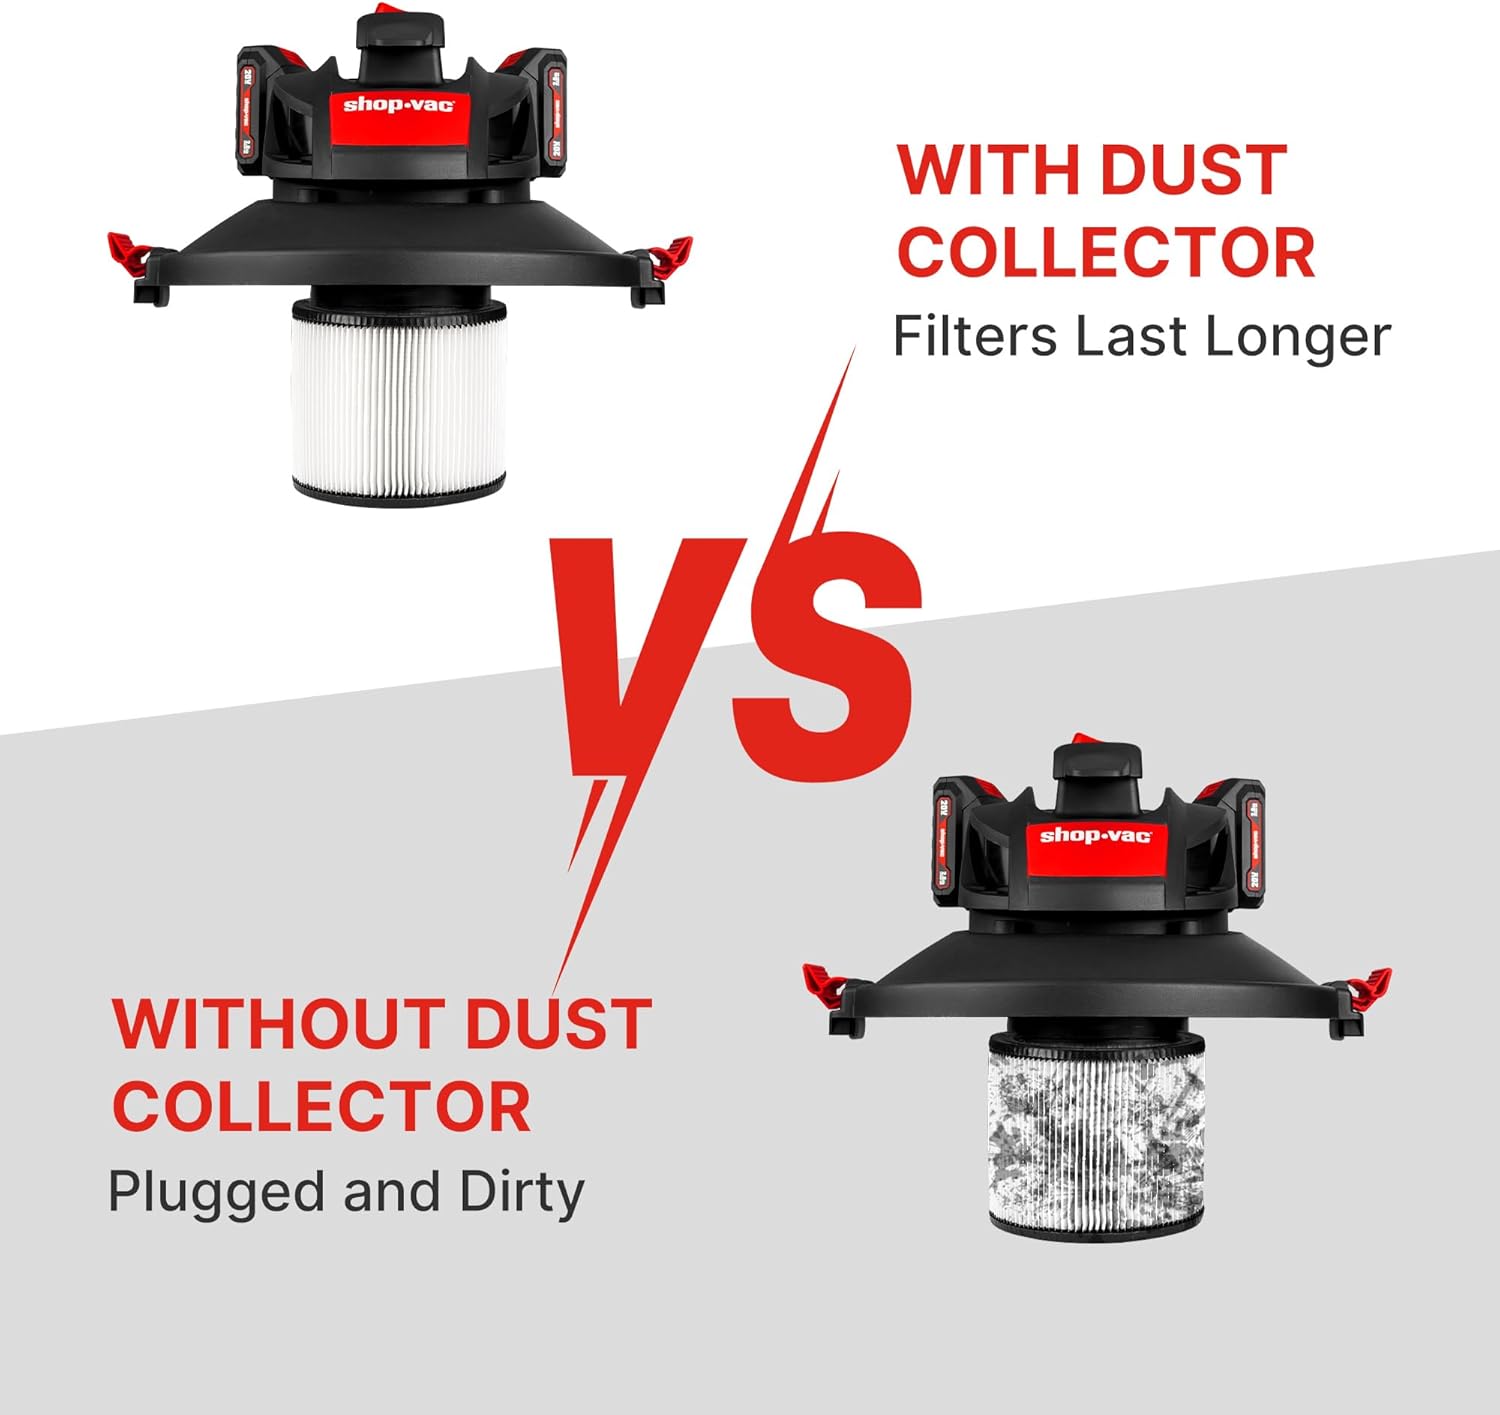
Image: Illustrates how the dust collector helps keep the main vacuum filter cleaner, extending its life.
- Cartridge Filter: For dry pickup, tap off loose dirt or rinse with water. Allow to air dry completely before reinstallation. Replace if damaged or excessively dirty.
- Foam Sleeve: For wet pickup, rinse with water and allow to air dry.
- Filter Bag: Disposable. Replace when full or when suction decreases.
- Metal Filter (Dust Collector): Periodically remove and clean any accumulated debris.
6.2 Tank Cleaning
Empty the collection tank after each use, especially after wet pickup, to prevent mold and odors. Rinse the tank with water and mild detergent, then allow it to air dry completely before storing.
6.3 Hose and Accessory Care
Inspect hoses and accessories for blockages or damage. Clear any obstructions. Store accessories neatly to prevent loss or damage.
7. Troubleshooting
If you encounter issues with your Shop-Vac, refer to the following common problems and solutions:
| Problem | Possible Cause | Solution |
|---|---|---|
| Motor does not start | No power to outlet; Faulty cord/plug; ON/OFF switch off | Check power outlet; Inspect cord/plug for damage; Ensure switch is ON |
| Loss of suction | Clogged filter; Full tank; Hose/tool blockage; Loose connections | Clean/replace filter; Empty tank; Clear blockages; Secure all connections |
| Water coming from exhaust | Foam sleeve not installed for wet pickup; Tank is full | Install foam sleeve; Empty tank |
| Dust escaping from exhaust | Cartridge filter missing/damaged; Filter not properly seated | Install/replace cartridge filter; Ensure filter is seated correctly |
8. Specifications
Key technical specifications for the Shop-Vac 5 Gallon 5.5 Peak HP Wet/Dry Vacuum and Dust Collector:
| Feature | Specification |
|---|---|
| Brand | Shop-Vac |
| Special Feature | Wet/Dry |
| Filter Type | Cartridge |
| Included Components | Crevice Tool, Gulper Nozzle, 10 In Wet/Dry Nozzle, Round Brush, Extension Wands, Hoses, Filters |
| Is Cordless? | No (Corded) |
| Capacity | 18.93 Liters (5 Gallons) |
| Hose Length | 2.1 Meters (7 feet) and 5.49 Meters (18 feet) |
| Recommended Uses | Carpet, Hard Floor, Garage |
| Motor Horsepower | 5.5 Peak HP |
| Control Method | Touch (ON/OFF Switch) |
| Number of Handles | 1 |
| Number of Wheels | 4 |
| Indoor/Outdoor Usage | Indoor |
9. Warranty and Support
For warranty information and customer support, please refer to the warranty card included with your product or visit the official Shop-Vac website. Keep your purchase receipt as proof of purchase.


