1. Introduction
This manual provides essential instructions for the safe operation, maintenance, and troubleshooting of your NorthStar c5500 Commercial-Grade Portable Generator, Model 1654400. This generator is designed to provide reliable portable power with 5500 surge watts and 4500 rated watts. Please read this manual thoroughly before operating the generator to ensure proper use and to prevent injury or damage.

Figure 1: NorthStar c5500 Commercial-Grade Portable Generator. This image shows the overall design of the generator, including its frame, wheels, and control panel.
2. Safety Information
Operating a generator safely is paramount. Failure to follow safety instructions can result in serious injury or death. Always operate the generator in a well-ventilated area to prevent carbon monoxide poisoning. Keep children and pets away from the generator during operation.
2.1 Carbon Monoxide (CO) Safety
This generator is equipped with a Carbon Monoxide detection system that automatically shuts down the engine if CO levels become unsafe. Never operate the generator indoors, in a garage, or in any enclosed space. Ensure exhaust fumes are directed away from occupied areas.
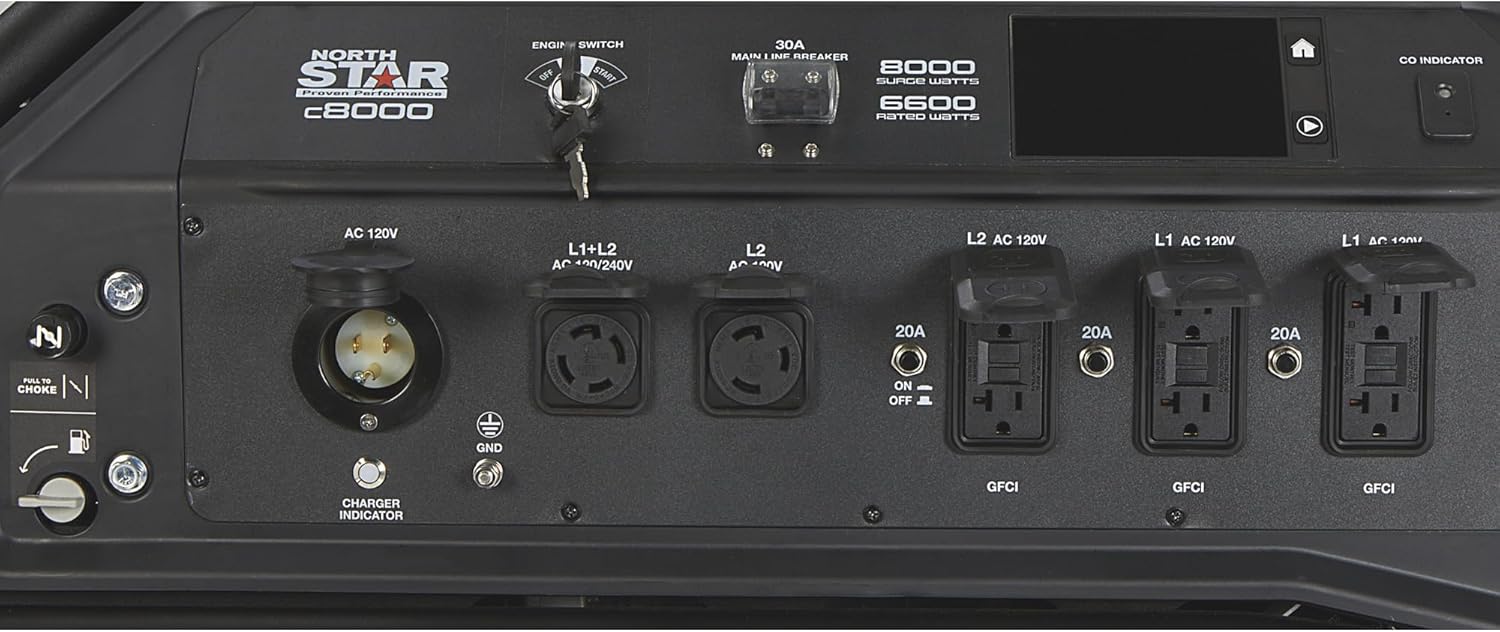
Figure 2: Carbon Monoxide (CO) Indicator. This close-up shows the CO indicator light and sensor on the generator's control panel, which signals the presence of dangerous CO levels.
2.2 Electrical Safety
- Ensure all connected appliances and extension cords are in good condition and rated for the generator's output.
- Do not overload the generator.
- All outlets are GFCI (Ground Fault Circuit Interrupter) protected for enhanced safety, especially in damp conditions.
- Never connect the generator directly to a building's electrical system without a transfer switch installed by a qualified electrician. This can cause backfeeding and electrocute utility workers.
2.3 Fuel Safety
- Gasoline is highly flammable. Store fuel in approved containers in a well-ventilated area away from ignition sources.
- Never refuel a hot or running engine. Allow the generator to cool down before adding fuel.
- Avoid spilling fuel. If spilled, wipe it up immediately and ensure fumes dissipate before starting the generator.
3. Components Overview
Familiarize yourself with the various parts of your NorthStar c5500 generator before operation.

Figure 3: Key Features and Components. This diagram highlights important parts of the generator, including the control panel, outlets, engine, and frame structure.
3.1 Control Panel
The control panel houses the main operational controls and indicators.

Figure 4: Generator Control Panel. This image provides a detailed view of the control panel, showing the engine switch, main line breaker, various AC outlets, and the LCD display.
- Engine Switch: Used to start and stop the engine.
- Main Line Breaker: Protects the generator from overload.
- AC Outlets: Includes (6) 120V, 20A GFCI outlets, (1) 120V, 30A locking outlet, and (1) 120/240V, 60A outlet.
- LCD Display: Provides operational information such as hours of use, maintenance reminders (spark plug, oil, air filter), and CO sensor status.
- CO Indicator: Alerts to dangerous carbon monoxide levels.
4. Setup and Assembly
Before first use, some assembly and preparation are required.
4.1 Unpacking and Wheel Kit Installation
- Carefully remove the generator from its packaging.
- Attach the wheels to the generator frame using the provided hardware. Ensure they are securely fastened.
- Install the handle kit for portability.
4.2 Adding Engine Oil
- The generator is shipped without engine oil. Add the recommended type and amount of oil (refer to the specifications section for details) before starting.
- Place the generator on a level surface.
- Remove the oil fill cap/dipstick.
- Slowly pour oil into the engine until it reaches the upper mark on the dipstick. Do not overfill.
- Securely replace the oil fill cap/dipstick.
4.3 Adding Fuel
- Use fresh, unleaded gasoline with an octane rating of 87 or higher.
- Ensure the generator is turned off and cool before refueling.
- Open the fuel cap and slowly add fuel to the tank. Do not fill above the red indicator line or the bottom of the filler neck.
- Securely close the fuel cap.
5. Operation
Follow these steps to safely start and operate your generator.
5.1 Starting the Engine
- Ensure the generator is on a level surface and in a well-ventilated outdoor area.
- Check oil and fuel levels.
- Turn the fuel valve to the "ON" position.
- If the engine is cold, move the choke lever to the "CHOKE" position.
- Insert the key into the engine switch and turn it to the "START" position. Release the key once the engine starts.
- Once the engine warms up (a few seconds), gradually move the choke lever to the "RUN" position.

Figure 5: Engine Switch and Electric Start. This image shows the key-operated engine switch, which facilitates convenient electric starting of the generator.
5.2 Connecting Electrical Loads
- Allow the engine to run for a few minutes before connecting any electrical devices.
- Plug in appliances or extension cords to the appropriate outlets.
- Do not exceed the generator's rated wattage (4500 watts running, 5500 watts surge).
- Monitor the LCD display for load information and maintenance reminders.
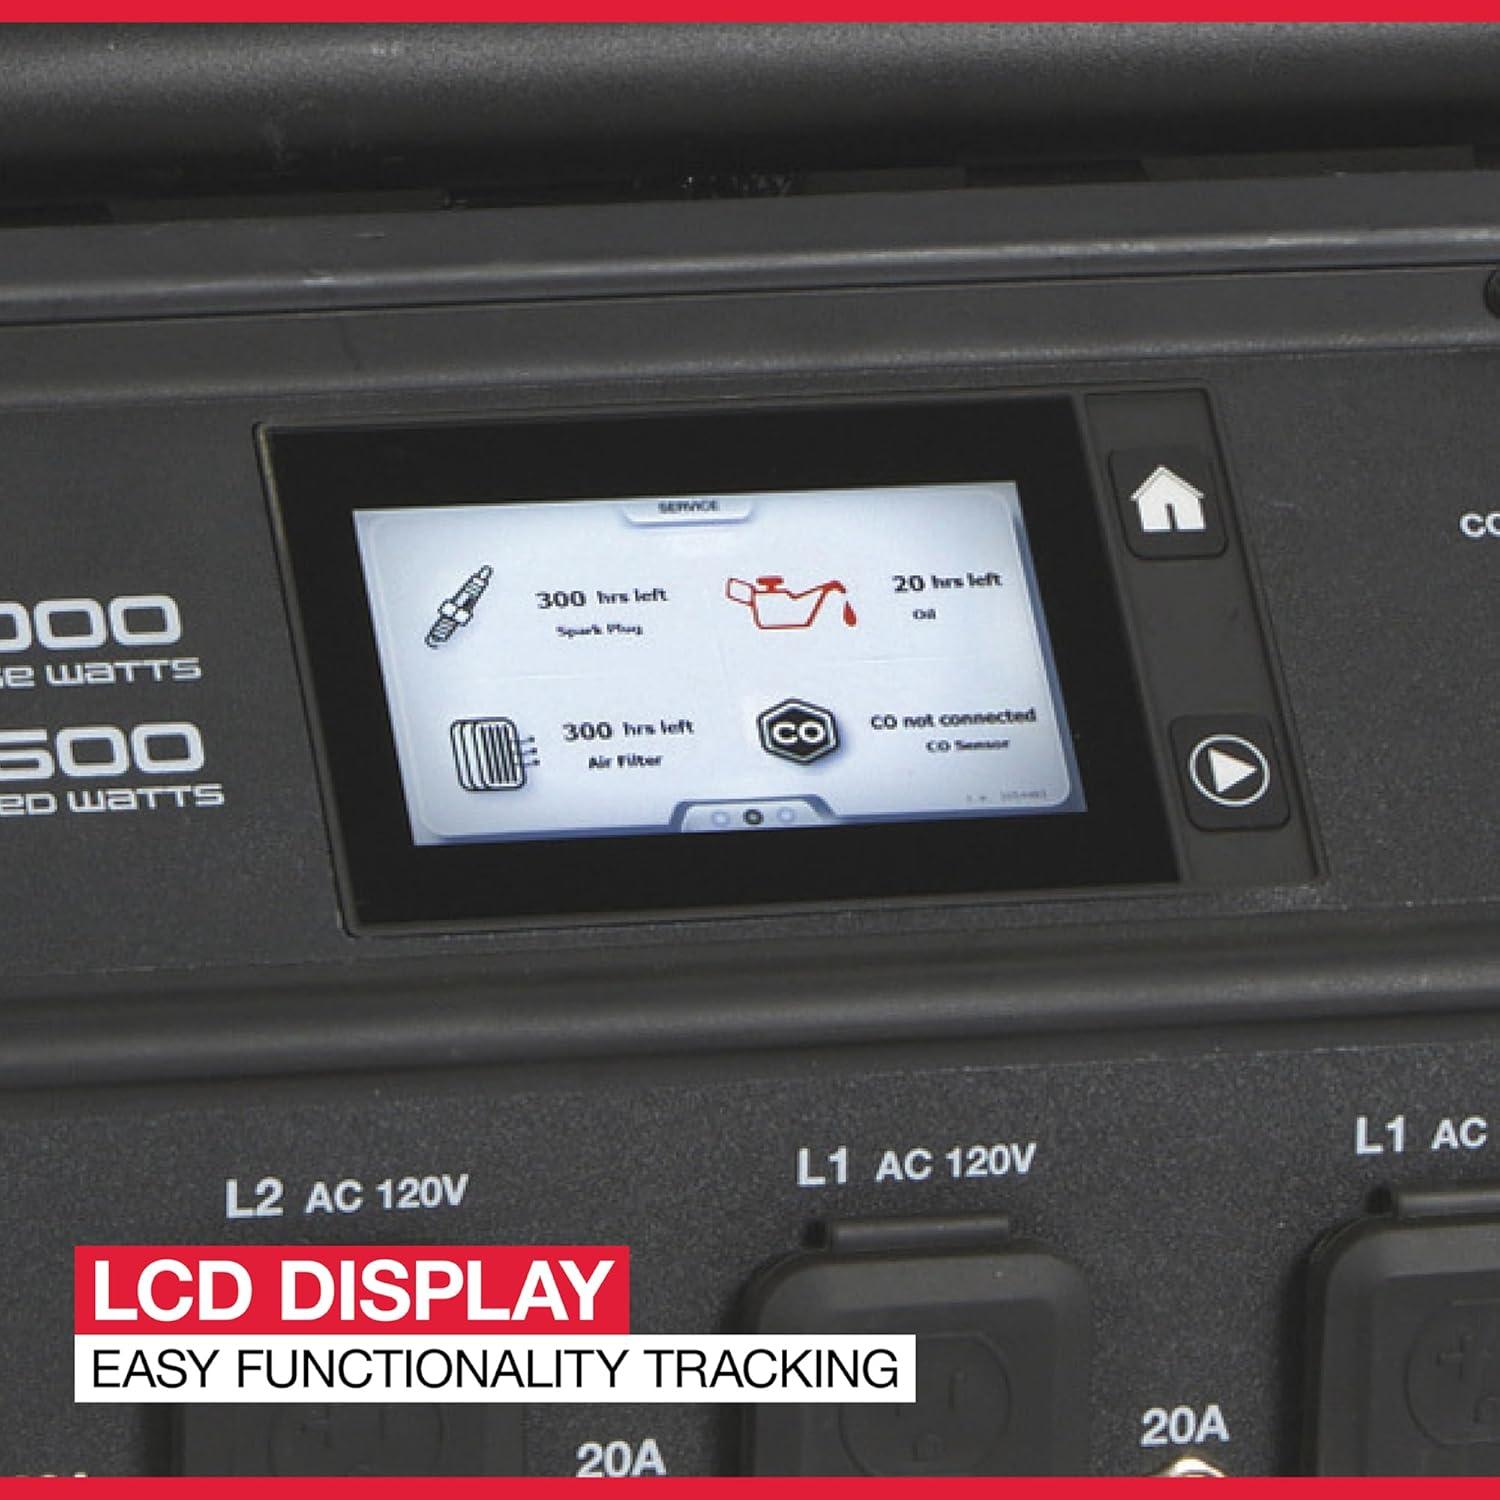
Figure 6: LCD Display. This close-up shows the generator's LCD display, which provides real-time information on engine hours, maintenance intervals for spark plug, oil, and air filter, and CO sensor status.
5.3 Stopping the Engine
- Disconnect all electrical loads from the generator.
- Allow the generator to run for a few minutes without load to cool down.
- Turn the engine switch to the "OFF" position.
- Turn the fuel valve to the "OFF" position for storage.
6. Maintenance
Regular maintenance ensures optimal performance and extends the life of your generator. Always perform maintenance with the engine off and cool.
6.1 Maintenance Schedule
| Item | Interval | Action |
|---|---|---|
| Engine Oil | Every 50 hours or annually | Check level before each use, change oil. |
| Air Filter | Every 100 hours or annually | Inspect and clean/replace if necessary. |
| Spark Plug | Every 300 hours or annually | Inspect, clean, and adjust gap. Replace if worn. |
| Fuel Filter | Annually or as needed | Inspect and replace if clogged. |
6.2 Storage
- For extended storage, drain the fuel tank and carburetor, or use a fuel stabilizer.
- Change the engine oil.
- Clean the exterior of the generator.
- Store in a clean, dry area away from direct sunlight and extreme temperatures.
7. Troubleshooting
This section provides solutions to common operational issues. For problems not listed here, contact customer support.
| Problem | Possible Cause | Solution |
|---|---|---|
| Engine will not start | No fuel; Low oil; Choke not set; Engine switch off; Faulty spark plug | Add fuel; Add oil; Adjust choke; Turn engine switch to START; Inspect/replace spark plug |
| No power output | Circuit breaker tripped; Overload; GFCI tripped | Reset circuit breaker; Reduce load; Reset GFCI outlets |
| Engine runs rough | Stale fuel; Clogged air filter; Dirty spark plug | Drain and replace fuel; Clean/replace air filter; Clean/replace spark plug |
| CO sensor shutdown | High carbon monoxide levels | Move generator to a more open, well-ventilated area. Ensure exhaust is directed away from people and buildings. |
8. Specifications
| Feature | Detail |
|---|---|
| Brand | NorthStar |
| Model Number | 1654400 |
| Engine Type | Honda GX270 OHV |
| Engine Displacement | 270 Cubic Centimeters |
| Starting Wattage | 5500 Watts |
| Running Wattage | 4500 Watts |
| Fuel Type | Gasoline |
| Tank Volume | 21.6 Liters |
| Total Power Outlets | (6) 120V, 20A GFCI; (1) 120V, 30A locking; (1) 120/240V, 60A |
| Product Dimensions (L x W x H) | 41" x 32" x 29" |
| Item Weight | 246 Pounds |
| Special Features | Quiet Armor Technology, CO Detection, GFCI Outlets, Portable |
9. Warranty Information
The NorthStar c5500 Commercial-Grade Portable Generator (Model 1654400) comes with a warranty of 4 years for consumer use and 2 years for commercial use. Please retain your proof of purchase for warranty claims. For specific terms and conditions, refer to the warranty card included with your product or visit the official NorthStar website.
10. Customer Support
If you require assistance, have questions about your generator, or need to order replacement parts, please contact NorthStar customer support. You can typically find contact information on the NorthStar website or in the documentation provided with your generator.
For further information, visit the NorthStar Store on Amazon.


