1. Introduction
Thank you for purchasing the GEVEELIFE Burnishing Polishing Machine. This manual provides essential information for the safe and efficient operation, maintenance, and troubleshooting of your new tool. Please read this manual thoroughly before first use and keep it for future reference.
2. Safety Instructions
Always follow basic safety precautions to reduce the risk of fire, electric shock, and personal injury.
- Personal Safety: Always wear appropriate personal protective equipment (PPE) such as safety glasses, gloves, and hearing protection. Do not wear loose clothing or jewelry that could get caught in moving parts.
- Work Area Safety: Keep your work area clean and well-lit. Do not operate the machine in explosive atmospheres, such as in the presence of flammable liquids, gases, or dust.
- Electrical Safety: Ensure the power supply matches the specifications of the machine (110V). Do not expose the machine to rain or wet conditions. Always unplug the machine before making any adjustments, changing accessories, or performing maintenance.
- Machine Operation: Secure the workpiece before operating. Do not force the machine; let the tool do the work. Maintain a firm grip on the machine with both hands during operation.
- Overheat and Overvoltage Protection: The machine is equipped with overheat and overvoltage protection. If the machine stops unexpectedly, allow it to cool down before resuming operation.
3. Product Overview
Familiarize yourself with the components of your burnishing polishing machine.

Figure 3.1: Main components of the burnishing polishing machine. Key parts include the L-shape handle, anti-dust cover, burnishing wheel, speed adjustment dial, non-slip handle, operating switch, operating locking button, copper motor, vent, and shaft locking mechanism.
Key Features:
- Powerful Motor: 1400W high-power motor for efficient polishing.
- Variable Speed Control: 6-speed levels ranging from 600-3600 RPM for versatile applications.
- Operation Lock: Button for continuous operation, reducing hand fatigue.
- Durable Design: Double heat dissipation holes and thickened dust cover for extended service life and debris isolation.
- Ergonomic Handle: Non-slip L-shape handle for stability and control.
- Long Power Cord: 6.56ft (2m) cable for larger operating area.

Figure 3.2: Illustration of the 1400W high power motor with built-in over-protection features for enhanced durability and safety.

Figure 3.3: Details of the thickened dust cover for isolating debris and the efficient heat dissipation system designed to prolong the machine's lifespan.
4. Specifications
| Parameter | Value |
|---|---|
| Power Output | 1400W |
| Voltage | 110V |
| Speed Range | 600-3600 RPM (6 variable speeds) |
| Power Source | Corded Electric |
| Cord Length | 6.56 ft (approx. 2 meters) |
| Material | Metal |
| Included Components | Polisher, 5 Burnishing Wheels (80#, 120#, 240#, 320# Grit) |
5. Setup
Before operating the machine, ensure proper assembly and preparation.
5.1 Unpacking:
- Carefully remove all components from the packaging.
- Verify that all listed components are present: Burnishing Polishing Machine, L-shape handle, anti-dust cover, and burnishing wheels (80#, 120#, 240#, 320# grit).
- Inspect the machine for any damage that may have occurred during shipping. Do not operate if damaged.
5.2 Attaching the Burnishing Wheel:
Follow these steps to securely attach the burnishing wheel:
- Install Protective Cover: Position the protective cover over the shaft and secure it.
- Install Polishing Wheel: Slide the desired burnishing wheel onto the shaft.
- Insert Two Shafts: Ensure the two shafts (or keyways) align and insert them into the wheel.
- Tighten the Screw: Use the provided wrench to tighten the retaining screw firmly.

Figure 5.1: Visual guide for installing the protective cover and burnishing wheel onto the machine.
5.3 Attaching the L-shape Handle:
- Attach the L-shape handle to the designated mounting point on the machine.
- Ensure it is securely fastened to provide stable grip during operation.
6. Operation
Operating your burnishing polishing machine safely and effectively.
6.1 Power Connection:
- Ensure the machine's power switch is in the "OFF" position.
- Plug the power cord into a standard 110V electrical outlet.
6.2 Speed Adjustment:
The machine features a 6-speed control dial to adjust the RPM according to the material and desired finish.
- Rotate the speed adjustment dial to select the desired RPM (600-3600 RPM).
- Lower speeds are suitable for delicate work or initial passes, while higher speeds are for aggressive material removal or fine finishing.

Figure 6.1: The speed control dial allows selection from 600 RPM to 3600 RPM. The operation locking button is also visible.
6.3 Starting and Stopping:
- To start the machine, press the operating switch.
- For continuous operation, press the operation lock button while the machine is running. This will keep the machine running without needing to hold the switch.
- To stop the machine, release the operating switch. If the operation lock is engaged, press the operating switch again to disengage the lock and stop the machine.
6.4 Polishing Techniques:
- Material Compatibility: This machine is suitable for burnishing and polishing stainless steel, non-ferrous steel, other metals, plastic, and wood.
- Wheel Selection: Choose the appropriate burnishing wheel grit (80#, 120#, 240#, 320#) based on the desired finish. Lower grit numbers (e.g., 80#) are for coarse material removal, while higher grit numbers (e.g., 320#) are for fine finishing.
- Application: Apply even, consistent pressure. Move the machine smoothly across the surface of the workpiece. Avoid excessive pressure, which can lead to overheating or uneven results.

Figure 6.2: The included burnishing wheels with different grit levels (80#, 120#, 240#, 320#) for various polishing needs, from coarse to ultra-fine.
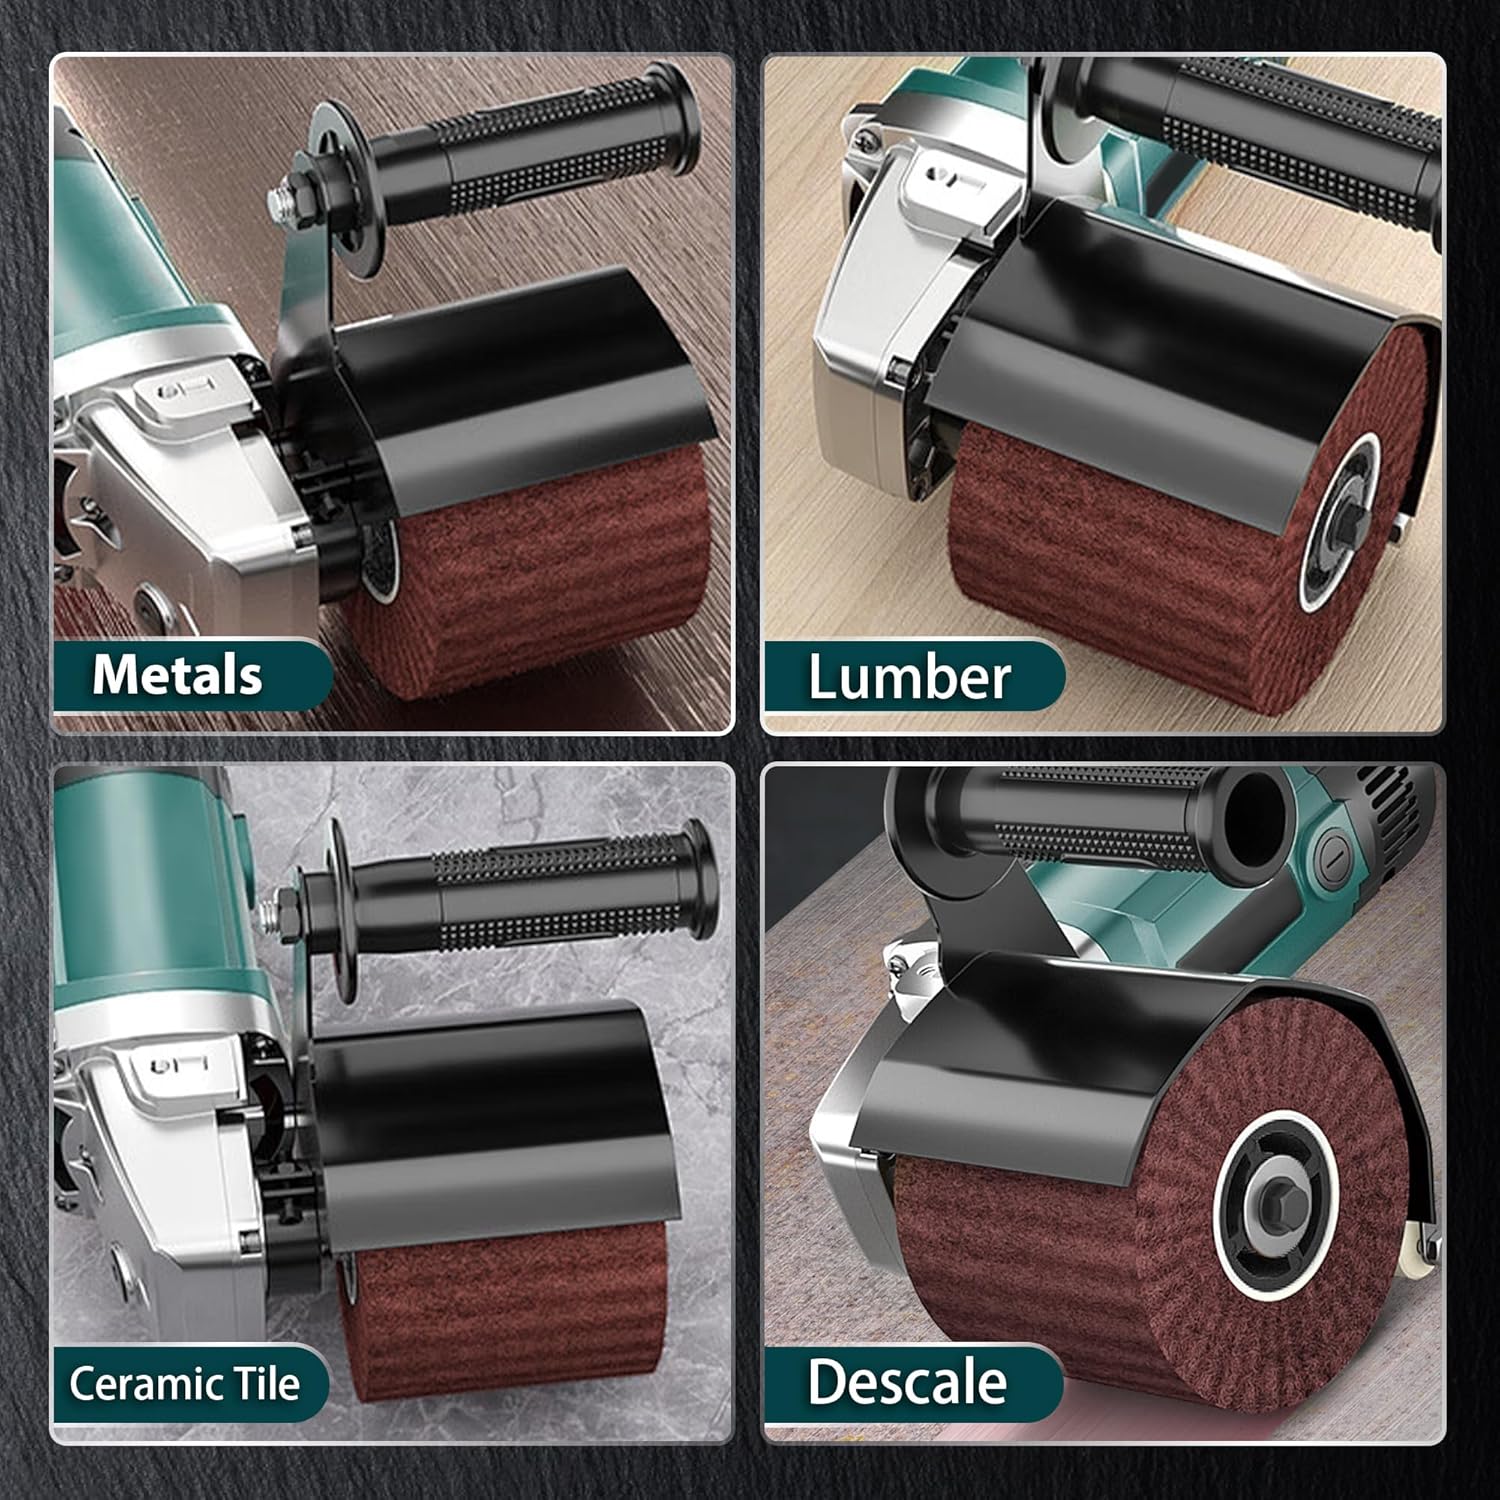
Figure 6.3: The burnishing machine can be used for various applications including polishing metals, lumber, ceramic tile, and descaling surfaces.
7. Maintenance
Regular maintenance ensures the longevity and optimal performance of your machine.
- Cleaning: After each use, unplug the machine and clean off any dust or debris from the machine body, especially around the vents and the dust cover. Use a soft, dry cloth. Do not use harsh chemicals or abrasive cleaners.
- Burnishing Wheel Inspection: Regularly inspect the burnishing wheels for wear and tear. Replace worn-out wheels to maintain polishing efficiency and prevent damage to the workpiece.
- Cord Inspection: Check the power cord for any cuts, fraying, or damage. If damaged, have it repaired by a qualified technician.
- Storage: Store the machine in a clean, dry place, away from direct sunlight and extreme temperatures. Keep it out of reach of children.
8. Troubleshooting
Common issues and their solutions.
| Problem | Possible Cause | Solution |
|---|---|---|
| Machine does not start | No power supply; Power switch off; Overheat protection activated | Check power outlet and cord; Ensure switch is ON; Allow machine to cool down |
| Reduced polishing efficiency | Worn-out burnishing wheel; Incorrect speed setting; Excessive pressure | Replace wheel; Adjust speed; Apply lighter, even pressure |
| Machine overheats quickly | Blocked vents; Continuous heavy use; Excessive pressure | Clean vents; Allow machine to rest; Reduce pressure |
| Unusual noise or vibration | Loose components; Damaged wheel; Internal issue | Check all fasteners; Replace wheel; Contact customer support if persists |
9. Warranty and Support
For warranty information or technical support, please contact GEVEELIFE customer service through the retailer where the product was purchased or refer to the warranty card included with your product. Please have your model number (B0CV5BFQRR) and purchase date ready when contacting support.