1. Introduction
This manual provides essential information for the safe and efficient operation of your Brother NQ3550W Sewing & Embroidery Machine. Please read this manual thoroughly before using the machine to ensure proper setup, usage, and maintenance. Retain this manual for future reference.

Figure 1: Brother NQ3550W Sewing and Embroidery Machine.
2. Safety Information
Always follow basic safety precautions when using electrical appliances to reduce the risk of fire, electric shock, or injury to persons.
- Do not operate the machine with a damaged cord or plug.
- Keep fingers away from all moving parts. Special care is required around the sewing machine needle.
- Always use the proper needle plate. The wrong plate can cause the needle to break.
- Turn off the machine when making any adjustments in the needle area, such as threading the needle, changing the needle, or changing the presser foot.
- Never drop or insert any object into any opening.
- Do not use outdoors.
3. What's Included
Your Brother NQ3550W machine comes with a comprehensive set of accessories to support both sewing and embroidery functions:
- Presser Feet: Zigzag foot, Monogramming foot, Overcasting foot, Zipper foot, Buttonhole foot, Blind stitch foot, Button fitting foot, Embroidery foot, Open toe foot, Free motion open toe quilting foot, Non stick foot, Stitch guide foot, Adjustable zipper/piping foot.
- Needle & Bobbin Accessories: Needle set, Twin needle, Bobbins, Bobbin center pin, Alternate bobbin case.
- Maintenance Tools: Seam ripper, Scissors, Cleaning brush, Eyelet punch, Screwdrivers.
- Thread Management: Horizontal spool pin, Spool caps, Thread spool insert, Spool net.
- Embroidery Hoops: 10" x 6" and 5" x 7" embroidery frames.
- Control: Knee lifter, Foot controller.
- Software: Brother BES BLUE Embroidery Software.
- Additional Hoop: Brother Magnetic Sash Frame Embroidery Hoop SAMF180 (5” x 7”).
- Instructional Videos: Embroidery Magic: A Quick Start Guide to Your Embroidery Machine by Mr. Vac & Mrs. Sew Video, Ready, Set, Sew: A Quick Start Guide to Your Sewing Machine by Mr. Vac & Mrs. Sew Video.
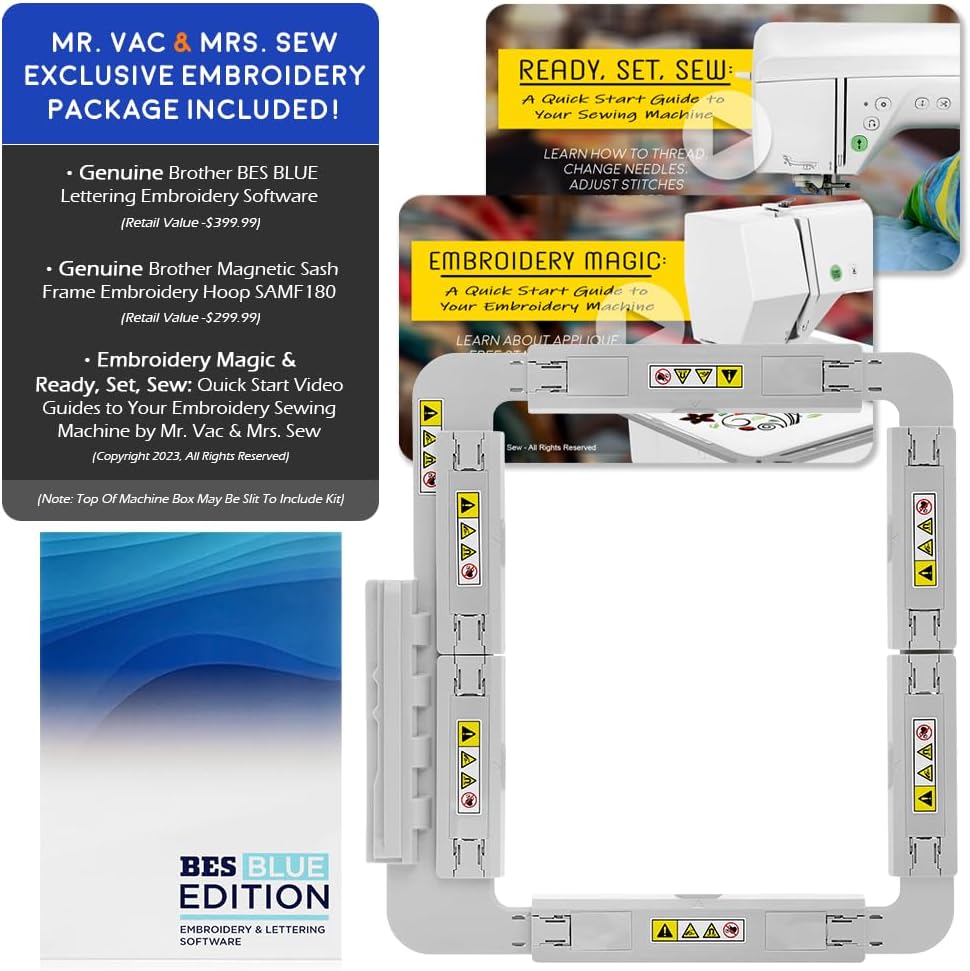
Figure 2: Included accessories such as BES BLUE software and magnetic hoop.
4. Setup
Follow these steps to prepare your machine for use:
- Unpacking: Carefully remove the machine and all accessories from the packaging. Retain packaging for storage or transport.
- Power Connection: Connect the power cord to the machine and then to a suitable electrical outlet.
- Foot Controller: Plug the foot controller into its designated port on the machine.
- Threading the Machine: Refer to the detailed threading instructions in the operation manual. Ensure the bobbin is correctly inserted into the quick-set bobbin system.
- Needle Installation: Install the appropriate needle for your fabric type.

Figure 3: Proper needle and threading setup is crucial for optimal performance.
5. Key Features
5.1. BES BLUE Embroidery Software
The included BES BLUE Embroidery Software offers extensive embroidery and lettering features, including on-screen typing, sewing order management, font categories, fills, and underlay options. It comes with over 800 embroidery designs and 199 built-in digitized fonts.

Figure 4: Overview of BES BLUE Embroidery Software capabilities.
5.2. Magnetic Sash Frame Embroidery Hoop SAMF180
This 5” x 7” magnetic flat frame is designed for ease of use, allowing you to hoop and embroider materials up to 2MM in thickness with its six strong magnets.
5.3. Built-In Designs & Stitches with Wireless Capability
The machine features 258 built-in embroidery designs and 291 built-in sewing stitches. Its WLAN capability allows for wireless transfer of designs, with additional officially licensed designs available from iBroidery.

Figure 5: Wireless design transfer functionality.
5.4. Programmed Thread Trimming
The machine automatically cuts both the upper and lower threads at the end of each thread color, simplifying the embroidery process.
5.5. Large Embroidery Field & LCD Touch Screen
An extra-large 6" x 10" embroidery field accommodates large projects. The 3.67" full-color LCD touch screen allows for on-screen editing, including design positioning, rotation, reflection, and tracing.

Figure 6: The intuitive LCD touch screen for design management.
5.6. Automatic Needle Threader
The integrated automatic needle threader simplifies the threading process, saving time and reducing eye strain.

Figure 7: Detail of the automatic needle threader.
5.7. Quick Set Bobbin System
The quick-set bobbin system allows for easy and fast bobbin insertion, ensuring smooth operation.

Figure 8: The quick-set bobbin system in action.
5.8. USB Port
A USB port is available for importing additional embroidery designs from external storage devices.

Figure 9: Location of the USB port for design transfer.
5.9. Free Arm Capability & Accessory Storage
The machine features a free arm for sewing cylindrical items like sleeves and pant legs, along with integrated accessory storage to keep your tools organized.

Figure 10: Free arm and accessory storage compartment.
6. Operating Instructions
Your NQ3550W machine offers both sewing and embroidery functionalities. Detailed instructions for specific operations are available in the full operation manual.
6.1. Basic Sewing
- Select your desired stitch from the 291 built-in options using the LCD touch screen.
- Place your fabric under the presser foot.
- Use the foot controller or the Start/Stop button to begin sewing.
- Adjust speed using the speed control slider.

Figure 11: The machine's large work area facilitates sewing larger projects.
6.2. Embroidery Operation
- Attach the embroidery unit and hoop your fabric securely.
- Select a built-in design or import one via USB or WLAN.
- Edit the design on the LCD touch screen as needed (size, position, rotation).
- Start the embroidery process. The machine will automatically trim threads between color changes.

Figure 12: The embroidery foot precisely executing a design.
7. Maintenance
Regular maintenance ensures the longevity and optimal performance of your machine:
- Cleaning: Regularly clean the bobbin case, feed dogs, and needle plate area using the provided cleaning brush. Remove any lint or thread buildup.
- Needle Replacement: Replace the needle frequently, especially when sewing different fabric types or if it becomes dull or bent.
- Lubrication: Refer to your full operation manual for specific lubrication points and frequency.
- Storage: When not in use, cover the machine to protect it from dust.
8. Troubleshooting
Below are common issues and their potential solutions. For more complex problems, consult the full operation manual or contact customer support.
| Problem | Possible Cause | Solution |
|---|---|---|
| Skipped Stitches | Incorrect needle, bent needle, improper threading. | Change needle, rethread machine, ensure correct needle type for fabric. |
| Thread Breakage | Incorrect tension, poor quality thread, burr on needle plate. | Adjust tension, use quality thread, check for burrs. |
| Machine Not Starting | Power cord loose, foot controller not connected, safety features engaged. | Check power and foot controller connections, ensure presser foot is down. |
9. Specifications
Key technical specifications for the Brother NQ3550W Sewing & Embroidery Machine:
| Feature | Detail |
|---|---|
| Brand | Brother |
| Model Number | NQ3550W |
| Product Dimensions (D x W x H) | 16.62" x 19.25" x 11.87" |
| Power Source | AC/DC Electric |
| Embroidery Field Size | 6" x 10" |
| Built-In Embroidery Designs | 258 |
| Built-In Sewing Stitches | 291 |
| LCD Touch Screen Size | 3.67" Full Color |
| Connectivity | WLAN, USB Port |
10. Warranty and Support
For warranty information and customer support, please refer to the warranty card included with your product or visit the official Brother support website. Keep your purchase receipt as proof of purchase for any warranty claims.
For additional assistance, you may contact the seller, Mr. Vac & Mrs. Sew, who offers customer support and a 30-day easy returns policy.