Introduction
This manual provides detailed instructions for the proper use and maintenance of your Levenhuk Atom DNB250 Digital Day and Night Vision Binoculars. Please read this manual thoroughly before operating the device to ensure optimal performance and longevity. The Levenhuk Atom DNB250 offers high-definition imaging for both day and night observations, featuring optical and digital magnification, infrared illumination, and recording capabilities.
Package Contents
Carefully unpack the box and ensure all items listed below are present and in good condition. If any items are missing or damaged, please contact your retailer.
- Levenhuk Atom DNB250 Digital Night Vision Binoculars
- Carrying Pouch
- Neck Strap
- Removable Rechargeable Battery
- USB Type-C Cable
- Cleaning Wipe
- User Manual
- Warranty Card

Image: Levenhuk Atom DNB250 Digital Night Vision Binoculars with all included accessories laid out.
Product Overview
Controls and Ports

Image: Top view of the binoculars highlighting the control panel.
- Power Button: Turns the device on or off.
- IR Button: Activates and adjusts the infrared illuminator brightness levels.
- OK Button: Confirms selections and takes photos/starts video recording.
- Menu Button: Accesses the device settings menu.
- Zoom In/Up Button (+): Increases digital magnification or navigates up in menus.
- Zoom Out/Down Button (-): Decreases digital magnification or navigates down in menus.

Image: Side view of the binoculars showing the USB-C port and microSD card slot.
- MicroSD Card Slot: For inserting a memory card (up to 128GB, not included) to store photos and videos.
- USB Type-C Port: For charging the device and transferring data to a computer.
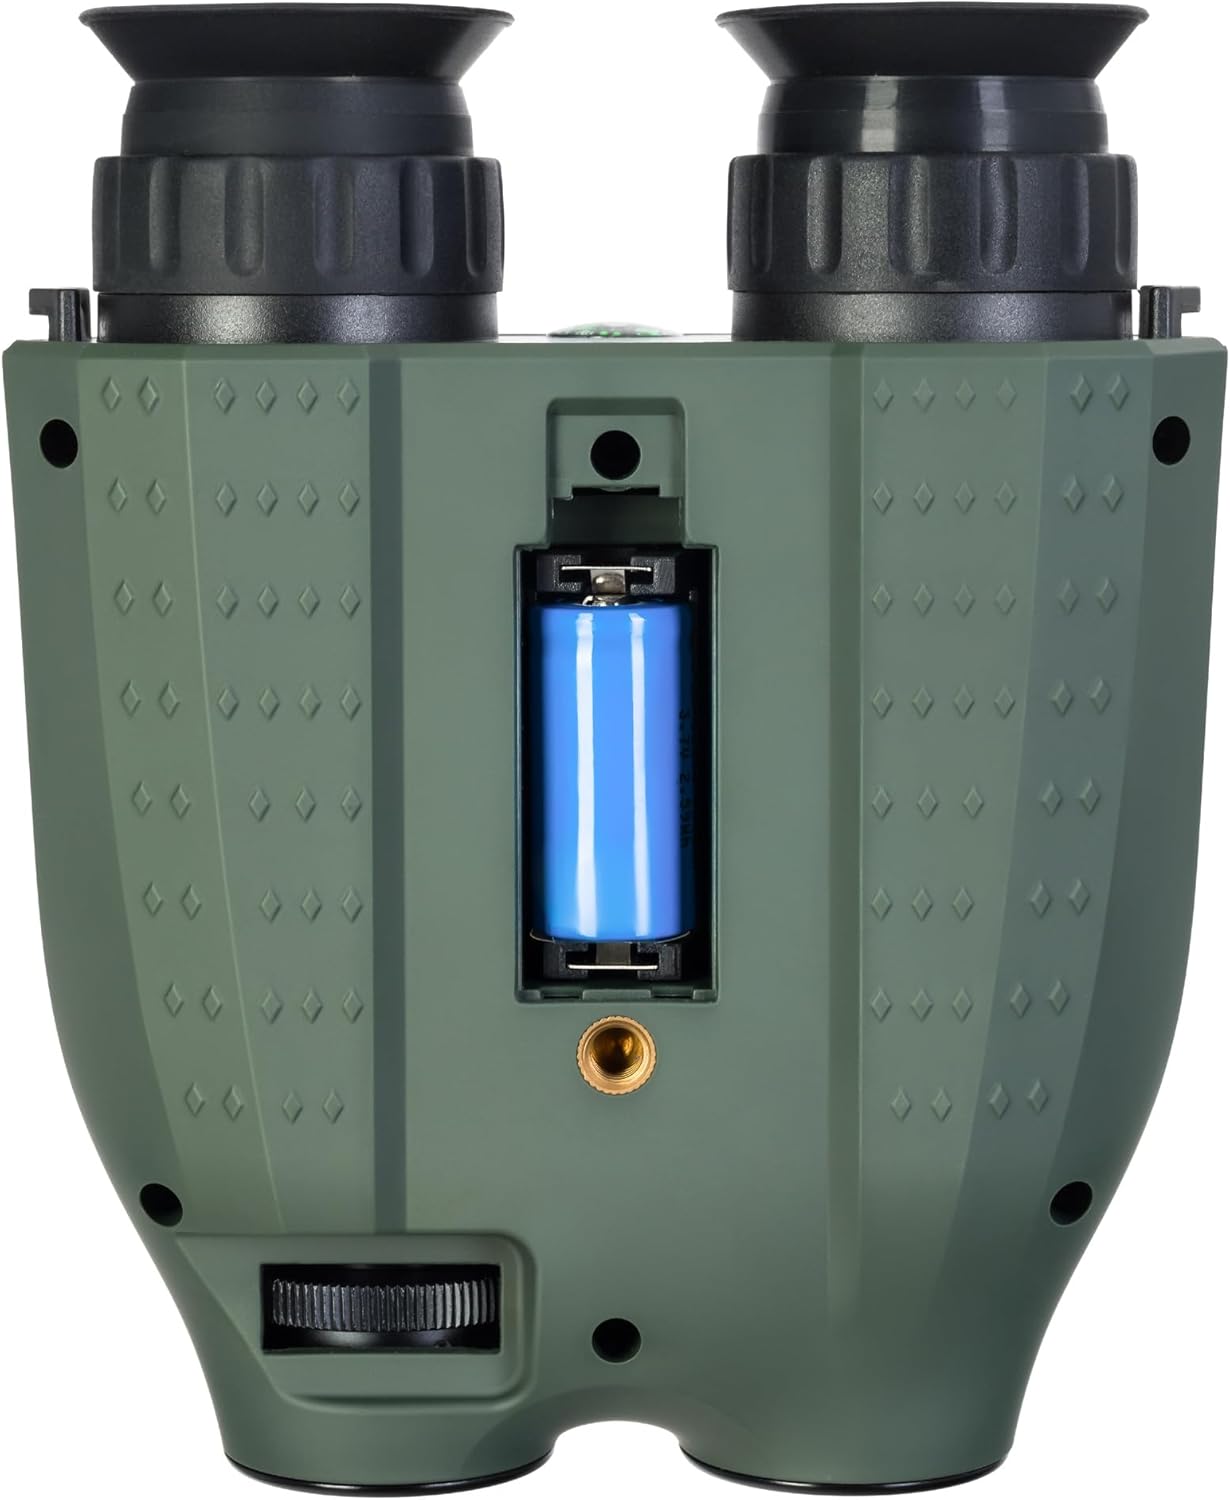
Image: Bottom view of the binoculars showing the battery compartment and tripod mounting thread.
- Battery Compartment: Houses the removable rechargeable battery.
- Tripod Mounting Thread: Allows attachment to a standard tripod.
Setup
1. Battery Installation
- Locate the battery compartment on the bottom of the device.
- Open the compartment cover.
- Insert the provided rechargeable battery, ensuring correct polarity.
- Close the battery compartment cover securely.
2. Memory Card Installation
A microSD card (up to 128GB) is required for storing photos and videos. It is not included in the package.
- Locate the microSD card slot on the side of the device.
- Gently insert the microSD card into the slot until it clicks into place.
- To remove, press the card inward until it springs out.
3. Charging the Battery
Before first use, fully charge the battery. The device can be charged using the supplied USB Type-C cable.
- Connect the USB Type-C cable to the device's USB port.
- Connect the other end of the cable to a USB power source (e.g., computer, wall adapter - not included).
- The charging indicator will show the charging status.
Operation
1. Powering On/Off
- To power on, press and hold the Power Button until the display activates.
- To power off, press and hold the Power Button again until the display shuts down.
2. Focus Adjustment
Adjust the focus by rotating the eyepiece rings until the image appears clear on the internal displays.
3. Magnification (Optical and Digital Zoom)
The device features 6x optical magnification and up to 8x digital zoom.
- Use the Zoom In (+) and Zoom Out (-) buttons to adjust the digital magnification.
4. Infrared (IR) Illumination
The infrared illuminator enhances visibility in low-light or complete darkness. It has three brightness levels.
- Press the IR Button to cycle through the IR brightness levels (Low, Medium, High, Off).
- The IR illuminator automatically adapts to lighting conditions.
5. Photo and Video Recording
The built-in recorder captures observations as photos (JPG, up to 8000x6000px) and videos (AVI, up to 2560x1440px).
- To take a photo: Press the OK Button once.
- To start video recording: Press and hold the OK Button. Press again to stop recording.
- Captured media is stored on the inserted microSD card.
6. Display Modes
The binoculars are equipped with two color IPS screens that can be used together or separately.
- Day shooting provides full-color images.
- Night shooting provides monochrome images for enhanced visibility in darkness.
Video: An overview of the Levenhuk Atom DNB250 Digital Night Vision Binoculars, demonstrating key features such as night vision range, magnification, high-resolution screen, photo/video capture, IR illumination, battery life, and mounting options.
Mounting Options
The Levenhuk Atom DNB250 can be used handheld or mounted for stable observation.
- Tripod Mounting: The device features a standard tripod mounting thread on its base, allowing it to be attached to a tabletop tripod (included) or any compatible full-size tripod for extended, stable viewing and recording.
- Helmet Mounting: The NVD can also be mounted on a helmet for hands-free operation (helmet mount not included).
Maintenance and Care
- Cleaning: Use the provided cleaning wipe to gently clean the lenses and external surfaces. Avoid abrasive materials or harsh chemicals.
- Storage: When not in use, store the binoculars in the carrying pouch in a cool, dry place, away from direct sunlight and extreme temperatures.
- Battery Care: Remove the battery if the device will not be used for an extended period.
- Durability: The device features a lightweight and durable ABS plastic body with a polymer coating for increased damage resistance and a reliable grip.
Troubleshooting
| Problem | Possible Cause | Solution |
|---|---|---|
| Device does not power on. | Low or uncharged battery; incorrectly installed battery. | Charge the battery; ensure battery is installed with correct polarity. |
| Image is blurry. | Improper focus adjustment. | Adjust the eyepiece rings until the image is clear. |
| Cannot record photos/videos. | No microSD card; full microSD card; faulty microSD card. | Insert a microSD card; delete old files or use a new card; try a different card. |
| Poor night vision performance. | IR illuminator off or on low setting. | Increase IR brightness using the IR button. |
Specifications
| Feature | Detail |
|---|---|
| Model Number | 83055 |
| Optical Magnification | 6x |
| Digital Zoom | 1-8x |
| Objective Lens Diameter | 21.3 mm |
| Night Vision Range | Up to 300 meters |
| Day Vision Range | Up to 1000 meters |
| Infrared Illuminator | Yes, with 3 brightness levels |
| Photo Resolution | Up to 8000 x 6000px (JPG) |
| Video Resolution | Up to 2560 x 1440px (AVI) |
| Memory Card Support | MicroSD up to 128GB (not included) |
| Battery Type | Removable 700mAh rechargeable battery |
| Battery Life (Night) | Up to 2 hours (IR activated) |
| Battery Life (Day) | Up to 10 hours |
| Material | Acrylonitrile Butadiene Styrene (ABS) |
| Mounting Type | Tripod mount |
| Dimensions (L x W x H) | 17 x 7 x 17.5 cm |
| Weight | 700 grams |
Warranty and Support
Levenhuk provides a lifetime warranty for all elements of this device, reflecting its commitment to high quality and standards. For warranty claims or technical support, please refer to the warranty card included in your package or visit the official Levenhuk website.