1. Introduction
The NEEWER Q300 is a versatile and powerful 300W outdoor strobe flash designed for professional photography. It features a stable 5600K color temperature, a high-capacity 7800mAh lithium battery providing up to 1000 full-power flashes, and a fast recycling time of 0.4 to 2.5 seconds. With multiple operating modes including Manual, Multi, S1, S2, and Fast, along with a 2.4G wireless Q system, the Q300 offers flexible and precise lighting control for various shooting scenarios. Its robust design and Bowens mount compatibility make it an essential tool for both studio and outdoor photography.
2. Safety Information
Please read all safety instructions carefully before using the NEEWER Q300 flash. Improper use can lead to electric shock, fire, or serious injury.
- Do not disassemble or modify the flash unit. Repairs should only be performed by authorized service personnel.
- Do not expose the unit to rain, moisture, or extreme temperatures.
- Avoid direct eye exposure to the flash light, especially at full power, as it can cause temporary vision impairment.
- Ensure the battery is inserted correctly and charged using only the provided charger.
- Keep the unit away from flammable materials.
- Disconnect the power cable before cleaning or when not in use for extended periods.
- This product is not waterproof. Avoid using it in wet conditions.
3. Package Contents
Verify that all items listed below are included in your package:
- 1 x NEEWER Q300 Strobe Light
- 1 x Q Compact Trigger
- 1 x Protective Cover
- 1 x Battery Charger
- 1 x Charging Cable
- 1 x Lithium Battery (10.8V 7800mAh)
- 1 x Standard Reflector
- 1 x Diffuser Cloth
- 1 x 3.5mm Sync Cable
- 1 x User Manual
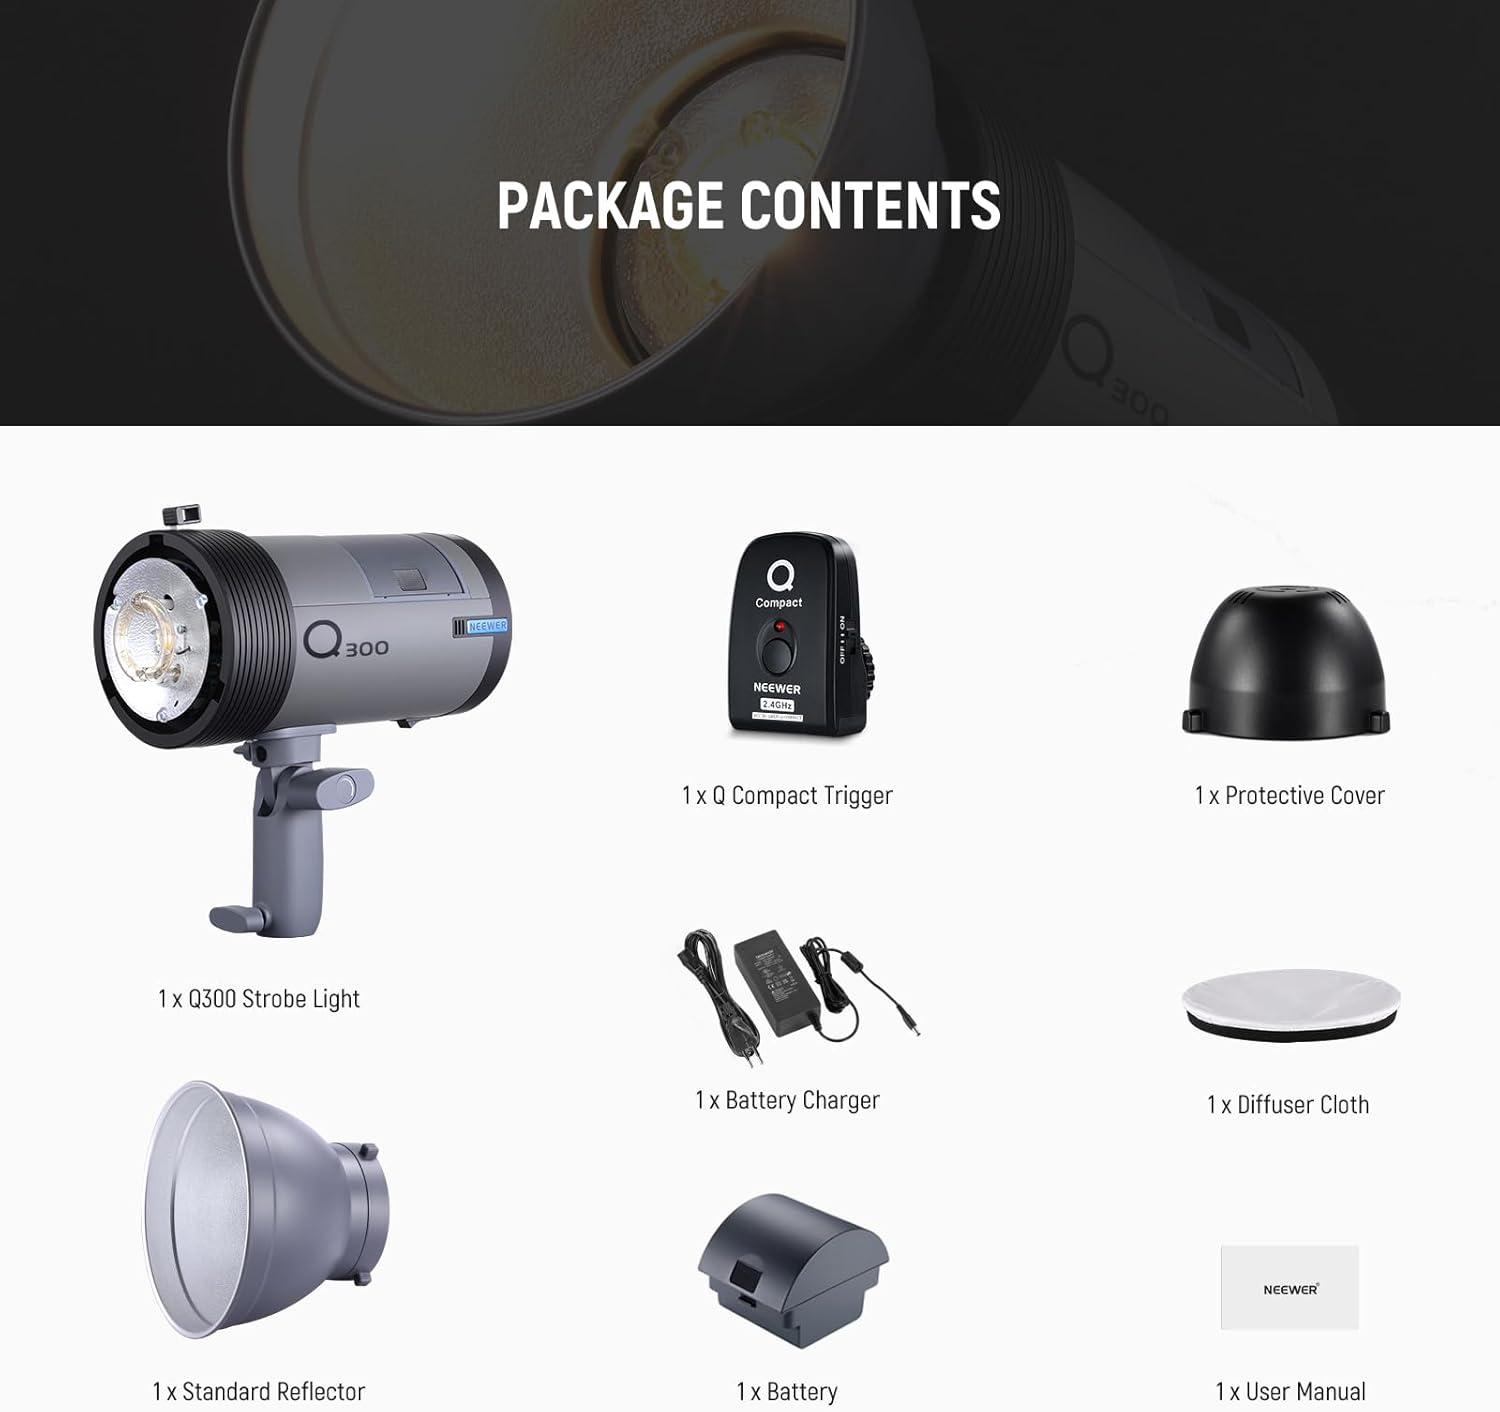
Image: Contents of the NEEWER Q300 package, including the strobe light, Q Compact trigger, protective cover, charger, battery, reflector, diffuser, and sync cable.
4. Product Overview
Familiarize yourself with the main components and controls of the NEEWER Q300 flash unit.

Image: The NEEWER Q300 strobe light with its standard reflector attached, alongside the compact wireless trigger.
4.1 Key Features
- High Power Output: 300Ws with GN60 (1m, ISO100) for powerful illumination.
- Stable Color Temperature: 5600K (±200K) for consistent lighting.
- 13W LED Modeling Lamp: 3050K color temperature, 5010 lux at 0.5m.
- High Capacity Battery: 10.8V 7800mAh lithium battery, providing up to 1000 full-power flashes.
- Fast Recycling Time: 0.4-2.5 seconds.
- Multiple Flash Modes: Manual (M), Multi (Stroboscopic), Optical Slave (S1/S2), and Fast (FP).
- 2.4G Wireless Q System: Supports 5 groups (A/B/C/D/E) and 32 channels for remote control.
- Bowens Mount: Compatible with a wide range of light modifiers.
- Adjustable Handle: Allows 180° rotation for flexible positioning.

Image: Visual representation of the Q300's 300Ws power, GN60, 5600K stable color temperature, and the 13W LED modeling lamp with its specifications.

Image: Demonstrates the Bowens mount for attaching various light modifiers and the adjustable handle allowing 180-degree angle rotation.
4.2 Control Panel and Display
The Q300 features an intuitive control panel and an HD display for easy operation and setting adjustments.

Image: Close-up view of the Q300's HD display showing settings and the simple control panel with clearly labeled buttons for efficient adjustment.
5. Setup
5.1 Battery Installation
- Ensure the flash unit is powered off.
- Locate the battery compartment on the rear of the flash unit.
- Slide the battery into the compartment until it clicks securely into place.
- To remove, press the release button and slide the battery out.
5.2 Attaching Light Modifiers
The Q300 features a standard Bowens mount for attaching various light modifiers.
- Align the modifier's mount with the Bowens mount on the flash unit.
- Twist the modifier clockwise until it locks securely.
- To remove, press the release button on the Bowens mount and twist the modifier counter-clockwise.
5.3 Mounting on a Light Stand
The adjustable handle allows for easy mounting on a light stand.
- Loosen the locking knob on the adjustable handle.
- Slide the handle onto the light stand's spigot.
- Tighten the locking knob to secure the flash unit.
- Adjust the angle of the flash as needed and tighten the angle adjustment knob.
6. Operating Instructions
6.1 Power On/Off
Press and hold the power button on the control panel to turn the unit on or off.
6.2 Flash Modes
The Q300 supports several flash modes. Press the 'MODE' button to cycle through them.
- Manual (M) Mode: Allows manual adjustment of flash power from 1/64 to 1/1. Use the dial to change power levels.
- Multi (Stroboscopic) Mode: Fires a series of rapid flashes. Adjust flash frequency (Hz) and number of flashes. Max 20 flashes at 20Hz.
- Optical Slave (S1/S2) Mode: The flash triggers when it detects another flash. S1 mode triggers on the first flash, S2 ignores the pre-flash of a TTL system.
- Fast (FP) Mode: Allows selection of 10 levels of flash duration from 1/1000s to 1/10000s.

Image: Illustrates the different flash modes (Manual, Multi, Optical Slave) and the full power flash duration of 1/220s.

Image: Shows the adjustable flash duration settings (F1-FP) ranging from 1/1000s to 1/10000s, along with the recycling time.
6.3 Wireless Control (2.4G Q System)
The Q300 integrates with the NEEWER 2.4G Wireless Q System, allowing it to function as a slave unit.
- Setting Group and Channel: Use the 'SET' and 'CH' buttons on the flash unit to select the desired group (A/B/C/D/E) and channel (1-32). Ensure your master trigger (e.g., Q Compact, QPRO, Z1, Z2, Z760) is set to the same group and channel.
- Using the Q Compact Trigger: Mount the Q Compact trigger onto your camera's hot shoe. This trigger operates on 16 channels within 30 meters.
- Sync Cable Triggering: Alternatively, connect your camera to the flash unit using the included 3.5mm sync cable for wired triggering.
Note: The Q300 does not support TTL or HSS (High-Speed Sync) modes. Maximum sync speed is 1/200s when used with the Q Compact trigger.

Image: Details of the Q Compact wireless trigger, its range and channels, and an overview of the NEEWER Q System showing compatibility with various master flashes and group/channel settings.
6.4 Modeling Lamp Operation
The 13W LED modeling lamp can be turned on or off independently to assist with lighting setup and focus.
- Locate the modeling lamp button on the control panel.
- Press the button to toggle the modeling lamp on or off.
7. Battery and Charging
The NEEWER Q300 is powered by a high-capacity 10.8V 7800mAh lithium battery.
7.1 Charging the Battery
- Connect the charging cable to the battery charger.
- Plug the charger into a suitable power outlet.
- Connect the charger to the battery. The charging indicator will show the charging status.
- A full charge takes approximately 5 hours. The indicator will change when charging is complete.
7.2 Battery Protection
The battery features intelligent protection mechanisms:
- Overheat Protection: Prevents damage from excessive heat.
- Overvoltage Protection: Safeguards against voltage spikes.
- Overcharge Protection: Prevents battery damage from prolonged charging.
- Low Battery Indicator: Alerts you when the battery level is low, prompting a recharge.

Image: Shows the high-capacity lithium battery, its specifications, charging process, and the built-in overheat, overvoltage, and overcharge protection features.
8. Maintenance
Proper maintenance ensures the longevity and optimal performance of your NEEWER Q300 flash.
- Cleaning: Use a soft, dry cloth to clean the exterior of the flash unit. Do not use abrasive cleaners or solvents.
- Storage: Store the flash unit in a cool, dry place away from direct sunlight and excessive humidity. If storing for extended periods, remove the battery.
- Flash Tube: The flash tube is removable and replaceable. If replacement is needed, consult authorized service personnel or refer to specific replacement instructions.
- Battery Care: For optimal battery life, avoid fully discharging the battery frequently. Recharge it regularly, even if not in use.
9. Troubleshooting
If you encounter issues with your NEEWER Q300 flash, refer to the following common problems and solutions:
| Problem | Possible Cause | Solution |
|---|---|---|
| Flash does not fire. | Low battery; Incorrect trigger settings (group/channel); Sync cable not connected; Flash unit not powered on. | Charge the battery; Verify group and channel settings on both flash and trigger; Ensure sync cable is securely connected; Power on the flash unit. |
| Long recycling time. | Low battery; High power output setting. | Recharge the battery; Reduce flash power output. |
| Wireless trigger not working. | Incorrect group/channel; Out of range; Trigger battery low. | Match group and channel settings; Move closer to the flash unit (within 30m); Replace or charge trigger battery. |
| Modeling lamp not working. | Modeling lamp turned off; Unit overheating. | Press the modeling lamp button to turn it on; Allow the unit to cool down if overheating. |
| Flash unit overheats. | Excessive continuous use at high power. | Allow the unit to cool down. Reduce frequency of flashes or power output. |
10. Specifications
Detailed technical specifications for the NEEWER Q300 flash unit.
| Feature | Specification |
|---|---|
| Model | Q300 (10103480) |
| Max Power | 300Ws |
| Guide Number (GN) | GN60 (1m, ISO 100) |
| Color Temperature | 5600K (±200K) |
| Flash Power Adjustment | 1/64 - 1/1 |
| Recycling Time | 0.4 - 2.5s |
| Full Power Flash Duration | 1/220s |
| Fast Mode Flash Duration | 1/1000s - 1/10000s (10 levels) |
| Modeling Lamp | 13W LED, 3050K, 5010 lux @ 0.5m |
| Battery Type | 10.8V 7800mAh Lithium Battery |
| Full Power Flashes per Charge | ≤ 1000 |
| Charging Time | Approx. 5 hours |
| Wireless Control | 2.4G Radio System |
| Wireless Groups | 5 (A/B/C/D/E) |
| Wireless Channels | 32 |
| Mount Type | Bowens Mount |
| Dimensions (L x W x H) | 11.2 x 11.2 x 22.85 cm |
| Weight | 2.2 kg (unit only) |
| Compatible Cameras | Canon, Nikon, Panasonic, Olympus, Pentax, Fujifilm, Sony (Mi Hot Shoe) - Excluding Canon EOS Rebel SL3/250D T7/1500D 2000D T100/3000D 4000D |
11. Warranty and Support
NEEWER products are designed for reliability and performance. For warranty information, technical support, or service inquiries, please contact NEEWER customer support through their official website or the retailer from whom you purchased the product. Please retain your proof of purchase for warranty claims.


