1. Introduction
This manual provides detailed instructions for the installation, operation, and maintenance of the GATEXPERT Control Board, model PY600-B-HOMELINK. This control board is designed as a replacement component specifically for the GATEXPERT DKC500ACL-Homelink sliding gate opener system. It operates at a frequency of 315MHz and is exclusively compatible with the GATEXPERT RT03-B remote control.
Key features of this control board include a soft start/close function to protect the gate mechanism, adjustable automatic close time settings (12s, 24s, and 36s), and a remote control mode switch for single or four-channel operation.
2. Safety Information
WARNING: Improper installation or use can lead to serious injury or property damage. Always follow these safety guidelines:
- Ensure all power to the gate opener system is disconnected before attempting any installation, maintenance, or repair.
- Installation should only be performed by qualified personnel with electrical knowledge.
- Do not operate the gate opener if any part of the system is damaged or malfunctioning.
- Keep hands, feet, and clothing clear of the gate and its moving parts.
- This control board is for use with GATEXPERT DKC500ACL-Homelink sliding gate openers only. Using it with incompatible systems may cause damage or malfunction.
3. Package Contents
Verify that all components are present and undamaged upon opening the package:
- 1 x GATEXPERT PY600-B-HOMELINK Control Board
4. Product Overview
Familiarize yourself with the various components and connection points on the control board.

Figure 4.1: Top-down view of the GATEXPERT PY600-B-HOMELINK control board. This image displays the layout of the circuit board, including the main processor, relays, capacitors, green terminal blocks for wiring connections, a set of red DIP switches, and four black potentiometers (VR1-VR4) for adjustments. An antenna wire is also visible.
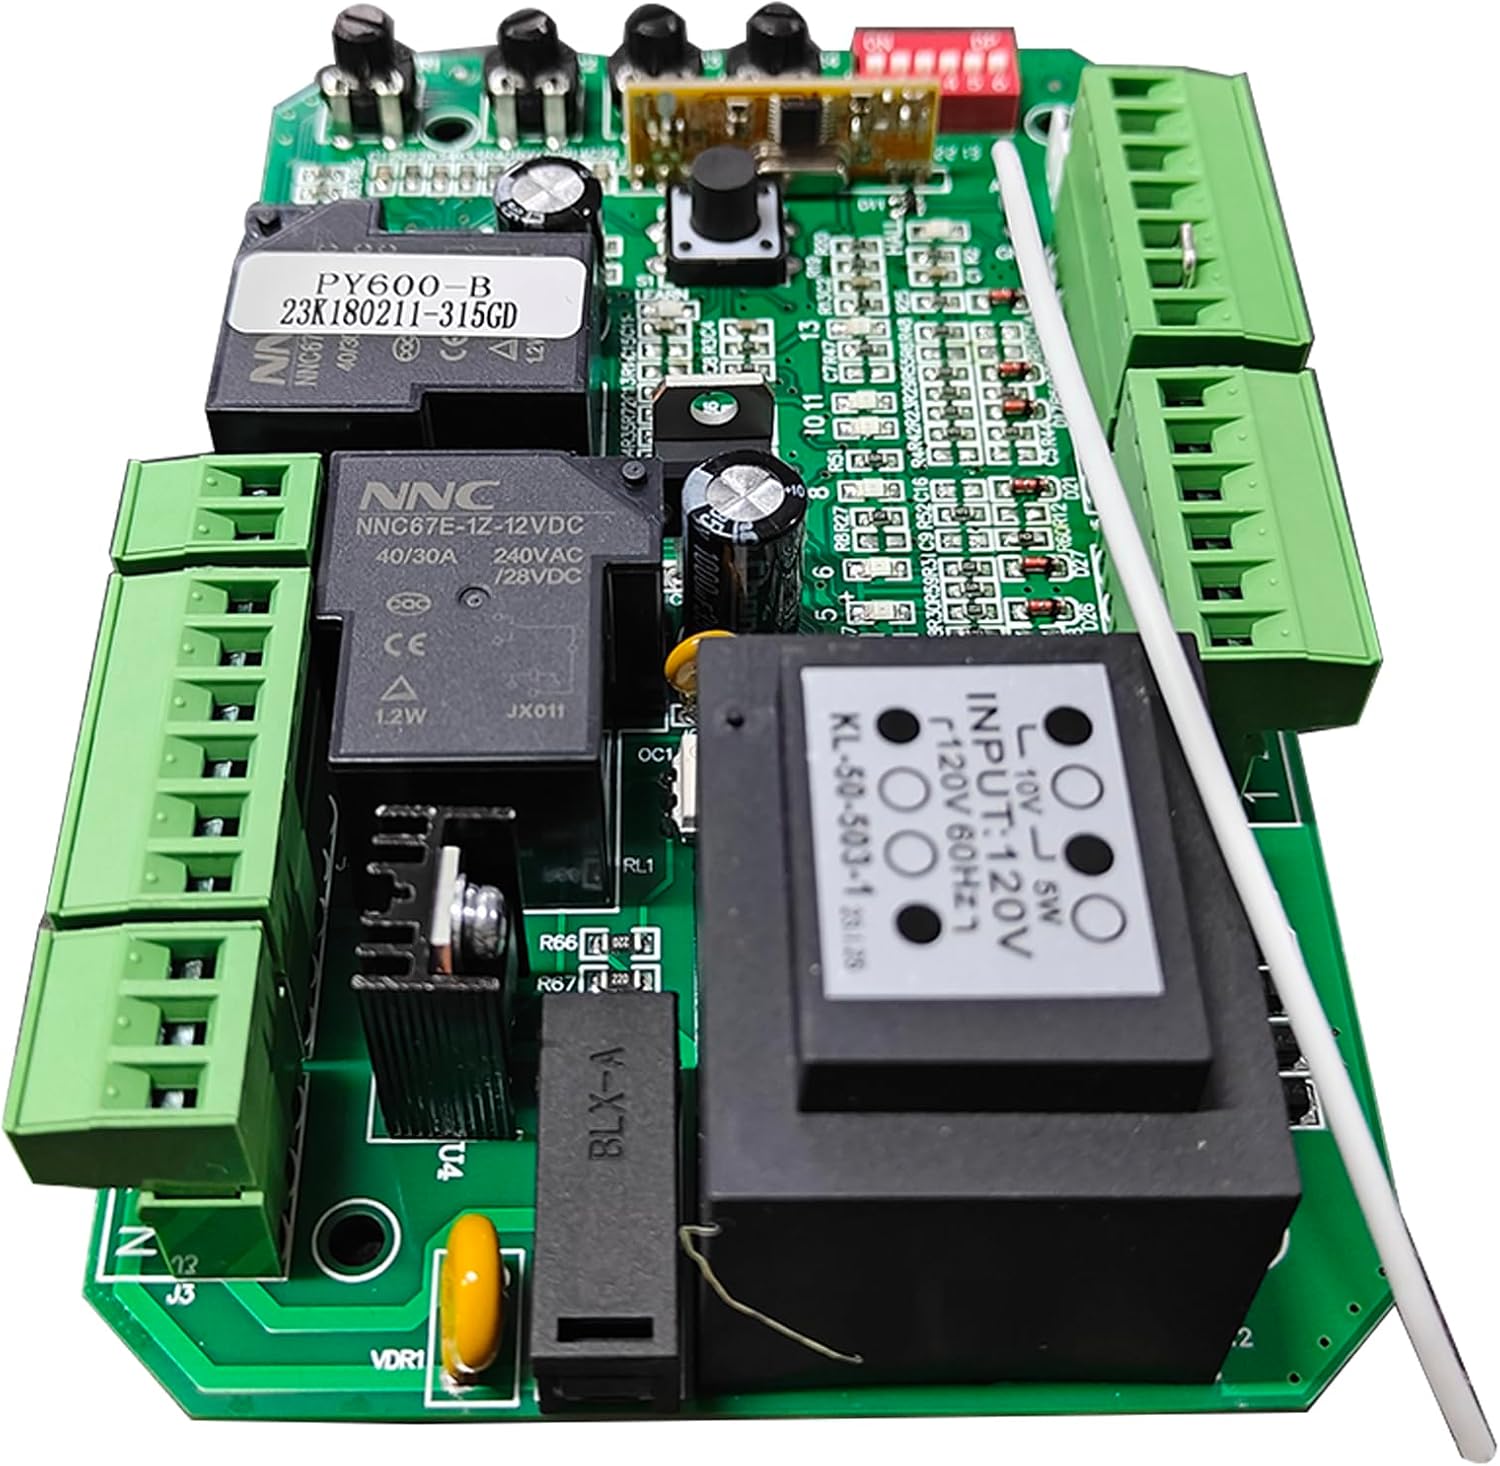
Figure 4.2: Angled view of the control board, showing the power input transformer (black rectangular component) and the various green terminal blocks where external wiring for power, motor, and accessories are connected. The DIP switches and potentiometers are also visible at the top edge.

Figure 4.3: Close-up angled view of the control board, emphasizing the small black "LEARN" button located near the center, used for remote control pairing. The white antenna wire and its connection point are also clearly visible.
Key Components:
- Terminal Blocks: Green connectors for wiring power, motor, and accessory connections.
- DIP Switches (ON/DP 1-6): Used for configuring various operational parameters.
- Potentiometers (VR1-VR4): Adjustable resistors for fine-tuning settings such as motor force or sensitivity.
- LEARN Button: Used for pairing remote controls.
- Antenna: Receives signals from remote controls.
5. Setup and Installation
This control board is a replacement part. Installation requires technical knowledge of gate opener systems and electrical wiring. If you are not confident in your ability to perform this installation, it is recommended to seek assistance from a qualified technician.
- Disconnect Power: Before beginning, ensure the main power supply to the gate opener is completely disconnected.
- Access Control Box: Open the gate opener's control box to access the existing control board.
- Document Wiring: Carefully photograph or diagram all existing wiring connections to the old control board. This is crucial for correct re-connection.
- Remove Old Board: Disconnect all wires and mounting screws from the old control board and remove it.
- Install New Board: Mount the new GATEXPERT PY600-B-HOMELINK control board in the same position as the old one.
- Reconnect Wiring: Using your documented wiring diagram, carefully reconnect all wires to the corresponding terminal blocks on the new board. Ensure all connections are secure.
- Initial Power-Up: Restore power to the gate opener. Observe for any unusual behavior or error indicators.
- Configuration: Proceed to Section 6 for initial configuration and remote control pairing.
6. Operating Instructions and Configuration
This section details how to configure and operate your GATEXPERT control board.
6.1. Remote Control Pairing (RT03-B)
The control board is compatible only with the GATEXPERT RT03-B remote control. To pair a remote:
- Press and hold the LEARN button on the control board (refer to Figure 4.3 for location).
- While holding the LEARN button, press the desired button on your RT03-B remote control.
- Release both buttons. The remote should now be paired. Test the remote to confirm functionality.
- Repeat for any additional RT03-B remotes.
6.2. Soft Start/Close Function
This feature ensures the gate starts and stops smoothly, reducing wear and tear on the motor and mechanical components. This function is typically pre-configured and does not require user adjustment.
6.3. Automatic Close Time Setting
The gate can be configured to close automatically after a set period. The available settings are 12 seconds, 24 seconds, and 36 seconds. This setting is typically adjusted using the DIP switches on the control board. Refer to the specific DIP switch configuration diagram (usually printed on the board or in the full gate opener manual) to select the desired auto-close time.
6.4. Remote Control Mode Switch
The control board supports both single-channel and four-channel remote control modes. This setting allows you to choose how your remote control buttons function. Adjustment is typically made via the DIP switches. Consult the gate opener's main manual for the correct DIP switch settings for your preferred mode.
6.5. Potentiometer Adjustments (VR1-VR4)
The potentiometers (VR1, VR2, VR3, VR4) allow for fine-tuning of various operational parameters, such as motor force, sensitivity, or obstacle detection. Adjust these carefully and incrementally, testing the gate's operation after each adjustment. Refer to the original gate opener manual for specific functions of each potentiometer.
7. Troubleshooting
If the gate opener system is not functioning as expected after installing the new control board, consider the following common issues:
- Gate Not Responding to Remote:
- Ensure the remote control is an RT03-B model.
- Verify the remote is properly paired (refer to Section 6.1).
- Check remote battery.
- Ensure the antenna on the control board is properly connected and unobstructed.
- Gate Not Moving:
- Confirm power supply to the control board.
- Check all wiring connections for looseness or incorrect placement.
- Inspect the motor for any obstructions or mechanical issues.
- Verify safety sensors (if installed) are clear and aligned.
- Gate Stops Unexpectedly:
- Check for physical obstructions in the gate's path.
- Review potentiometer settings (e.g., force adjustment) if the gate is stopping due to perceived obstacles.
For more complex issues, consult the complete GATEXPERT DKC500ACL-Homelink gate opener manual or contact GATEXPERT customer support.
8. Specifications
| Attribute | Detail |
|---|---|
| Model Number | PY600-B-HOMELINK |
| Brand | GATEXPERT |
| Operating Frequency | 315MHz |
| Compatibility | GATEXPERT DKC500ACL-Homelink Sliding Gate Opener, RT03-B Remote Control |
| Item Weight | 13.1 ounces |
| Product Dimensions | 3.74 x 5.9 x 1.57 inches |
| Included Components | Control Board x1 |
9. Maintenance
The GATEXPERT PY600-B-HOMELINK control board requires minimal maintenance. To ensure optimal performance and longevity:
- Keep Clean: Periodically inspect the control board for dust, debris, or insect nests. Gently clean with a soft, dry brush or compressed air. Ensure power is disconnected before cleaning.
- Inspect Connections: Annually check all wiring connections to the terminal blocks to ensure they are secure and free from corrosion.
- Environmental Protection: Ensure the control box remains sealed and protected from moisture, extreme temperatures, and direct sunlight.
10. Warranty and Support
For warranty information, technical support, or to purchase replacement parts, please contact GATEXPERT customer service. Refer to the original gate opener product documentation or the GATEXPERT website for contact details.
When contacting support, please have your product model number (PY600-B-HOMELINK) and a detailed description of the issue ready.