Outsunny 84C-182V02LG
Outsunny 16.5' x 10' Outdoor Polycarbonate Pergola Instruction Manual
Model: 84C-182V02LG
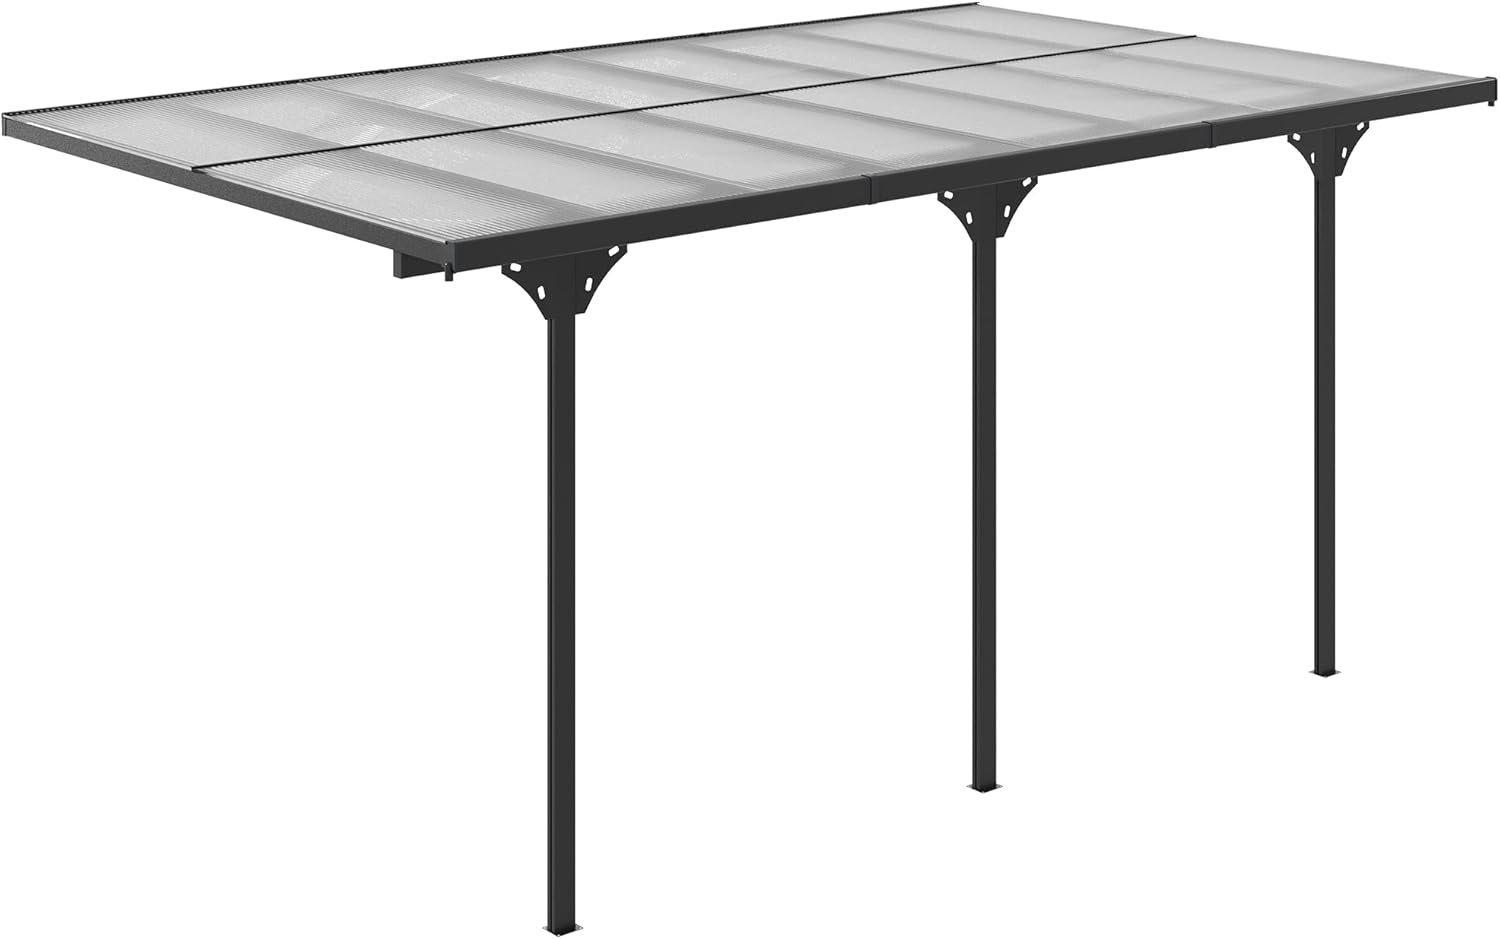
Image: The Outsunny 16.5' x 10' Outdoor Polycarbonate Pergola, showcasing its overall structure and design.
Introduction
This manual provides detailed instructions for the assembly, operation, and maintenance of your Outsunny 16.5' x 10' Outdoor Polycarbonate Pergola. Designed to enhance your outdoor living space, this pergola features a transparent UV-blocking awning and adjustable posts for versatile installation. Please read this manual thoroughly before beginning assembly or use to ensure safe and correct installation and operation.
Safety Information
Adherence to the following safety guidelines is crucial for preventing injury and damage to the product.
- Always follow the installation instructions provided in this manual precisely.
- Ensure the wall where the pergola will be attached is stable and capable of supporting the structure's weight. Professional assessment is recommended if unsure.
- Do not attempt installation during high winds, heavy rain, or other adverse weather conditions.
- Regularly inspect the pergola for any signs of damage, loose fasteners, or wear and tear, especially after severe weather events. Address any issues promptly.
- Keep children and pets away from the assembly area during installation. Once assembled, supervise children around the structure.
- Do not hang heavy objects from the pergola frame or roof.
- Ensure all connections are secure before and after each use season.
Package Contents
Verify that all components listed below are present and undamaged before beginning assembly. If any parts are missing or damaged, contact customer support.
| Component | Quantity | Description |
|---|---|---|
| Aluminum Frame Sections | Varies | Main structural elements for the pergola frame. |
| Polycarbonate Roof Panels | Varies | Transparent UV-blocking panels for the roof. |
| Adjustable Support Posts | Varies | Vertical posts with adjustable height and position. |
| Mounting Hardware | 1 Set | Screws, bolts, nuts, and washers for assembly. |
| Drainage Components | Varies | Gutter and downspout parts for water diversion. |
| Instruction Manual | 1 | This document. |
Setup and Assembly
Assembly of the Outsunny pergola requires careful attention to detail and may take a significant amount of time, typically a full day for two individuals. It is recommended to have at least two people for assembly. While the instructions are generally clear, some steps may require careful interpretation of diagrams.
Tools Required (Not Included):
- Drill (with appropriate bits for pilot holes and driving screws)
- Level
- Measuring Tape
- Wrenches/Socket Set
- Rubber Mallet (optional, for gentle tapping)
- Caulk/Silicone Sealant (recommended for sealing panel seams and gutter connections)
- Safety Glasses and Gloves
Assembly Steps:
- Preparation: Clear the assembly area. Lay out all parts and hardware, verifying against the package contents list.
- Wall Attachment: Securely attach the main support beam to your wall. The pergola is designed to fit a wall height between 91" and 98.5". Ensure the wall is structurally sound.
- Column Assembly: Assemble the adjustable support columns. These columns can be adjusted forward and back (63.75" - 112.25") and left and right (11.75" - 17.75") to custom-fit your deck or patio.
- Frame Construction: Connect the various aluminum frame sections according to the diagrams. Ensure all bolts and nuts are tightened securely. Some users have found that replacing certain screws with self-drilling screws or pre-drilling holes can improve assembly, especially for gutter components.
- Roof Panel Installation: Carefully slide the polycarbonate roof panels into their designated channels. It is highly recommended to apply a bead of silicone or glue along the middle metal line that divides and connects the polycarbonate sheets to prevent water leakage. Some panels may have rough spots that require light sanding to slide in properly.
- Drainage System: Install the gutter and drainage components. Ensure all connections are tight to effectively divert rainwater.
- Final Checks: Double-check all connections for tightness and stability. Ensure the pergola is level and securely anchored.

Image: Outsunny pergola installed on a wooden deck, demonstrating its integration with an outdoor living space. The pergola provides shade over a dining area.

Image: Diagram illustrating the adjustable installation capabilities of the pergola, showing how the height and column positions can be adapted to different wall and deck configurations.

Image: A close-up view of the decorative and structural support bracket connecting the roof frame to the posts.
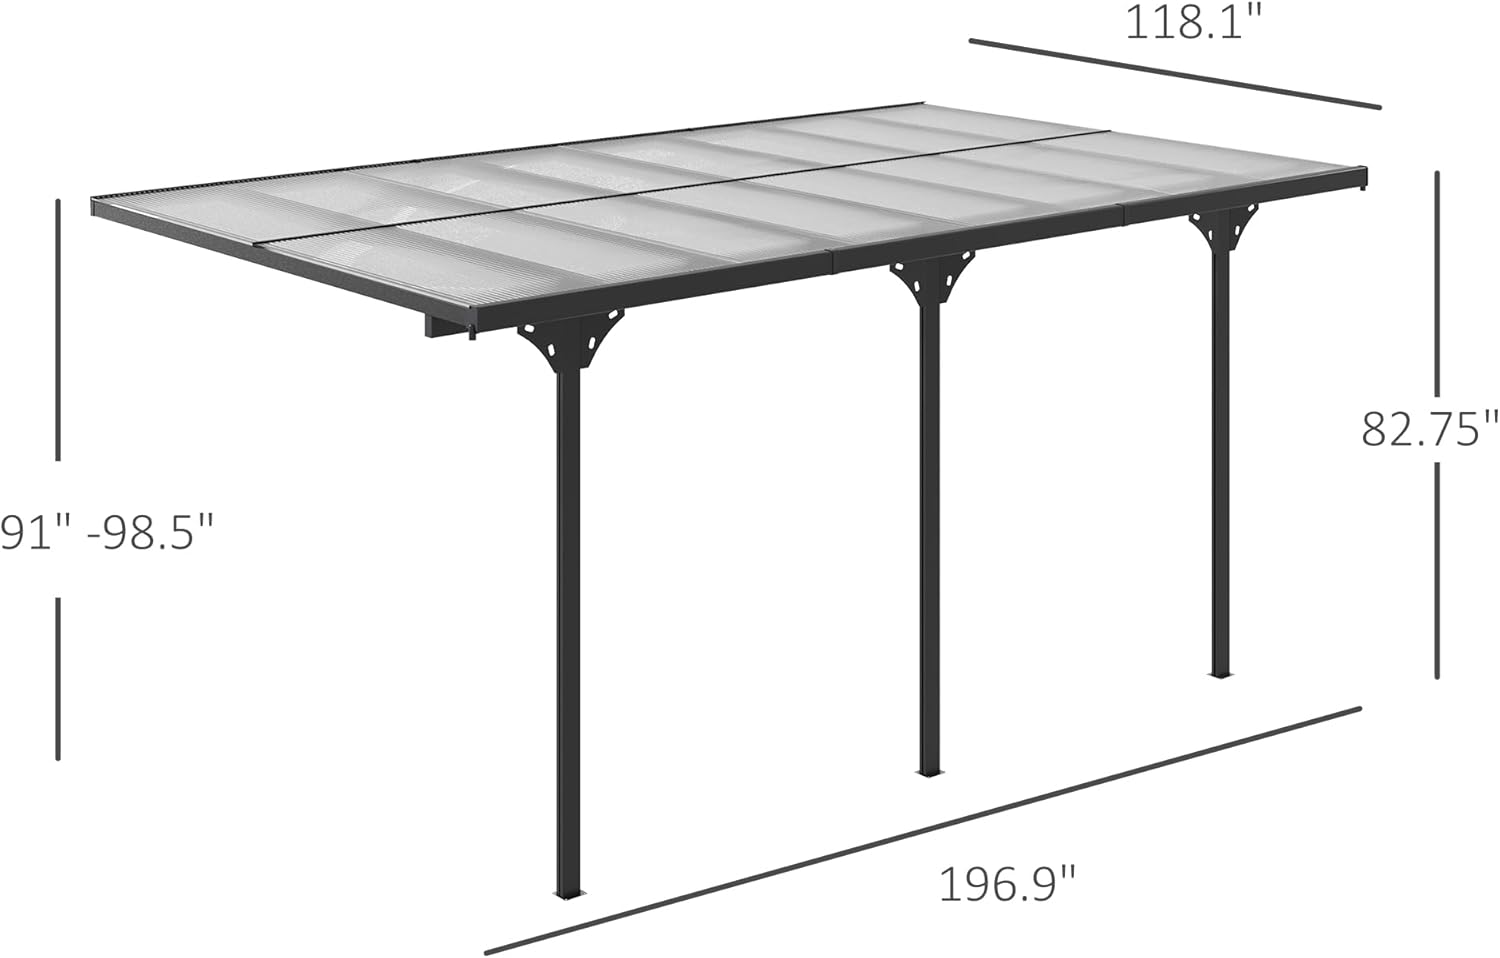
Image: A detailed view of the base plate for one of the pergola's support posts, showing the pre-drilled holes for anchoring.
Operation
The Outsunny Polycarbonate Pergola is designed for continuous outdoor use, providing shade and protection from elements.
- UV Protection: The polycarbonate roof panels are designed to filter out harmful UV rays, allowing you to enjoy sunlight without excessive exposure.
- Rainwater Diversion: The integrated drainage system, including gutters and drainage holes, is designed to effectively divert rainwater away from the covered area. This prevents water accumulation on the roof and keeps the space underneath dry.

Image: A close-up view of the polycarbonate roof panels, highlighting their transparent yet UV-blocking design, which makes sunlight gentler.
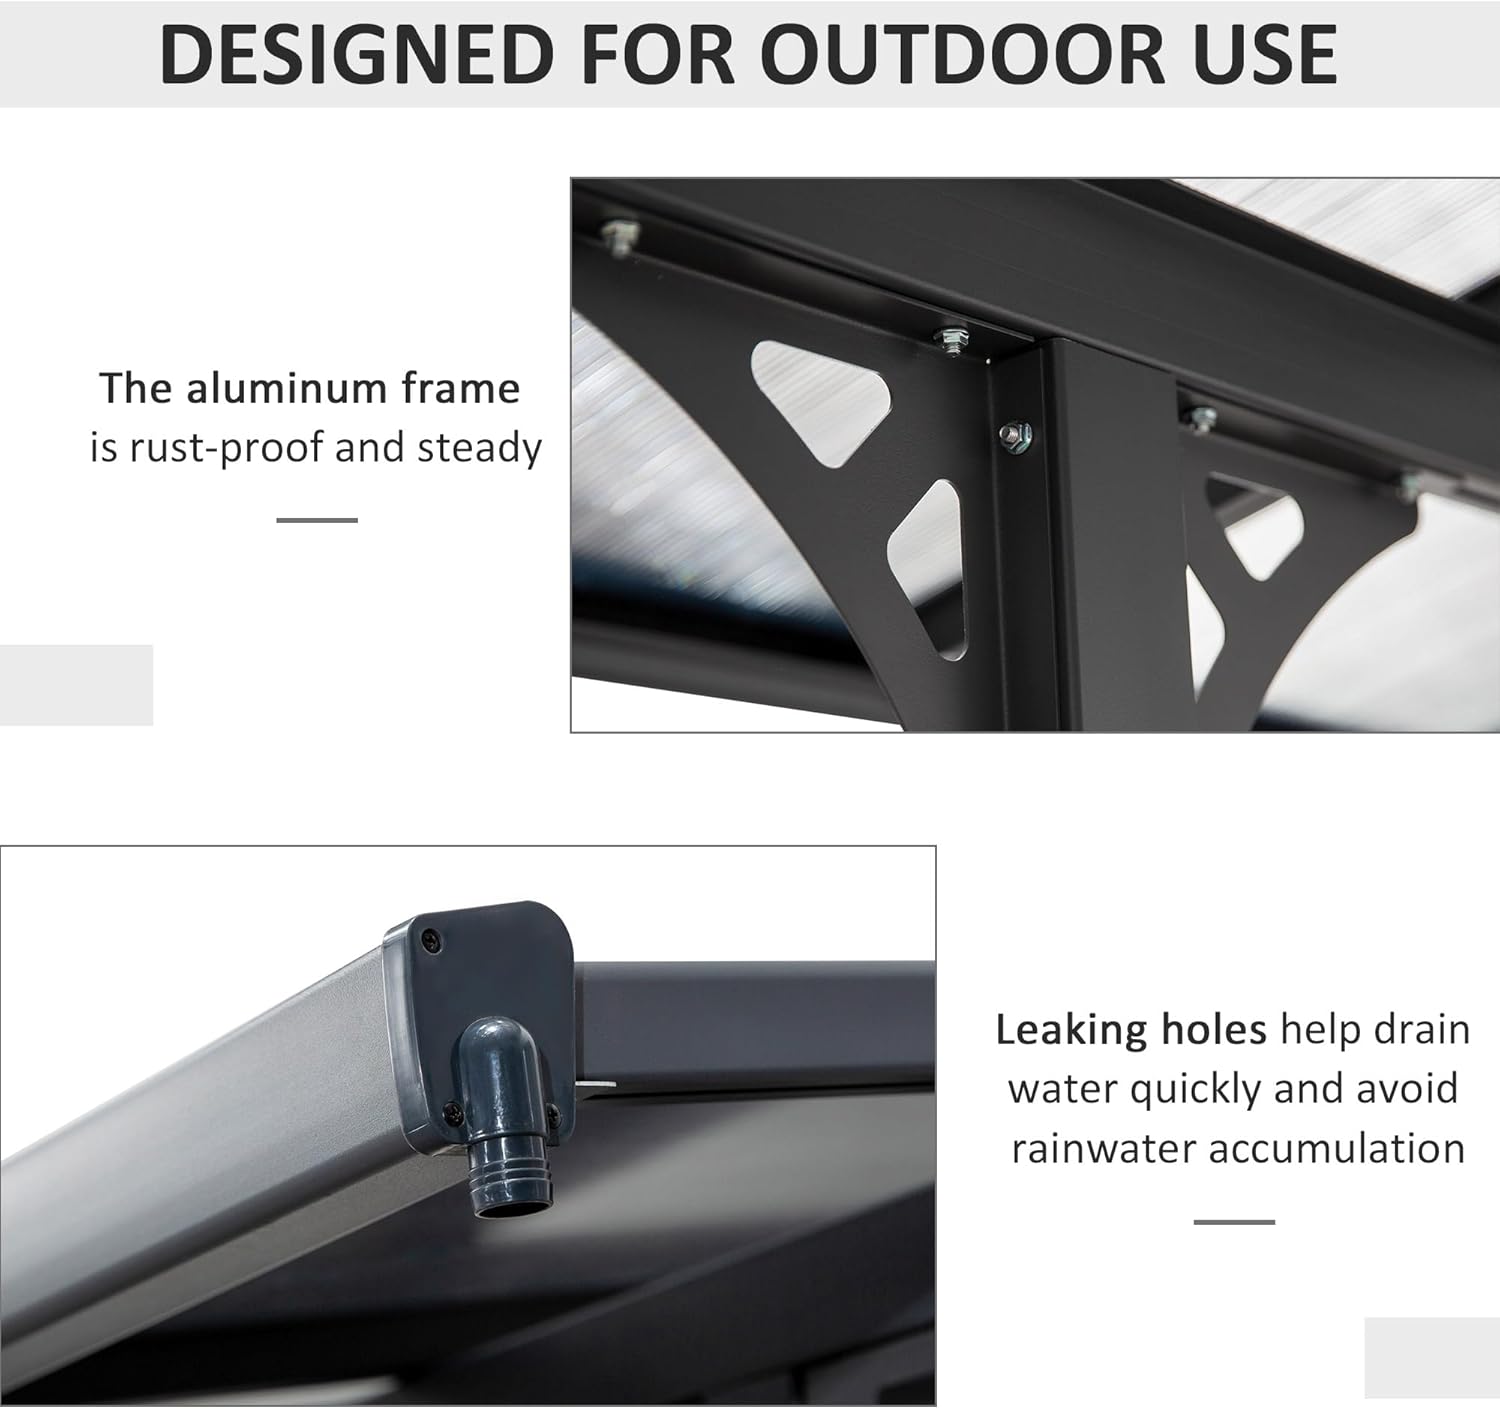
Image: Two detailed images. The top image shows the robust aluminum frame, indicating its rust-proof and steady construction. The bottom image shows the leaking holes designed to quickly drain water and prevent accumulation.

Image: A detailed view of the pergola's drainage spout, part of the system designed to divert rainwater effectively.
Maintenance
Proper maintenance will extend the lifespan and preserve the appearance of your pergola.
- Cleaning: Clean the polycarbonate panels and aluminum frame regularly with mild soap and water. Avoid abrasive cleaners or harsh chemicals that could damage the materials. Rinse thoroughly with clean water.
- Inspection: Periodically inspect all bolts, screws, and connections to ensure they remain tight. Re-tighten any loose fasteners.
- Drainage System: Keep the gutters and drainage holes clear of leaves, debris, and other obstructions to ensure proper water flow.
- Seasonal Checks: Before and after seasons with extreme weather (e.g., heavy snow, strong winds), perform a thorough inspection for any structural integrity issues.
Troubleshooting
This section addresses common issues that may arise during assembly or use.
- Issue: Difficulty sliding roof panels into channels.
- Solution: Some panels may have rough edges from manufacturing. Lightly sand these edges to allow for smoother insertion. Ensure the frame is perfectly aligned and level before attempting to slide panels.
- Issue: Water leakage from roof seams or gutter connections.
- Solution: Apply a high-quality silicone sealant or outdoor-grade caulk along all seams where polycarbonate panels meet, especially the middle connecting lines. Also, ensure all gutter connections are tightly secured and sealed with caulk if necessary.
- Issue: Screws breaking or stripping during assembly.
- Solution: Use a drill with adjustable torque settings to avoid over-tightening. For certain connections, especially with the gutter pieces, consider pre-drilling pilot holes or using higher quality self-tapping sheet metal fasteners if the provided hardware proves insufficient.
- Issue: Pergola does not line up properly or is difficult to square.
- Solution: Ensure the wall attachment is perfectly level and at the correct height. Double-check all measurements and ensure the adjustable columns are set to the appropriate positions. It may be necessary to slightly adjust the spacing of the support beams attached to the house to achieve proper alignment for panel insertion.
Specifications
| Attribute | Detail |
|---|---|
| Brand | Outsunny |
| Model Number | 84C-182V02LG |
| Product Dimensions (L x W x H) | 196.75" x 118" x 98.5" |
| Roof Size (L x W) | 196.75" x 118" |
| Column Size (L x W x H) | 3.25" x 1.5" x 82.75" |
| Adjustable Column Range (Forward/Back) | 63.75" - 112.25" |
| Adjustable Column Range (Left/Right) | 11.75" - 17.75" |
| Recommended Wall Height | 91" - 98.5" |
| Material | Aluminum Frame, Polycarbonate Roof |
| Color | Gray |
| Item Weight | 119.1 Pounds |
| Water Resistance Level | Water Resistant |
| Ultraviolet Light Protection | Yes |
| Assembly Required | Yes |
| Occupancy | 10 Person |

Image: A diagram illustrating the key dimensions of the pergola, including length, width, height, and adjustable wall attachment range.
Warranty and Support
For warranty information, product support, or to order replacement parts, please contact Outsunny customer service. Keep your purchase receipt and model number (84C-182V02LG) readily available when contacting support.
Customer Support: Refer to the contact information provided with your product packaging or visit the official Outsunny website for assistance.
Returns: This product typically offers a 30-day easy return policy. Please consult your retailer's return policy for specific details.
Ask a question about this manual
Ask about setup, troubleshooting, compatibility, parts, safety, or missing instructions. Manuals+ will review the question and use this page’s manual context to help answer it.