1. Introduction
Thank you for choosing the Qfun 9-in-1 A3 Laminator Machine. This versatile device is designed to protect and preserve your documents, photos, and artwork with both hot and cold lamination capabilities. Featuring a rapid 60-second warm-up time and a laminating speed of up to 450mm/min, it significantly enhances efficiency. This manual provides essential information for safe and effective operation, including setup, usage, maintenance, and troubleshooting.
2. Safety Instructions
- Read all instructions before use and retain for future reference.
- Do not operate the laminator with wet hands or near water.
- Ensure the power cord is not damaged and is properly connected to a grounded outlet.
- Keep children and pets away from the laminator during operation.
- Do not insert objects other than laminating pouches into the machine.
- Allow the machine to cool down completely before storing.
- The laminator features an auto shut-off function for safety and energy conservation.
3. Package Contents
Verify that all items are present in the package:
- Qfun Laminator Machine
- 1 x Paper Cutter
- 1 x Corner Rounder
- 1 x Hole Punch
- 3 x Binder Rings
- 30 sheets of 3 mil laminating paper (3 x A3, 9 x A4, 9 x A5, 9 x A6)

Image: The Qfun laminator machine shown with its accompanying accessories, including the paper cutter, corner rounder, hole punch, and various sizes of laminating sheets.
4. Setup
- Unpacking: Carefully remove the laminator and all accessories from the packaging.
- Placement: Place the laminator on a stable, flat, and heat-resistant surface, ensuring adequate ventilation around the machine.
- Power Connection: Plug the power cord into a standard electrical outlet.
- Power On: Press the power button. The machine will begin its warm-up cycle.
- Warm-up: The laminator heats up in approximately 60 seconds. The indicator light will change to signal readiness for use.

Image: A visual representation highlighting the laminator's fast laminating speed of 450 mm/min and its quick 60-second preheating time, indicating readiness for operation.
5. Operating Instructions
5.1 Hot Lamination
Hot lamination is suitable for general documents, photos, business cards, menus, and other artifacts. It provides two-sided lamination.
- Ensure the laminator is powered on and has completed its 60-second warm-up.
- Select the 'Hot' mode on the control panel.
- Place your document inside a thermal laminating pouch. Ensure the document is centered and there is a small margin around it. Compatible pouch thicknesses are 3 mil and 5 mil (80–100 mic).
- Insert the sealed edge of the pouch into the laminator's entry slot (13-inch wide entry supports A3, A4, A5, A6 sizes).
- The machine will automatically feed the pouch through. Do not pull or push the pouch during the process.
- Once the pouch exits the machine, place it on a flat surface to cool.
5.2 Cold Lamination
Cold lamination is ideal for heat-sensitive materials such as inked documents, stamps, and invoices. This mode requires self-adhesive pouches (not included) and provides single-sided lamination.
- Ensure the laminator is powered on.
- Select the 'Cold' mode on the control panel.
- Prepare your document with a self-adhesive cold laminating pouch according to the pouch manufacturer's instructions.
- Insert the prepared pouch into the laminator's entry slot.
- The machine will feed the pouch through, applying pressure to seal it.
- Remove the laminated item once it exits the machine.

Image: A diagram visually explaining the differences between hot and cold lamination modes, including suitable materials and lamination types (two-sided vs. single-sided).
5.3 Using Integrated Tools
The Qfun laminator includes several integrated tools for convenience:
- Paper Cutter: Use the built-in paper cutter for precise trimming of documents or laminated items.
- Corner Rounder: Smooth sharp corners of laminated documents for a professional finish and added safety.
- Hole Punch: Create holes in your documents for binding.
- Binder Rings: Use the included binder rings to organize your punched documents.

Image: A detailed view of the laminator highlighting its integrated paper cutter, hole punch, corner rounder, and binder rings, demonstrating its multifunctionality.
6. Maintenance
- Cleaning: Ensure the laminator is unplugged and completely cool before cleaning. Wipe the exterior with a soft, dry cloth. Do not use abrasive cleaners or solvents.
- Roller Cleaning: Periodically run a cleaning sheet (not included) through the laminator to remove any adhesive residue from the rollers.
- Storage: Store the laminator in a clean, dry place away from direct sunlight and extreme temperatures.
7. Troubleshooting
7.1 Paper Jam
If a laminating pouch becomes jammed:
- Press the ABS release button located on the side of the machine. This will disengage the rollers, allowing you to gently pull out the jammed pouch.
- Ensure the pouch is inserted straight and centered for future laminations to prevent jams.
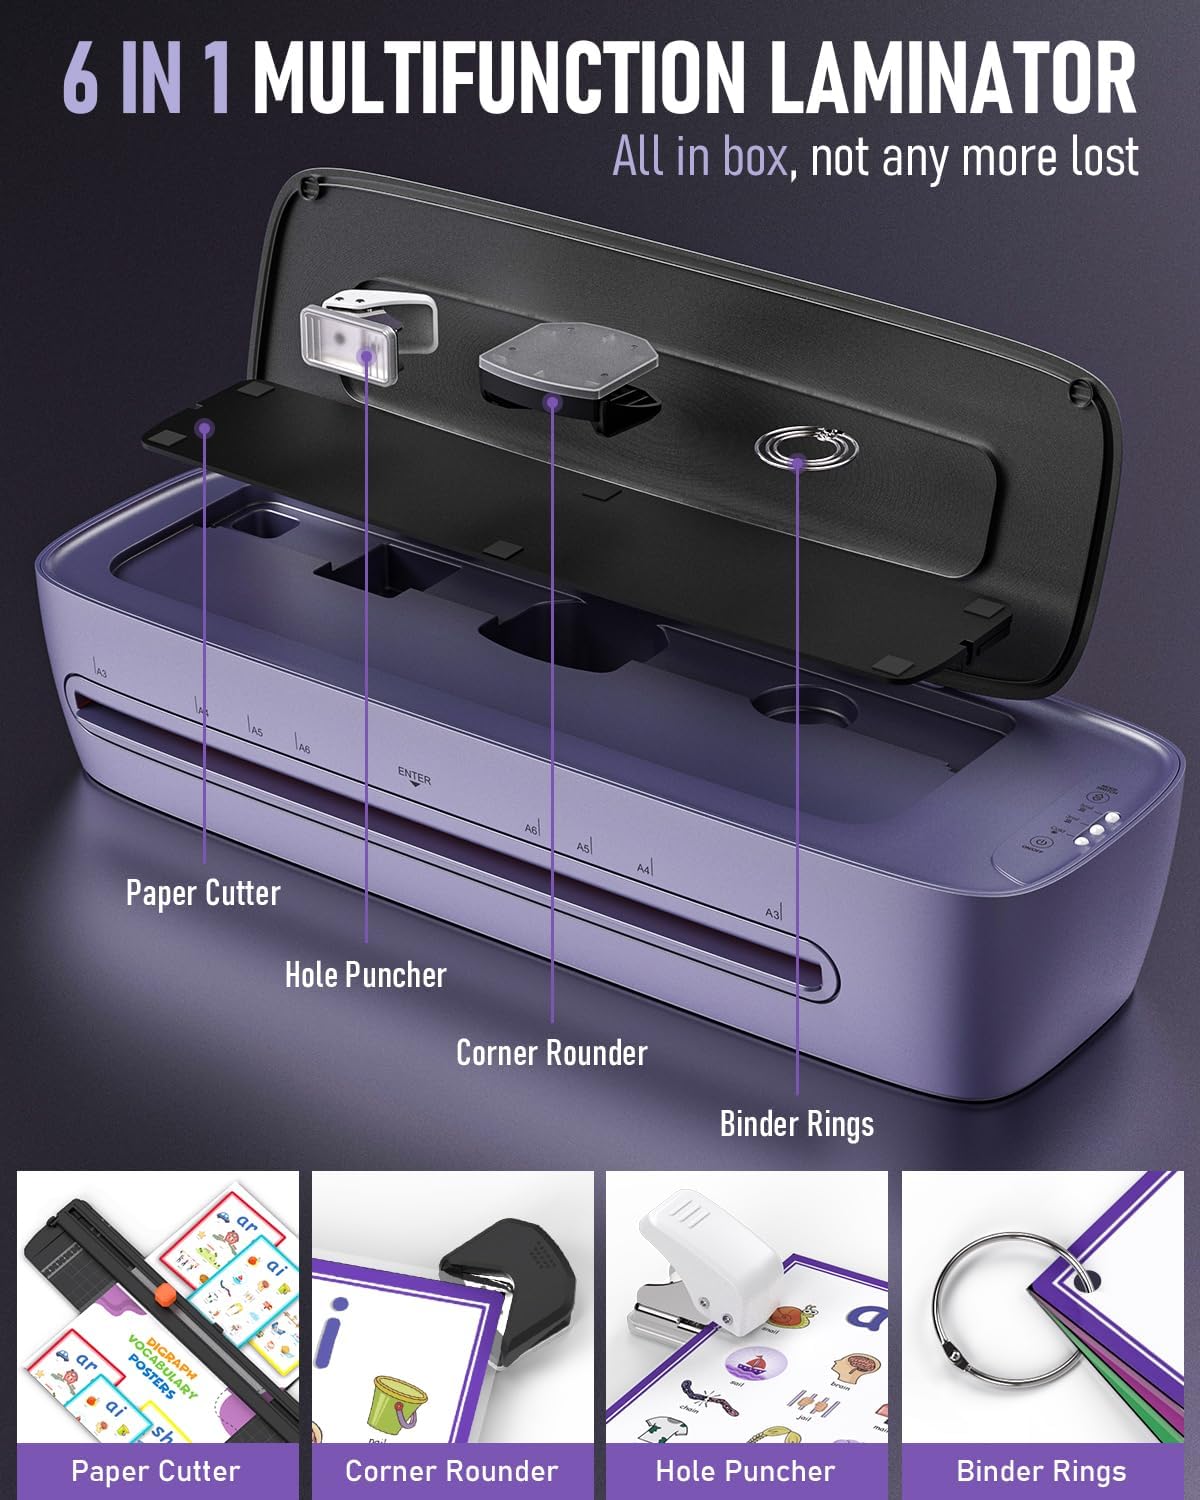
Image: The laminator featuring its ABS release design, which helps prevent paper jams, and an illustration indicating its low noise operation (less than 30dB).
7.2 Poor Lamination Quality (Wrinkles, Bubbles)
If laminated documents show wrinkles, bubbles, or are not sealed properly:
- Ensure the correct temperature setting (Hot mode) is selected for thermal pouches.
- Verify that the laminating pouch thickness (3 mil or 5 mil) is appropriate for the machine.
- Allow the machine to fully warm up before inserting documents.
- Ensure the document is properly centered within the pouch and the pouch is inserted straight into the machine.
- The dual-roll system is designed to ensure precise heat and pressure, preventing common issues like wrinkles and blisters.
8. Specifications
| Feature | Specification |
|---|---|
| Brand | Qfun |
| Model (ASIN) | B0CTYDTGH1 |
| Color | Purple and White |
| Sheet Size Compatibility | A3, A4, A5, A6 (up to 13 inches wide) |
| Pouch Thickness | 3 mil, 5 mil (80–100 mic) |
| Warm-Up Time | 60 seconds |
| Laminating Speed | Up to 450 mm/min |
| Lamination Modes | Hot & Cold |
| Product Dimensions (L x W x H) | 13"L x 13"W x 13"H |
| Noise Level | Less than 30dB |
9. Warranty and Support
For warranty information or technical support, please contact the seller, Qfun Laminator, directly through your purchase platform. Please have your product model number (ASIN: B0CTYDTGH1) and purchase date available when contacting support.