1. Introduction
Thank you for choosing EZVALO Under Cabinet and Puck Lights. This manual provides detailed instructions for the installation, operation, and maintenance of your new lighting system. Please read this manual thoroughly before use to ensure proper function and longevity of the product.
Product Components
- EZVALO Under Cabinet Bar Lights
- EZVALO Puck Lights
- Remote Control
- Mounting Hardware (Sticker Mounting Disks, Mounting Strips)
- USB Charging Cable (3-in-1 for Puck Lights)
2. Setup and Installation
2.1 Charging the Lights
Before initial use, fully charge both the bar lights and puck lights.
- Bar Lights: Connect the USB charging cable to the charging port on the bar light and a suitable USB power adapter (not included). A red light indicates charging, and a green light indicates a full charge.
- Puck Lights: Use the provided 3-in-1 USB charging cable to charge multiple puck lights simultaneously. Connect the cable to the charging port on each puck light and a USB power adapter.
Note: The bar lights feature a 1100mAh battery, offering up to 52 hours of continuous lighting or 60 days in Auto mode. Puck lights have a 2000mAh battery, lasting up to 19 hours at maximum brightness.
2.2 Installation
Both bar lights and puck lights offer wireless installation options.
- Magnetic Attachment: The lights have built-in magnets. They can be directly attached to any magnetic metal surface.
- Adhesive Mounting: For non-magnetic surfaces, use the provided mounting hardware.
- Clean the desired installation surface thoroughly to ensure it is dry and free of dust or grease.
- Peel off the protective film from the adhesive side of the mounting strips (for bar lights) or sticker mounting disks (for puck lights).
- Firmly press the adhesive side onto the clean surface.
- Attach the light to the magnetic side of the mounting strip/disk. The lights can be easily removed for recharging or repositioning.
3. Operation
3.1 Bar Light Control Options

Image Description: This image displays the side of an EZVALO bar light with a toggle switch labeled "ON/OFF/AUTO". Below it, a remote control is shown with buttons for ON, OFF, dimming, and timer functions. The image illustrates the physical controls and remote capabilities for the bar lights.
- Toggle Switch: Located on the side of the bar light.
- ON: Light remains continuously on.
- OFF: Light remains off.
- AUTO: Activates motion sensor mode. The light will turn on automatically when motion is detected in a dark environment.
- Remote Control:

Image Description: This image shows a hand holding the remote control, pointing towards several EZVALO bar lights installed under kitchen cabinets. The remote has buttons for ON, OFF, timer settings (30s, 60s), and dimming. Icons for Timer, Dimming, and 16ft Distance are displayed below, indicating the remote's capabilities.
- ON/OFF: Turn the lights on or off.
- Dimming: Adjust brightness levels.
- Timer Function: Set the lights to turn off automatically after a specified duration (e.g., 5 min, 15 min, 30 min, 45 min, 60 min). Note: Timer function is disabled in Always On mode.
3.2 Motion Sensor Function (Bar Lights & Puck Lights)
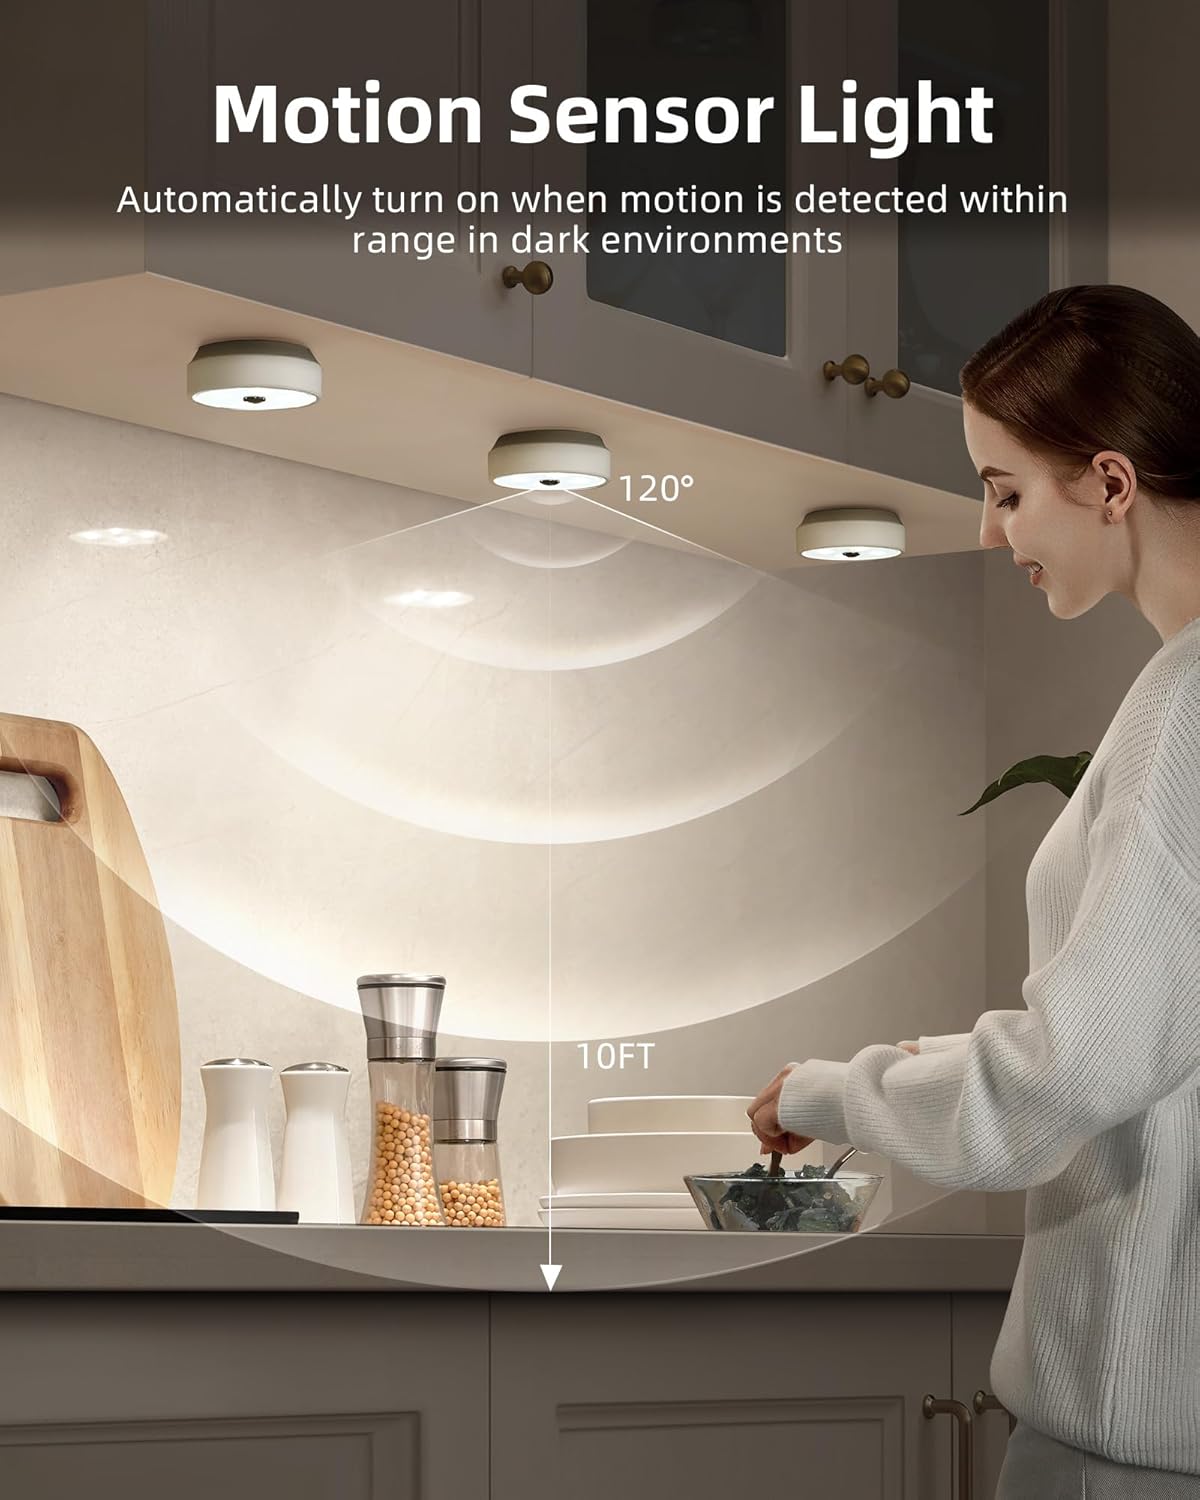
Image Description: This image illustrates the motion sensor functionality of the EZVALO puck lights installed under kitchen cabinets. A person is reaching into a cabinet, and the lights are illuminated. A diagram shows a 120° detection angle and a 10ft detection range, indicating how the motion sensor operates.
- The motion sensor activates the light when movement is detected within a 10ft (3 meters) range.
- For puck lights, the detection angle is 120°.
- To conserve energy, the lights will only activate in dark environments. They will not turn on if there is sufficient ambient daylight.
- Puck lights automatically turn off approximately 25 seconds after the last detected movement.
3.3 Puck Light Group Control (with Remote)
The remote control for puck lights allows for grouping and synchronized control.
- Puck lights can be assigned into 2 groups for separate control.
- All puck lights within the same group can be dimmed and turned On/Off in unison using the remote, eliminating the need to adjust each light individually.
3.4 Adjusting Light Temperature (Puck Lights)
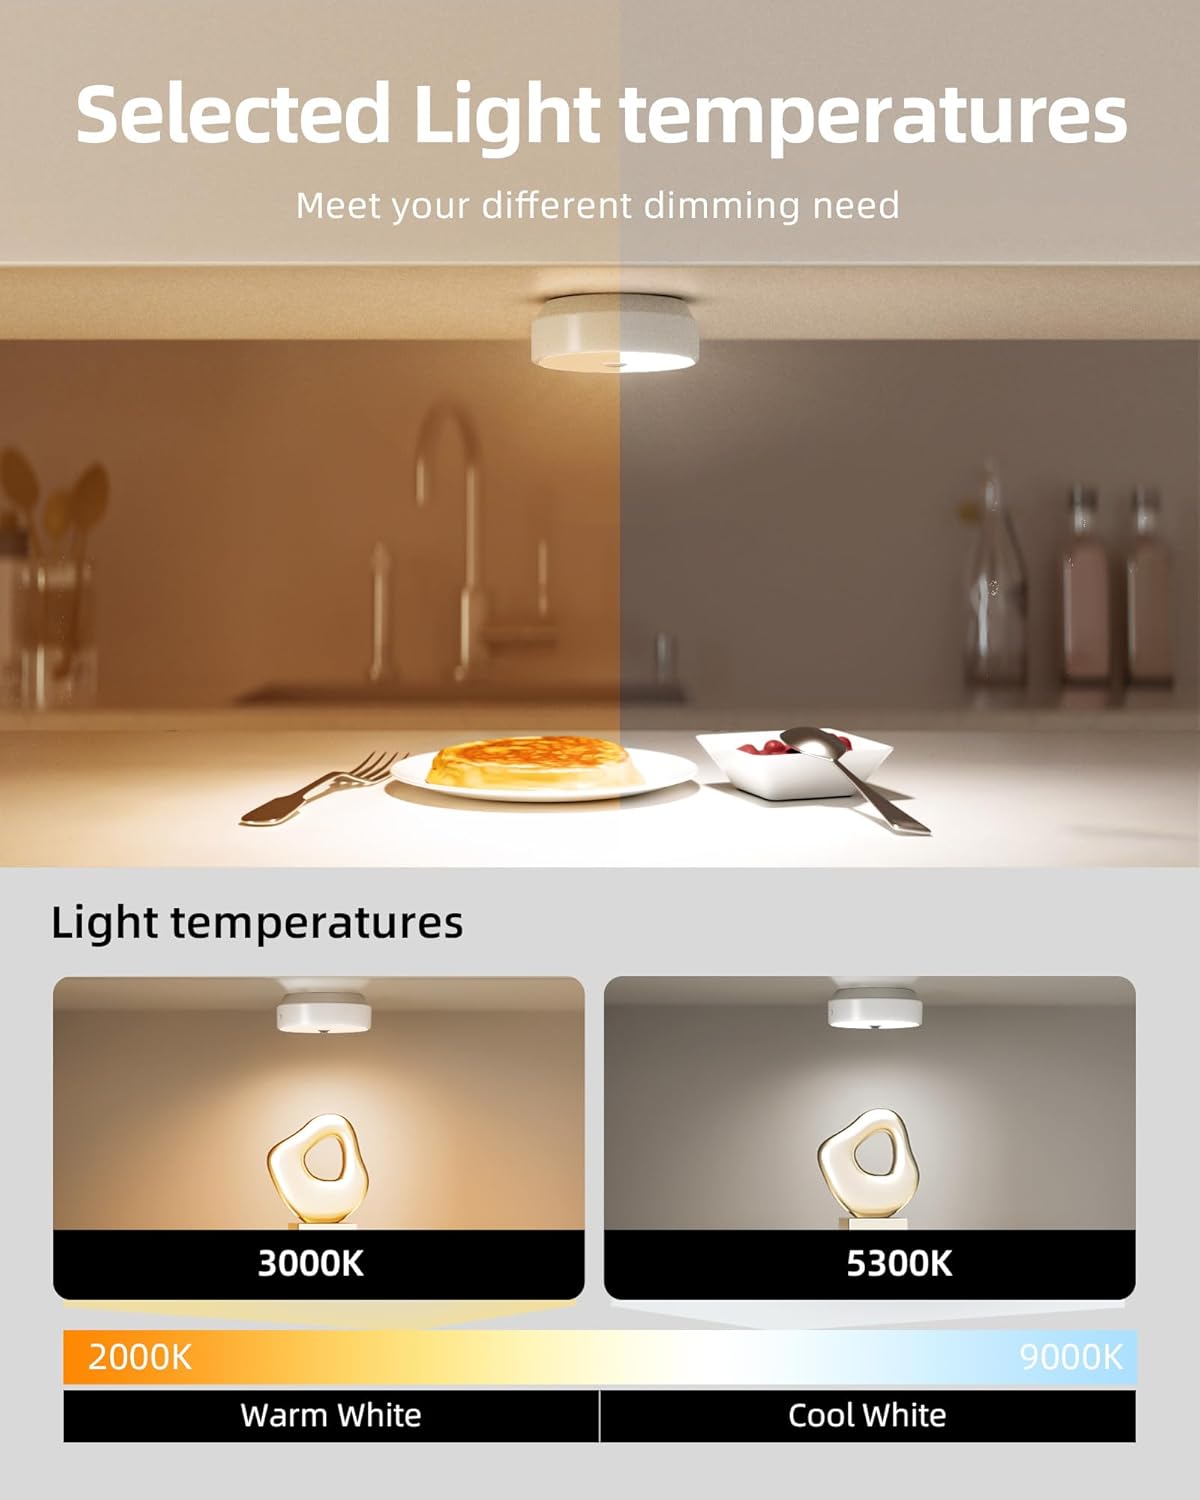
Image Description: This image demonstrates the adjustable light temperatures of the EZVALO puck lights. The top half shows a kitchen counter with warm lighting, while the bottom half shows two puck lights illuminating a surface, one at 3000K (Warm White) and another at 5300K (Cool White). A color temperature scale from 2000K to 9000K is also depicted.
Puck lights offer adjustable light temperatures to suit different preferences and environments.
- Use the remote control to cycle through available color temperatures, typically ranging from warm white (e.g., 3000K) to cool white (e.g., 5300K).
4. Maintenance
4.1 Cleaning
To maintain the appearance and functionality of your lights:
- Ensure the lights are turned off before cleaning.
- Wipe the surfaces with a soft, dry cloth.
- For stubborn marks, a slightly damp cloth can be used, followed by a dry cloth.
- Do not use abrasive cleaners, solvents, or harsh chemicals, as these can damage the finish or electronic components.
4.2 Battery Care
The lights are equipped with rechargeable lithium-polymer batteries. Follow these guidelines for optimal battery life:
- Recharge the lights when the brightness noticeably diminishes.
- Avoid fully depleting the battery frequently.
- If storing the lights for an extended period, charge them to about 50% every few months.
- Do not expose batteries to extreme temperatures.
5. Troubleshooting
| Problem | Possible Cause | Solution |
|---|---|---|
| Light does not turn on. | Battery is depleted. Light is in OFF mode. Insufficient darkness (in AUTO mode). | Recharge the light. Check the toggle switch/remote to ensure it's in ON or AUTO mode. Ensure the environment is dark enough for the motion sensor to activate. |
| Motion sensor not working. | Light is not in AUTO mode. Environment is too bright. Obstruction blocking sensor. | Set the light to AUTO mode using the toggle switch or remote. The sensor only activates in dark conditions. Ensure the sensor is clear of obstructions. |
| Remote control not responding. | Remote battery is low/dead. Out of range. Obstruction between remote and light. | Replace remote battery (if applicable) or ensure remote is charged. Move closer to the lights (max 16ft range). Ensure a clear line of sight. |
| Lights dim unexpectedly. | Battery is low. | Recharge the lights. |
6. Specifications
| Feature | Detail |
|---|---|
| Brand | EZVALO |
| Model Number | 02.L22.00007 |
| Light Source | LED |
| Brightness | 40 lumen (per light, typical) |
| Light Color | White (Adjustable for Puck Lights) |
| Power Source | Battery Powered (Rechargeable Lithium-Polymer) |
| Bar Light Battery Capacity | 1100mAh |
| Puck Light Battery Capacity | 2000mAh |
| Control Method | Remote Control, Toggle Switch (Bar Lights) |
| Special Features | Motion Sensor, Dimmable, Timer Function, Group Control (Puck Lights) |
| Motion Sensor Range | 10 ft (3 meters) |
| Puck Light Sensor Angle | 120° |
| Installation Type | Magnetic, Adhesive (Surface Mount) |
| Material | Iron, Metal, Plastic |
| Water Resistance Level | Not Water Resistant (Indoor Use Only) |
| Room Type | Indoor (Home, Kitchen, Bathroom, Bedroom, Office, Cabinet) |
7. Safety Information
- Do not disassemble or modify the product.
- Keep away from water and high humidity environments as the product is not water resistant.
- Do not expose to direct sunlight or high temperatures.
- Keep out of reach of children.
- Use only the specified charging cables.
8. Customer Support
For any questions, technical support, or warranty inquiries, please contact EZVALO customer service through the retailer's platform or visit the official EZVALO website.