1. Introduction
This manual provides essential information for the safe and efficient operation, installation, and maintenance of your WANLECY DF565416 28.7 Inch Built-in Natural Gas Cooktop. Please read all instructions carefully before using the appliance to ensure proper function and to prevent potential hazards.
This appliance is designed for use with natural gas only. Do not attempt to convert it for use with other gas types.
2. Safety Information
WARNING: Gas appliances can cause carbon monoxide poisoning if not installed and used correctly. Ensure adequate ventilation.
- Read all instructions before installation and use.
- Installation must be performed by a qualified technician in accordance with local codes and regulations.
- Ensure the gas supply is turned off before any installation or maintenance.
- Do not store or use flammable materials near this appliance.
- Keep children away from the cooktop during operation and when it is hot.
- In case of a gas leak, immediately turn off the gas supply, open windows, and do not operate any electrical switches or phones. Contact your gas supplier.
- Use only natural gas with this appliance.
- Ensure proper ventilation in the kitchen area.
3. Product Overview
The WANLECY DF565416 cooktop features a durable tempered glass surface and two powerful burners designed for efficient cooking.

Image 3.1: Top view of the WANLECY 28.7 Inch Built-in Natural Gas Cooktop, showcasing its black tempered glass surface, two burners, and control knobs.
Components:
- Tempered Glass Panel: Smooth, easy-to-clean surface.
- Left Burner (4200W): Features a wheeled design with double rows of cyclone air holes for even heating.
- Right Burner (5200W): Features a nine-cavity lotus-shaped design with direct flame injection for intense heat.
- Control Knobs: Push-button rotary switches for ignition and flame control.
- Heavy-Duty Cast-Iron Cooktop Racks: Provide stable support for pots and pans.
- Ignition System: Safe electric ignition.
- Safety Features: Flame failure system and anti-reflame protection.

Image 3.2: Illustration showing the distinct flame patterns of the left burner (wheel axle internal rotation uniform fire) and the right burner (nine-chamber lotus shaped flame direct injection).

Image 3.3: Diagram illustrating the flameout protection system, highlighting the pulse ignition needle and thermocouple flameout protection which cuts off gas supply upon accidental flameout.
4. Setup and Installation
Proper installation is crucial for the safe and efficient operation of your cooktop. It must be installed by a qualified professional.
4.1 Dimensions and Cut-out Requirements:
- Panel Size: 730mm x 410mm (28.7 x 15.7 inches)
- Hole Size (Cut-out): 620-680mm (24.4-26.7 inches) x 330-380mm (13-15 inches)
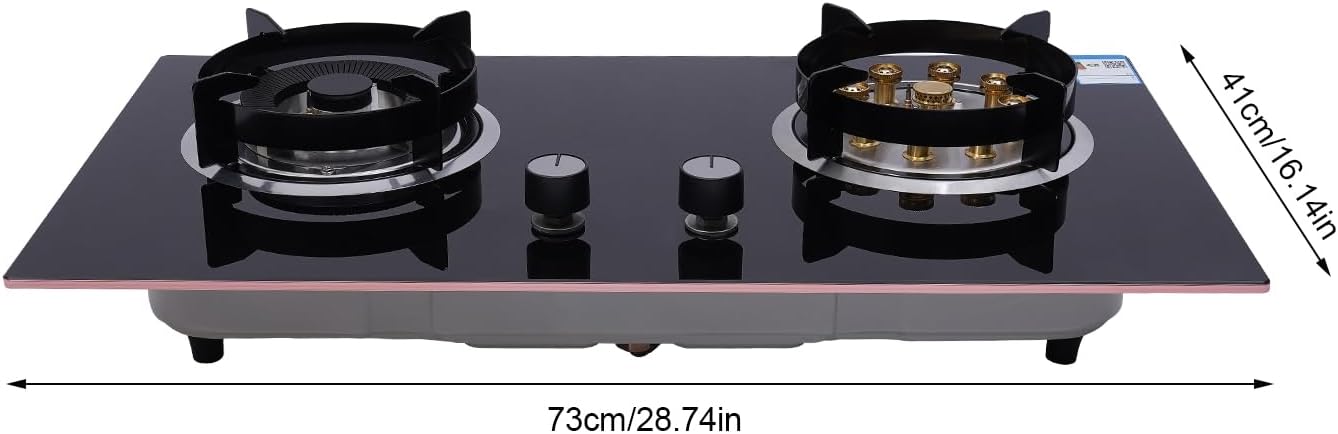
Image 4.1: Diagram showing the overall dimensions of the cooktop: 73cm (28.74 inches) in width and 41cm (16.14 inches) in depth.
4.2 Gas Connection:
- This cooktop is designed for Natural Gas only. Do not connect to LPG or other gas types.
- A gas pipe is not included and must be supplied by the installer.
- Ensure all gas connections are leak-tested after installation.
4.3 Electrical Connection:
The cooktop requires an electrical connection for the electronic ignition system. Consult a qualified electrician for proper wiring.

Image 4.2: View of the cooktop with its main components laid out, including the tempered glass panel, two burner grates, and sealing tape, indicating items included for installation.
5. Operating Instructions
5.1 Ignition:
The cooktop features a push-button rotary switch for ignition, which also acts as a child lock protection mechanism.
- Press Down: Push the desired burner's control knob down.
- Rotate Left: While holding the knob down, rotate it counter-clockwise to the "High" flame setting. You will hear a clicking sound as the igniter sparks.
- Observe Flame: Once the flame ignites, continue to hold the knob down for a few seconds to allow the thermocouple to heat up and activate the flame failure safety device.
- Adjust Flame: Release the knob and adjust the flame to your desired intensity by rotating it between "High" and "Low" settings.

Image 5.1: Visual guide demonstrating the ignition process: "Press down" on the control knob, then "Rotate Left" to ignite, illustrating the child lock protection feature.
5.2 Turning Off:
To turn off a burner, rotate the control knob clockwise until it clicks into the "Off" position. Ensure the flame is extinguished.
5.3 Burner Usage:
- Use the Left Burner (4200W) for general cooking, simmering, and dishes requiring even heat distribution.
- Use the Right Burner (5200W) for rapid boiling, stir-frying, or dishes requiring high heat due to its direct flame injection design.
- Always use cookware appropriate for the burner size and ensure it is stable on the cast-iron rack.
6. Maintenance and Cleaning
Regular cleaning and maintenance will ensure the longevity and optimal performance of your cooktop.
6.1 Tempered Glass Surface:
- Allow the cooktop to cool completely before cleaning.
- Wipe the tempered glass surface with a soft cloth and mild detergent or a specialized glass cleaner.
- For stubborn stains, use a non-abrasive cleaner designed for glass cooktops. Avoid abrasive pads or harsh chemicals that can scratch the surface.
- Dry the surface thoroughly to prevent water spots.

Image 6.1: A hand gently wiping the tempered glass panel of the cooktop with a cloth, illustrating that cleaning requires only a gentle wipe.
6.2 Burner Components and Grates:
- Remove the cast-iron grates and burner caps/rings when cool.
- Wash these components with warm soapy water. For baked-on food, soak them before scrubbing.
- Ensure all parts are completely dry before reassembling them on the cooktop.
- Periodically check burner ports for blockages and clean with a small brush or wire if necessary.
7. Troubleshooting
Before contacting customer support, please refer to the following troubleshooting guide for common issues.
| Problem | Possible Cause | Solution |
|---|---|---|
| Burner does not ignite. |
|
|
| Flame is weak or uneven. |
|
|
| Gas smell detected. | Gas leak. | Immediately turn off gas supply, open windows, do not use electrical switches or phones. Contact gas supplier or emergency services. |
8. Specifications
| Feature | Detail |
|---|---|
| Brand | WANLECY |
| Model Number | DF565416 |
| Installation Type | Drop-In |
| Fuel Type | Natural Gas |
| Number of Burners | 2 |
| Left Burner Output | 4200W (14000 BTU) |
| Right Burner Output | 5200W (17000 BTU) |
| Panel Material | Tempered Glass |
| Grates Material | Cast-Iron |
| Panel Dimensions (W x D) | 730mm x 410mm (28.7 x 15.7 inches) |
| Cut-out Dimensions (W x D) | 620-680mm x 330-380mm (24.4-26.7 x 13-15 inches) |
| Special Features | Energy-saving, Gas-saving, Flame Failure Protection, Anti-reflame Protection, Child Lock Ignition |
| Included Components | 1 x Gas stove (gas pipe not included) |
9. Warranty and Support
For warranty information or technical support, please refer to the documentation provided with your purchase or contact the retailer where the product was acquired. Keep your proof of purchase for any warranty claims.
For further assistance, you may also visit the official WANLECY website or contact their customer service department.