VEVOR JH-N3YC001BP
VEVOR Ball Vise 3-inch Engraving Setting Tool User Manual
Model: JH-N3YC001BP
1. Product Overview
The VEVOR 3-inch Ball Vise is a precision engraving and setting tool designed for intricate work such as gemstone inlay, jewelry engraving, and other small-scale crafting tasks. Its robust construction and versatile features provide stable support and maneuverability for detailed projects.

Figure 1.1: VEVOR 3-inch Ball Vise and included accessories.
Key Features:
- Excellent Quality: Crafted from high-quality steel with a hardened chrome plating for rust resistance and durability.
- Precision Work: Upgraded pins and coaxial control jaws ensure stable and precise clamping, reducing deviation.
- Professional Accessories: Includes a standardized kit with ring clamps, plate clamps, accessory pins, and a hex wrench for various workpiece sizes and shapes.
- 360° Rotatable: Features a dual-ball bearing system for smooth, 360-degree rotation, allowing free adjustment of workpiece position and angle.
- Wide Applications: Ideal for gemstone inlay, small-scale engraving, and other precision crafting, suitable for microscope work.
2. Package Contents
Verify that all components listed below are included in your package. If any items are missing or damaged, please contact VEVOR customer support.
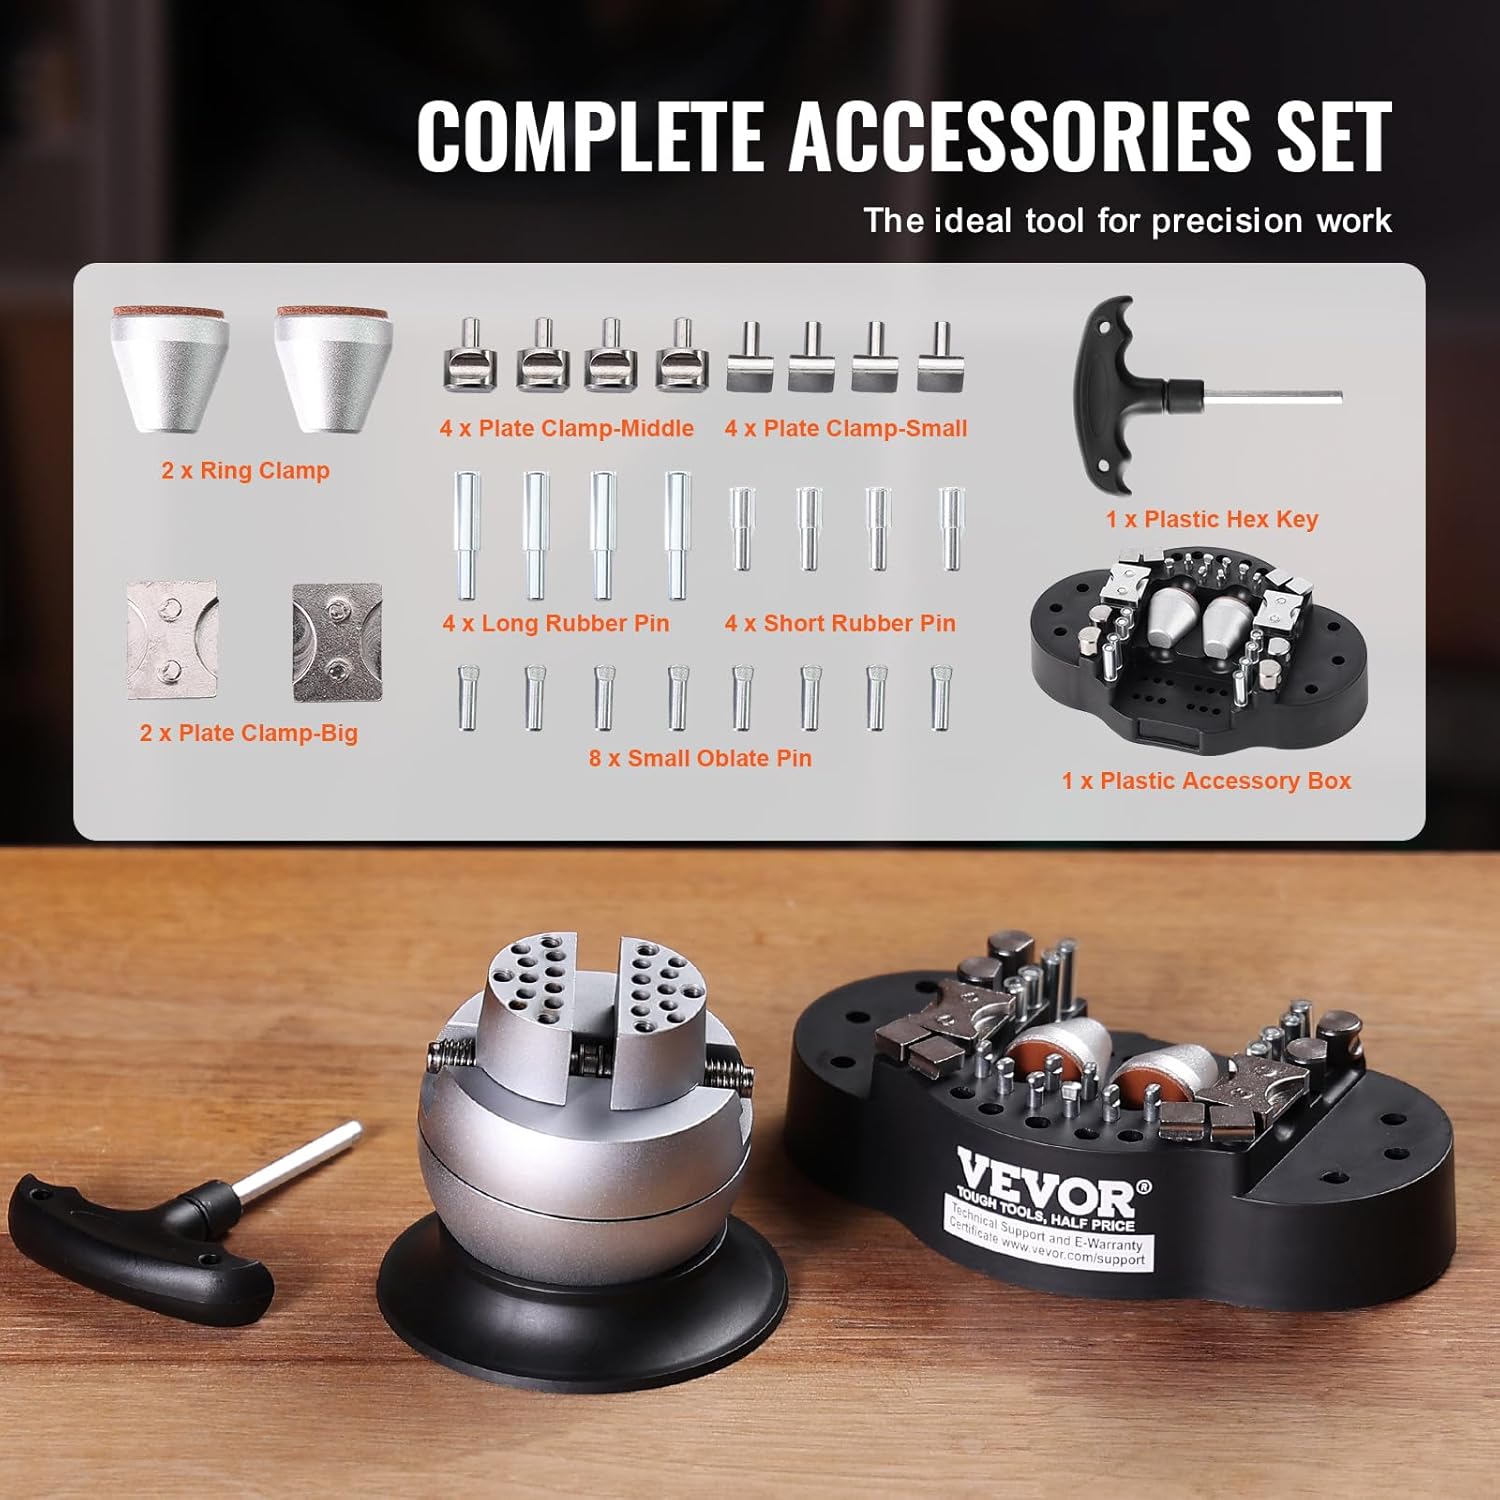
Figure 2.1: Complete accessory set for the VEVOR Ball Vise.
| Item | Quantity | Description |
|---|---|---|
| Ball Vise | 1 | Main engraving setting tool with 3-inch ball diameter. |
| Ring Clamp | 2 | Used for holding rings securely. |
| Plate Clamp-Middle | 4 | For clamping various flat workpieces. |
| Plate Clamp-Small | 4 | For clamping smaller flat workpieces. |
| Long Rubber Pin | 4 | Accessory pin for holding irregular shapes. |
| Short Rubber Pin | 4 | Accessory pin for holding irregular shapes. |
| Small Oblate Pin | 8 | Additional pins for versatile clamping. |
| Plate Clamp-Big | 2 | For clamping larger flat workpieces. |
| Plastic Hex Key | 1 | Tool for adjustments. |
| Plastic Accessory Box | 1 | Storage for small accessories. |
3. Specifications
Detailed technical specifications for the VEVOR Ball Vise.

Figure 3.1: VEVOR Ball Vise dimensions and component overview.
| Attribute | Value |
|---|---|
| Model Number | JH-N3YC001BP |
| Material | Alloy Steel |
| Ball Diameter | 3 inches / 78 mm |
| Maximum Jaw Opening | 2.13 inches / 54 mm |
| Surface Treatment | Chrome Plating |
| Net Weight (Including All Accessories) | 4.4 lbs / 2 kg |
| Product Max Size (Base + Installed Ball) | 3.8 x 3.8 x 3.3 inches / 97 x 97 x 85 mm |
| Color | Silver |
| Country of Origin | China |
4. Setup
The VEVOR Ball Vise comes largely pre-assembled. Follow these steps for initial setup:
- Unpack Components: Carefully remove all items from the packaging and verify against the "Package Contents" section.
- Place on Stable Surface: Position the ball vise on a clean, flat, and stable workbench. The non-slip base ensures stability during operation.
- Familiarize with Jaws: Observe the two main jaws of the vise. These are controlled by the threaded screws on the sides.
- Insert Accessories: Depending on your task, select the appropriate accessory (ring clamp, plate clamp, or pins) and insert them into the designated holes on the vise jaws. Ensure they are seated firmly.
- Initial Adjustment: Use the hex key to loosen or tighten the side screws to adjust the jaw opening as needed.
5. Operating Instructions
This section provides guidance on how to effectively use your VEVOR Ball Vise for various precision tasks.
5.1 Securing Workpieces
The coaxial control jaws and various attachments allow for secure clamping of diverse shapes.

Figure 5.1: Stable clamping with coaxial control jaws.
- Choose Attachment: Select the appropriate ring clamp, plate clamp, or accessory pins based on the shape and size of your workpiece.
- Insert Workpiece: Place your item between the jaws or within the chosen attachment.
- Adjust Jaws: Use the side screws to gently close the jaws until the workpiece is held firmly. Do not overtighten, as this may damage the workpiece or the vise. The maximum jaw opening is 2.13 inches (54 mm).
- Verify Stability: Lightly tug on the workpiece to ensure it is securely held and will not shift during your work.

Figure 5.2: Adjustable jaw opening for various workpieces.
5.2 Utilizing 360° Rotation
The ball vise's 360-degree rotation feature allows for optimal positioning of your workpiece, reducing the need to reposition yourself or the entire setup.

Figure 5.3: 360° rotating design for flexible work angles.
- Once the workpiece is secured, gently rotate the ball vise to achieve the desired angle for engraving, setting, or inspection.
- The dual-ball bearing system ensures smooth and precise rotation without internal looseness.
- The weight of the ball vise and its non-slip base provide stability even during rotation.
5.3 Precision Crafting Techniques
The VEVOR Ball Vise is designed to support various precision crafting needs, from inlay to engraving.

Figure 5.4: Precision engraving in progress.
- Engraving: Use appropriate engraving tools with the workpiece securely held. The stable platform minimizes vibrations.
- Gemstone Inlay: Position the workpiece for optimal access to the setting area. The adjustable angle is crucial for precise stone placement.
- Microscope Work: The compact and stable design makes it suitable for use under a microscope, providing a steady platform for highly detailed work.
6. Maintenance
Proper maintenance ensures the longevity and optimal performance of your VEVOR Ball Vise.
- Cleaning: After each use, wipe down the vise with a soft, dry cloth to remove dust, debris, and metal shavings. For stubborn grime, a slightly damp cloth can be used, followed by immediate drying.
- Lubrication: Periodically apply a small amount of light machine oil to the threaded screws and the ball bearing mechanism to ensure smooth operation. Wipe off any excess oil.
- Storage: Store the ball vise and its accessories in a clean, dry environment, preferably in the provided accessory box, to prevent rust and damage.
- Inspection: Regularly inspect the jaws, pins, and screws for any signs of wear or damage. Replace worn components if necessary.
- Avoid Harsh Chemicals: Do not use abrasive cleaners or harsh chemicals, as they can damage the chrome plating and other surfaces.
7. Troubleshooting
This section addresses common issues you might encounter with your VEVOR Ball Vise.
| Problem | Possible Cause | Solution |
|---|---|---|
| Jaws are stiff or difficult to adjust. | Lack of lubrication or accumulation of debris. | Clean the threaded screws and apply a small amount of light machine oil. Operate the jaws back and forth to distribute the lubricant. |
| Ball does not rotate smoothly. | Debris in the bearing system or insufficient lubrication. | Inspect the base and ball for any visible debris. Apply a small amount of light machine oil to the contact points of the ball and base, then rotate to distribute. |
| Workpiece slips during operation. | Jaws not tightened sufficiently, incorrect accessory used, or workpiece surface is oily/slippery. | Ensure jaws are tightened firmly but not excessively. Select the most appropriate accessory for the workpiece shape. Clean the workpiece surface if it's slippery. |
| Accessories do not fit into holes. | Incorrect accessory for the specific hole, or debris in the hole. | Verify you are using the correct accessory for the intended hole. Clean any debris from the holes using a small brush or compressed air. |
8. Warranty and Support
VEVOR products are designed for durability and performance. For information regarding product warranty, returns, or technical support, please refer to the official VEVOR website or contact their customer service directly.
VEVOR Official Website: www.vevor.com
Please have your model number (JH-N3YC001BP) and purchase information ready when contacting support.
Ask a question about this manual
Ask about setup, troubleshooting, compatibility, parts, safety, or missing instructions. Manuals+ will review the question and use this page’s manual context to help answer it.