Bailigo BL-EAC002.18.12.W-Z01
Bailigo RV Air Conditioner with Heat 12V Universal Rooftop AC Unit (Model BL-EAC002.18.12.W-Z01) User Manual
Comprehensive instructions for setup, operation, and maintenance.
1. Introduction
This manual provides detailed instructions for the installation, operation, and maintenance of your Bailigo 12V RV Air Conditioner with Heat. This unit is designed to provide efficient cooling and heating for various recreational vehicles, including RVs, campers, box trucks, travel trailers, and motorhomes. Please read this manual thoroughly before installation and use to ensure proper function and safety.

Image 1.1: Bailigo 12V RV Air Conditioner unit and remote control. The image shows the white rooftop unit from an angled top-down view, and a hand holding a white remote control with various buttons for mode, fan speed, and temperature adjustment.
The Bailigo RV AC unit offers year-round comfort with its integrated heat pump, providing both cooling and heating capabilities. It features increased airflow, a lighter design, quiet operation, and contributes to a smaller carbon footprint through reduced energy consumption.

Image 1.2: This image highlights the benefits of the Bailigo RV AC unit, including year-round comfort with a heat pump, maximum airflow (15% increase), lighter weight (20% lighter), quiet operation, and a smaller carbon footprint. A motorhome is shown in a natural setting.
Designed for convenience, this electric air conditioner eliminates the need for fuel consumption while parked, prevents discomfort from heat, and ensures warmth in cold weather, making your travel experience more enjoyable.

Image 1.3: This image illustrates the advantages of the electric air conditioner for parked trucks and RVs, emphasizing "No Fuel Consumption Required," "No More Sweating in Hot Weather," and "No More Freezing in The RV In Winter."
2. Important Safety Instructions
WARNING: Failure to follow these instructions could result in electric shock, fire, or serious injury.
- Always disconnect power before performing any installation, maintenance, or troubleshooting.
- Installation must be performed by a qualified technician in accordance with all local and national electrical codes.
- Ensure the unit is securely mounted to prevent movement during vehicle operation.
- Do not operate the unit with damaged wiring or components.
- Keep hands and objects clear of moving parts, such as fans.
- Do not block air intake or exhaust vents.
- Use only specified refrigerant (R-134A) and ensure proper handling.
3. Included Components
Your Bailigo RV Air Conditioner package includes the following items:
- AC Unit (Rooftop)
- Installation Kit (includes mounting hardware, wiring harness, and seals)
- Remote Control
- Interior Air Distribution Panel
4. Product Specifications
Refer to the table below for detailed technical specifications of the Bailigo 12V RV Air Conditioner.

Image 4.1: Detailed parameters for the RV Rooftop AC Unit. The table lists specifications such as Rated Voltage (12V/24V Optional), Current (30-50A), Rated Power (330-1000W), Rated Cooling Capacity (2300W), Refrigerant (R134A), Refrigerant Charge Amount (650g), Range of Rotation (1600-3800), Inner Machine Size (500x600mm), External Machine Size (720x660x180mm), Product Weight (31KG), and Applicable Minimum Skylight Size (320mm x 240mm).
| Feature | Specification |
|---|---|
| Brand | Bailigo |
| Model Number | BL-EAC002.18.12.W-Z01 |
| Cooling Power | 9000 BTU |
| Voltage | 12 Volts (DC) |
| Wattage | 790 watts |
| Noise Level | 48 dB |
| Refrigerant | R-134A |
| Material Type | ABS |
| Item Weight | 46 pounds |
| Product Dimensions (External) | 36 x 28 x 7 inches (approx.) |
| Applicable Skylight Size | Minimum 12.6" x 9.5" (320mm x 240mm) |
| Special Features | Fast Cooling, Heating & Cooling Function, Inverter Compressor, Remote Controlled |
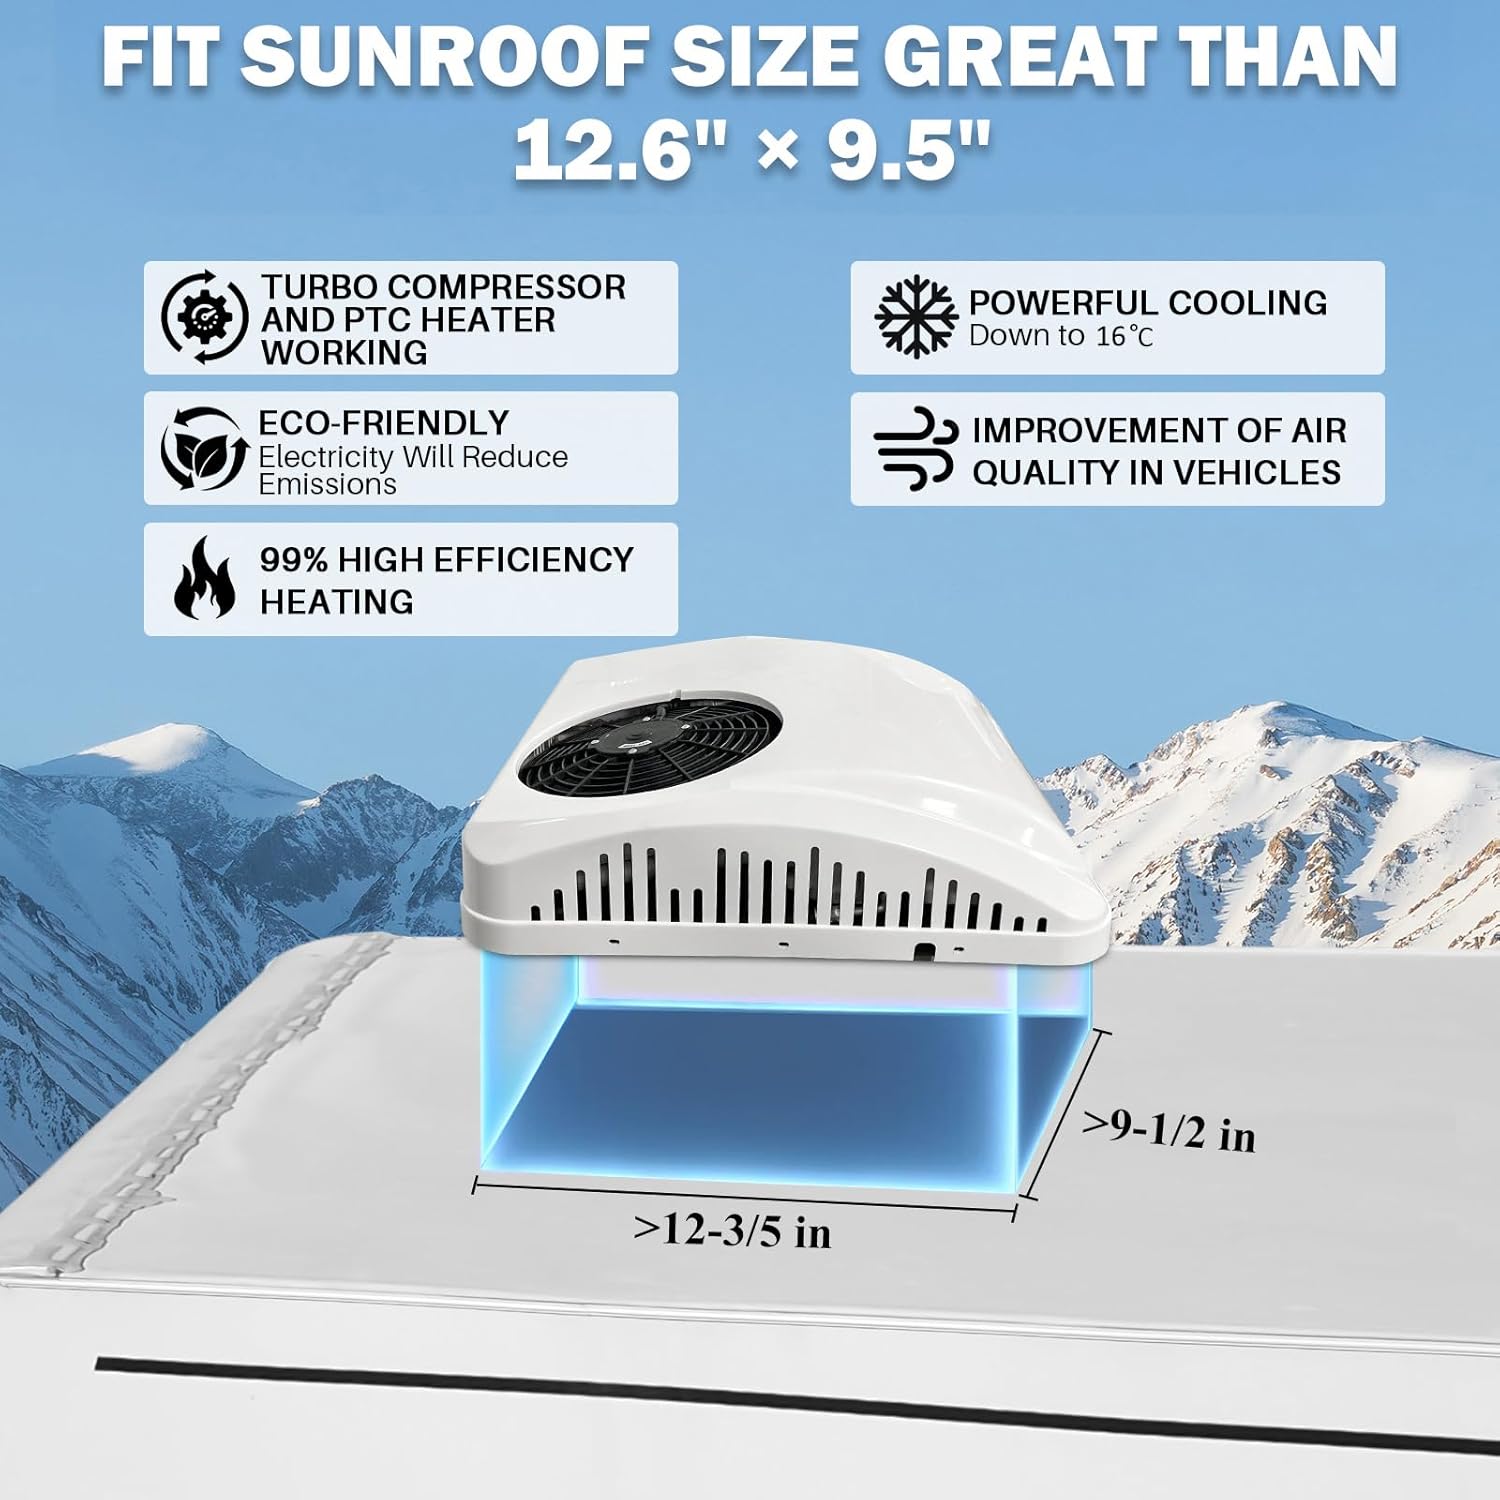
Image 4.2: Diagram illustrating the required sunroof size for installation (greater than 12.6" x 9.5") and key features such as Turbo Compressor, PTC Heater, Powerful Cooling (down to 16°C), Eco-Friendly operation, 99% High Efficiency Heating, and Improvement of Air Quality in Vehicles.
The Bailigo RV AC unit incorporates advanced components for reliable performance, including an inverter compressor, a slim design, high air volume, a quiet brushless motor, metal springs for durability, and a stronger fan wheel.

Image 4.3: This image showcases the internal components and design advantages of the Bailigo RV AC, including an Inverter Compressor, Slim Design, 300CFM High Air Volume, Quiet Brushless Motor, Metal Springs, and a Stronger Fan Wheel.
5. Installation Guide
This section provides a quick guide for installing your Bailigo RV Air Conditioner. For detailed instructions, refer to the separate installation manual included with your product. Professional installation is recommended.

Image 5.1: A visual quick installation guide showing 8 steps. These steps include: 1. Applying waterproof foam strips to the roof opening. 2. Positioning the rooftop AC unit. 3. Pulling out the internal wiring harness and control panel. 4. Securing the rods horizontally or vertically. 5. Taking out the interior panel. 6. Connecting the AC unit's wiring harness to the vehicle's battery. 7. Connecting the wires of the control panel to the AC unit and installing the interior panel. 8. Turning on the AC unit to confirm normal function.
- Prepare the Roof Opening: Apply waterproof foam strips from the packaging kit around the vehicle's roof opening. Adjust and secure the sealing strips as necessary for a proper seal.
- Position the Rooftop Unit: Carefully place the rooftop air conditioner onto the vehicle's roof, ensuring it sits squarely over the opening and the sealing strips.
- Access Internal Wiring: From inside the vehicle, pull out the internal wiring harness and control panel from the air conditioner unit. Inspect for any damage.
- Secure the Unit: Use the provided flange nuts, mounting studs, and supports from the packaging kit to secure the rods horizontally or vertically. Ensure the unit is firmly fixed to the vehicle's structure.
- Prepare Interior Panel: Take out the interior panel (item #11) from the packaging kit.
- Connect to Power: Connect the air conditioner's wiring harness to the vehicle's 12V battery. Ensure correct polarity and secure connections.
- Connect Control Wires and Install Panel: Connect the wires of the control panel to the corresponding wires of the air conditioning unit. Then, fit the interior panel from the top (ceiling) and cover the bolt holes with decorative covers.
- Test Functionality: Turn on the air conditioner and confirm that it is functioning normally in both cooling and heating modes.
6. Operating Instructions
Your Bailigo RV Air Conditioner offers both cooling and heating functions, along with quiet operation and automatic airflow control. The unit is designed for rapid temperature regulation.
6.1 Basic Operation (Cooling & Heating)
- Power On/Off: Use the power button on the remote control or the unit's control panel to turn the unit on or off.
- Mode Selection: Press the "Mode" button to cycle through cooling, heating, and fan-only modes.
- Temperature Adjustment: Use the temperature up/down buttons to set your desired temperature. The unit will automatically adjust its operation to maintain this setting.
- Fan Speed: Adjust the fan speed using the fan control button. Multiple fan settings are available for customized airflow.

Image 6.1: This image highlights the 4-in-1 functionality of the air conditioner: Fan, Heating, ECO mode, and Cooling. An RV is shown on a scenic road, emphasizing its use for comfortable caravan life.
The unit provides rapid cooling, achieving significant temperature changes in a short period, and high heating efficiency.

Image 6.2: This graphic illustrates the performance of the Bailigo RV AC unit, highlighting 8500 BTU rapid cooling in 8 minutes and 4000 BTU with 99% heating efficiency. It also shows 20% higher cooling capacity, 15% more airflow, a 130 sq. ft. working area, and 350 CFM maximum airflow.
6.2 Quiet Operation
The Bailigo RV AC unit is designed for low-noise operation, typically below 50 dB, ensuring a tranquil environment inside your vehicle.

Image 6.3: A woman is shown relaxing and reading in an RV, illustrating the quiet operation of the Bailigo AC unit. A graph compares the indoor noise level, showing Bailigo at 55dB versus others at 75dB, indicating a 36% noise reduction.
6.3 Auto Wind Swing
The unit features an auto wind swing function to distribute air more evenly and widely throughout your space, covering a wider area, providing softer air, and reaching a greater distance.

Image 6.4: This image depicts the "Auto Wind Swing" feature, showing air flowing from the interior unit. Benefits highlighted are covering a wider area, softer air distribution, and reaching a greater distance.
7. Maintenance
Regular maintenance ensures optimal performance and longevity of your RV Air Conditioner. Always disconnect power before performing any maintenance.
- Clean Air Filters: Periodically check and clean the air filters located in the interior air distribution panel. Dirty filters can reduce efficiency and airflow. Wash with mild soap and water, then dry thoroughly before reinstallation.
- Inspect Vents: Ensure all air intake and exhaust vents are free from obstructions (leaves, debris, etc.).
- Check Electrical Connections: Annually, or if issues arise, have a qualified technician inspect all electrical connections for tightness and corrosion.
- Clean Exterior Unit: Gently clean the exterior of the rooftop unit to remove dirt and grime. Avoid using harsh chemicals or high-pressure washers.
8. Troubleshooting
This section addresses common issues you might encounter. For problems not listed here, or if solutions do not resolve the issue, contact customer support.
| Problem | Possible Cause | Solution |
|---|---|---|
| Unit does not turn on | No power supply; Blown fuse/circuit breaker; Loose wiring connection. | Check battery connections and charge level; Inspect fuses/breakers; Verify all wiring is secure. |
| Insufficient cooling/heating | Dirty air filters; Blocked air vents; Low refrigerant; Incorrect temperature setting. | Clean air filters; Clear obstructions from vents; Contact a qualified technician for refrigerant check; Adjust temperature setting. |
| Unusual noise during operation | Loose components; Debris in fan; Unit not level. | Inspect for loose parts and tighten; Check for and remove any debris; Ensure unit is level. |
| Water leakage | Blocked condensate drain; Improper installation/sealing. | Clear condensate drain; Re-check installation seals, consult technician if necessary. |
9. Warranty Information
Bailigo products are manufactured to high-quality standards. Specific warranty terms and conditions may vary. Please refer to the warranty card included with your product or contact Bailigo customer support for detailed information regarding your product's warranty coverage.
10. Customer Support
If you have any questions, require technical assistance, or need to report an issue, please contact Bailigo customer support. For the most up-to-date contact information, please visit the official Bailigo website or refer to the contact details provided in your product packaging.
Online Resources: Bailigo Amazon Store
Ask a question about this manual
Ask about setup, troubleshooting, compatibility, parts, safety, or missing instructions. Manuals+ will review the question and use this page’s manual context to help answer it.