1. Product Overview
The GOWENIC A780+ is an ATX desktop motherboard designed to support LGA940 and 938 pin processors, including AMD AM2, AM2+, AM3, and FX series CPUs. It features dual-channel DDR3 memory support, allowing for a maximum capacity of 32GB, and includes a PCIE 16X Gen 3.0 graphics card slot for enhanced visual performance.
This motherboard is constructed with a rugged PCB material and an all-solid state panel, ensuring durability and a long lifespan. Its multi-phase power supply delivers stable and accurate power distribution, optimizing CPU performance. Advanced thermal solutions are integrated for efficient heat dissipation, contributing to system stability and longevity.
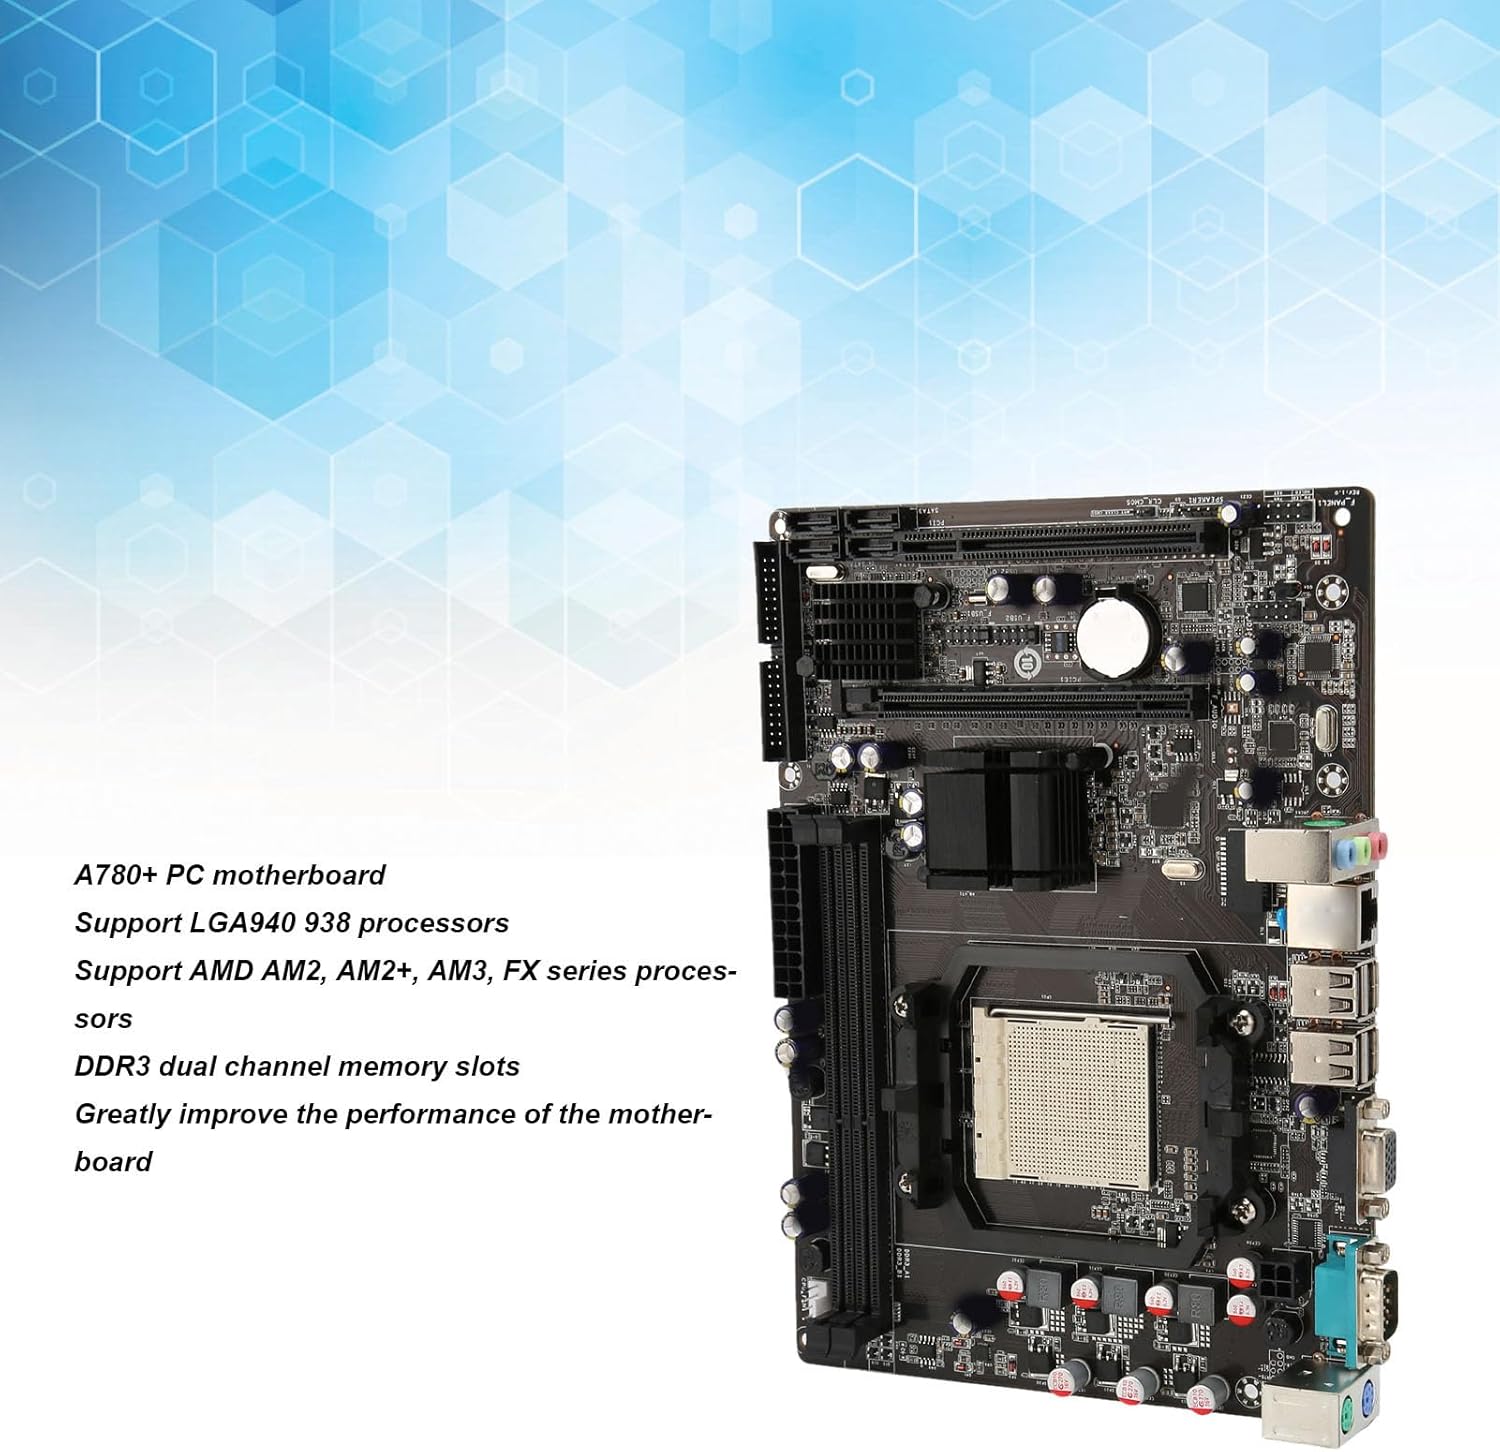
Figure 1: General view of the GOWENIC A780+ PC Motherboard.
2. Package Contents
Verify that all items listed below are included in your package. If any items are missing or damaged, please contact your retailer.
- 1 x GOWENIC A780+ Desktop Motherboard
- 1 x I/O Baffle
- 1 x SATA Data Cable

Figure 2: Motherboard with I/O baffle and SATA cable.
3. Motherboard Layout and Components
Familiarize yourself with the various components and connectors on the A780+ motherboard before installation.

Figure 3: Detailed layout of the A780+ motherboard with key component labels.
- 4 PIN CPU Power Supply: Connects to the CPU power cable from the power supply unit.
- PS/2 Mouse Button Interface: For connecting legacy PS/2 mice.
- COM Port: Serial communication port.
- VGA: Video Graphics Array output port.
- USB2.0*4: Four USB 2.0 ports for peripheral connections.
- 100 Megabit Network Card: Ethernet port for network connectivity.
- Audio Interface: Audio input/output jacks.
- USB2.0 Front Interface: Header for front panel USB 2.0 ports.
- Front Sound Interface: Header for front panel audio jacks.
- Front Panel Interface: Header for power button, reset button, power LED, and HDD LED.
- PCI: PCI expansion slot.
- SATA2.0*4: Four SATA 2.0 ports for storage devices.
- IDE: Integrated Drive Electronics connector for older storage devices.
- PCIE 16X Slot: PCI Express x16 slot for graphics cards.
- 24PIN Motherboard Power Supply: Main power connector from the power supply unit.
- 2 x DDR3 Memory Slots: Slots for DDR3 RAM modules.
- CPU Fan Power Connector: For connecting the CPU cooler fan.
4. Installation Guide
Before beginning installation, ensure your computer is powered off and unplugged from the wall outlet. Wear an anti-static wrist strap to prevent electrostatic discharge (ESD) damage to components.
4.1. CPU Installation
- Locate the CPU socket (LGA940/938) on the motherboard.
- Open the CPU socket lever.
- Carefully align the CPU with the socket, ensuring the gold triangle on the CPU matches the indicator on the socket. Do not force the CPU into the socket.
- Gently lower the CPU into the socket.
- Close the CPU socket lever to secure the CPU.
- Apply a thin layer of thermal paste to the CPU (if not pre-applied to the cooler).
- Install the CPU cooler according to its manufacturer's instructions and connect its fan cable to the "CPU Fan" header on the motherboard.
4.2. Memory (RAM) Installation
- Locate the two DDR3 memory slots.
- Open the clips at both ends of the memory slot.
- Align the notch on the DDR3 memory module with the key in the memory slot.
- Insert the memory module firmly into the slot until the clips snap into place. Ensure both clips are fully closed.
4.3. Power Supply Connection
- Connect the 24-pin ATX power cable from your power supply unit (PSU) to the 24PIN Motherboard Power Supply connector.
- Connect the 4-pin CPU power cable from your PSU to the 4 PIN CPU Power Supply connector.
4.4. Storage Device Connection (SATA)
- Connect one end of the SATA data cable to a SATA2.0 port on the motherboard.
- Connect the other end of the SATA data cable to your hard drive or SSD.
- Connect a SATA power cable from your PSU to the storage device.
4.5. Expansion Card Installation (PCIe)
- Locate the PCIE 16X slot for your graphics card or the PCI slot for other expansion cards.
- Remove the corresponding expansion slot cover from your computer case.
- Align the expansion card with the slot and press down firmly until it is securely seated.
- Secure the card with a screw or retention clip to the computer case.
4.6. Front Panel Connections
Connect the cables from your computer case's front panel (Power Button, Reset Button, Power LED, HDD LED, Front USB, Front Audio) to the corresponding headers on the motherboard (Front Panel Interface, USB2.0 Front Interface, Front Sound Interface). Refer to the motherboard layout diagram (Figure 3) and your case manual for specific pin assignments.
4.7. Rear Panel Connections
Install the I/O baffle into the rear opening of your computer case. After installing the motherboard into the case, connect your peripherals (monitor, keyboard, mouse, network cable, etc.) to the appropriate ports on the rear I/O panel.
5. Initial Setup and Operation
5.1. First Boot
After completing all hardware installations, connect your monitor, keyboard, and mouse. Plug in the power cord and press the power button on your computer case. The system should power on and display the BIOS/UEFI splash screen.
5.2. BIOS/UEFI Access
To enter the BIOS/UEFI setup utility, press the designated key (commonly DEL or F2) repeatedly during the initial boot sequence. In the BIOS/UEFI, you can configure boot order, system time, and other hardware settings.
5.3. Driver Installation
After installing your operating system, install the necessary drivers for the motherboard's chipset, network card, and any integrated graphics (if applicable). These drivers are typically provided on a CD/DVD with the motherboard or can be downloaded from the GOWENIC support website.
6. Maintenance
6.1. Cleaning
Regularly clean the interior of your computer case to prevent dust buildup, which can hinder airflow and lead to overheating. Use compressed air to remove dust from fans, heatsinks, and motherboard components. Ensure the system is powered off and unplugged before cleaning.
6.2. BIOS Updates
BIOS updates can provide improved compatibility, stability, and performance. Check the GOWENIC support website for the latest BIOS versions and follow the provided instructions carefully. Incorrect BIOS updates can damage your motherboard.
7. Troubleshooting
This section provides solutions to common issues you might encounter.
7.1. No Power / No Boot
- Ensure all power cables (24-pin ATX, 4-pin CPU) are securely connected to the motherboard and the power supply.
- Verify that the power supply is switched on and plugged into a working outlet.
- Check front panel connections (Power Button header) for correct installation.
- Test with a different power supply if possible.
7.2. No Display Output
- Ensure your monitor is connected to the correct video output port (VGA on the motherboard or on your dedicated graphics card).
- Verify that the graphics card (if installed) is properly seated in its PCIE 16X slot and any required auxiliary power cables are connected.
- Reseat memory modules.
- Try booting with only one memory module installed.
7.3. Memory Issues
- Ensure DDR3 memory modules are fully seated in their slots.
- Verify that the memory modules are compatible with the motherboard (DDR3 type, maximum 32GB capacity).
- Test each memory module individually in different slots to identify a faulty module or slot.
7.4. System Instability
- Check CPU and GPU temperatures to ensure they are within safe operating limits. Ensure CPU cooler is properly installed.
- Verify that all drivers are up to date.
- Ensure the power supply unit provides sufficient and stable power to all components.
- Run memory diagnostic tools to check for RAM errors.
8. Technical Specifications
Below are the detailed technical specifications for the GOWENIC A780+ PC Motherboard.

Figure 4: Dimensions of the A780+ PC Motherboard.
| Feature | Specification |
|---|---|
| Product Model | A780+ |
| Chipset | RS 780L |
| Motherboard Architecture | ATX |
| Motherboard Size | Approx. 235x170mm / 9.3x6.7in |
| CPU Socket | LGA940 / 938 Pins |
| Supported CPUs | AM2, AM2+, AM3, FX Series Processors |
| Memory Type | 2 x DDR3 Dual Channel |
| Maximum Memory Capacity | 32GB |
| Graphics Card Slot | 1 x PCIE 16X Gen 3.0 |
| SATA Interface | 4 x SATA2.0 |
| USB Interface | 4 x USB2.0 (Rear), 1 x USB2.0 (Front Header) |
| Network Card | 100Mbit Ethernet |
| Video Output | 1 x VGA |
| Expansion Slots | 1 x PCIE Expansion Slot, 1 x PCI Slot |
| Other Interfaces | 1 x COM Interface, 1 x PS/2 Mouse/Keyboard Interface |
| Power Supply | Three Phase Power Supply |
| CMOS Battery | CR2032 Button Cell (Built-in) |
9. Warranty and Support
For warranty information and technical support, please refer to the documentation provided by your retailer or contact GOWENIC directly through their official website. Keep your proof of purchase for warranty claims.