1. Introduction
Thank you for choosing the Dpofirs 2-Channel USB Audio Mixer. This compact sound mixing console is designed for various audio applications, including music recording, home karaoke, and internet karaoke. It features stable performance, high-accuracy audio resolution, and convenient USB power supply. This manual provides detailed instructions for setup, operation, and maintenance to ensure optimal performance and longevity of your device.

Image 1.1: Front view of the Dpofirs 2-Channel USB Audio Mixer.
Key Features:
- Stable Performance: Compatible with mainstream audio software, offering fast connection and low power consumption.
- High Accuracy: Equipped with 16-bit, 48KHz audio resolution for professional sound quality.
- USB Power Supply: Connects directly to a computer via USB for power, enhancing portability and convenience.
- Compact & Portable: Small design, easy to carry, with switchable 48V phantom power.
- Wide Application: Ideal for music recording, home karaoke, and internet karaoke.

Image 1.2: Visual representation of key features including Mic Preamp, 16BIT/48KHZ audio, monitoring function, main output, USB power/digital audio, and individual volume control.
2. Setup
Follow these steps to set up your Dpofirs 2-Channel USB Audio Mixer.
2.1 Package Contents
Before proceeding, ensure all items are present in the package:
- 1 x Dpofirs 2-Channel USB Audio Mixer
- 1 x USB Power Cable
- 1 x User Manual (this document)
2.2 Connecting to a Computer
The mixer receives power and transmits audio data via a single USB connection to your computer.
- Connect one end of the provided USB cable to the USB port on the Dpofirs mixer.
- Connect the other end of the USB cable to an available USB port on your computer.
- The mixer will power on automatically. Your computer should recognize the device as an audio interface.

Image 2.1: The mixer connected to a laptop via USB, illustrating simultaneous power supply and data transfer.
2.3 Connecting Microphones and Instruments
The mixer features two input channels, each supporting microphone, line, or instrument sources.
- Microphone/Line/Instrument Interface: Use the INPUT 1 MIC/LINE and INPUT 2 MIC/LINE jacks for connecting microphones (XLR or 1/4" TRS), line-level devices, or instruments.
- 48V Phantom Power: For condenser microphones requiring phantom power, press the +48V PHANTOM (CH1-2) switch. A red indicator light will illuminate. Ensure dynamic microphones or instruments that do not require phantom power are not connected when this feature is active, or ensure they can handle phantom power.
- Hi-Z Switch: For connecting high-impedance instruments like electric guitars or basses, activate the Hi-Z switch for the corresponding channel. This optimizes the input for instrument-level signals.
2.4 Connecting Output Devices
Connect your speakers or headphones to the mixer's output ports.
- Main Outputs (1/L, 2/R): Connect these 1/4" TRS jacks to your powered studio monitors or amplifier for main audio output.
- Headphone Monitor Interface: Plug your headphones into the 1/4" PHONES jack for direct monitoring of your audio.
3. Operating Instructions
This section details the functions of the mixer's controls and how to operate them.
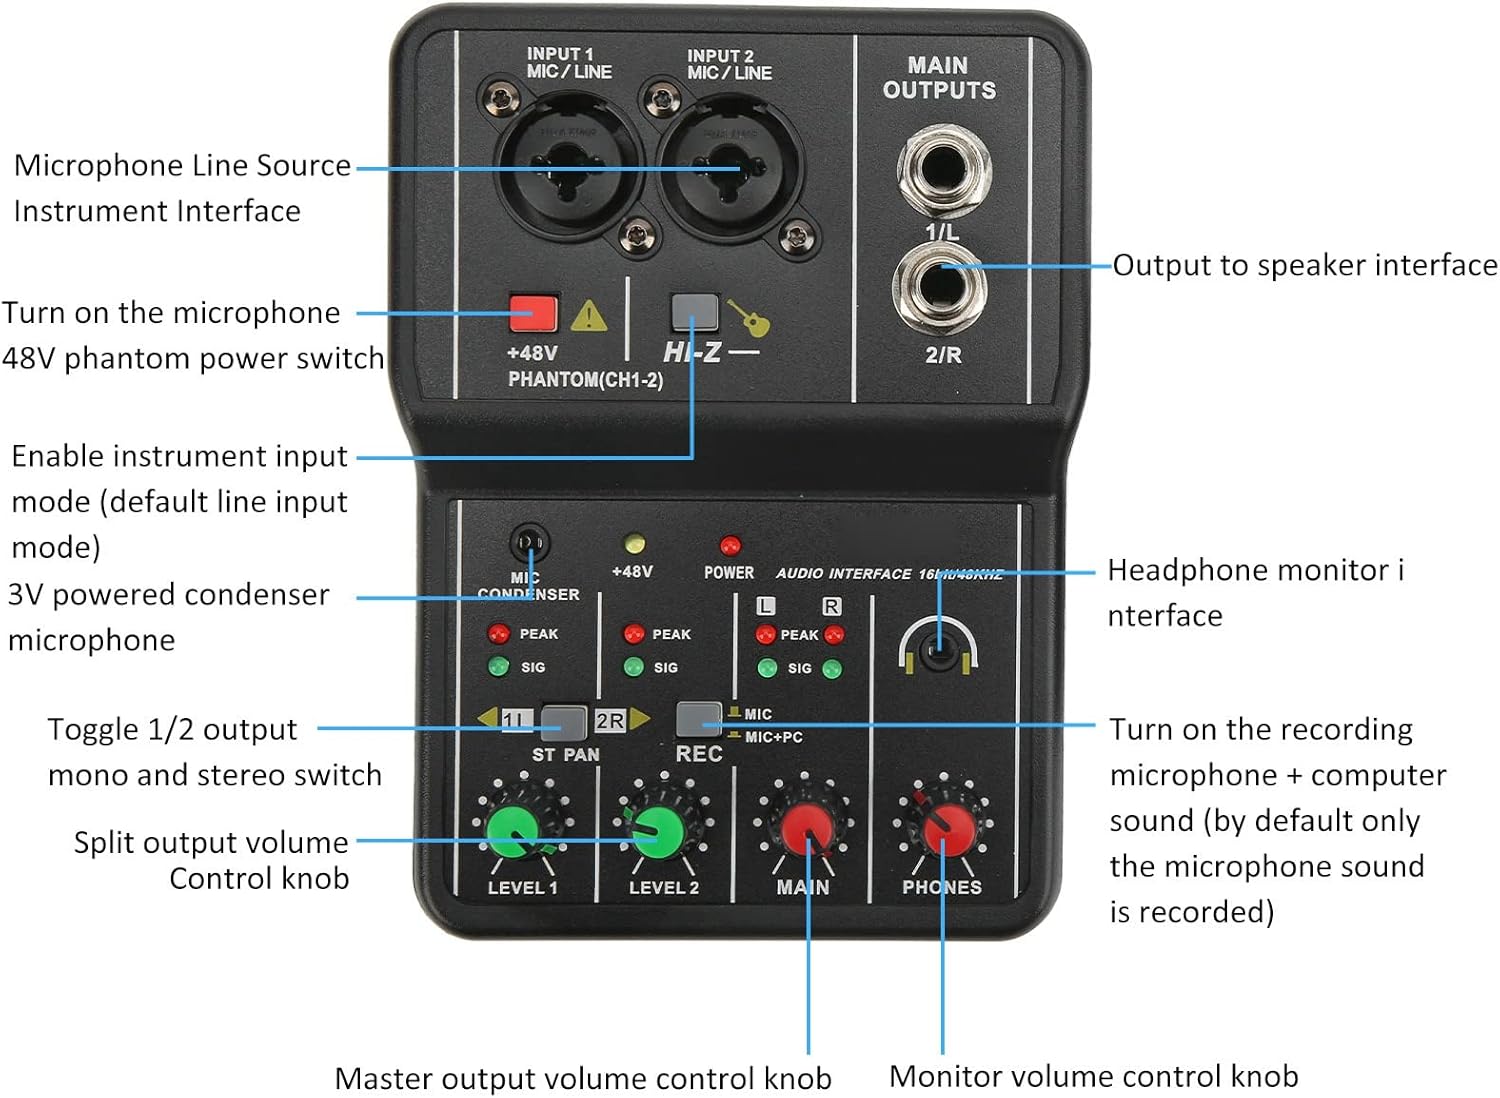
Image 3.1: Labeled diagram of the mixer's controls and interfaces.
3.1 Control Overview
- INPUT 1/2 MIC/LINE: Combination XLR/TRS jacks for connecting microphones, line-level devices, or instruments.
- +48V PHANTOM (CH1-2) Switch: Activates 48V phantom power for condenser microphones on both channels.
- Hi-Z Switch: Enables high-impedance input mode for instruments.
- MAIN OUTPUTS (1/L, 2/R): 1/4" TRS jacks for main stereo output to speakers.
- PHONES: 1/4" TRS jack for headphone monitoring.
- MIC CONDENSER Switch: For 3V powered condenser microphones.
- PEAK Indicators: Lights up when the input signal is too high, indicating potential clipping. Adjust input gain to prevent clipping.
- SIG Indicators: Lights up when an input signal is detected.
- 1L / 2R ST PAN Switch: Toggles between mono (1L) and stereo (2R) output for channels.
- REC Switch: Activates recording mode. When engaged, it records microphone + computer sound (by default, only microphone sound is recorded if not engaged).
- LEVEL 1 / LEVEL 2 Knobs: Individual volume control for Input Channel 1 and Input Channel 2.
- MAIN Knob: Master output volume control for the main outputs.
- PHONES Knob: Monitor volume control for the headphone output.
3.2 Basic Operation
- Power On: Connect the mixer to your computer via USB. The POWER indicator will light up.
- Input Level Adjustment: Connect your microphone or instrument. Speak into the microphone or play your instrument. Adjust the corresponding LEVEL 1 or LEVEL 2 knob until the SIG indicator lights consistently and the PEAK indicator flashes only occasionally during the loudest parts. If the PEAK indicator stays lit, reduce the input level.
- Output Level Adjustment: Adjust the MAIN knob for your main speakers and the PHONES knob for your headphones to a comfortable listening level.
- Recording: To record both microphone and computer audio, ensure the REC switch is engaged. Otherwise, only the microphone input will be recorded.
- Software Compatibility: The mixer is designed to be stable and compatible with mainstream audio software, ensuring a fast transmission rate and low power consumption.

Image 3.2: An audio software interface demonstrating the mixer's compatibility and stable signal for recording.

Image 3.3: Visual representation of the 48V phantom power supply feature.
4. Maintenance
Proper care and maintenance will extend the life of your Dpofirs 2-Channel USB Audio Mixer.
- Cleaning: Use a soft, dry cloth to clean the exterior of the mixer. Do not use liquid cleaners, aerosols, or solvents, as these may damage the finish or internal components.
- Storage: When not in use, store the mixer in a cool, dry place away from direct sunlight and extreme temperatures.
- Handling: Avoid dropping or subjecting the mixer to strong impacts. This can damage internal circuitry and external components.
- Moisture: Keep the mixer away from water and high humidity. Moisture can cause electrical shorts and corrosion.
- Ventilation: Ensure the mixer has adequate ventilation to prevent overheating, although its compact design typically manages heat well.
5. Troubleshooting
If you encounter issues with your mixer, refer to the following common problems and solutions.
| Problem | Possible Cause | Solution |
|---|---|---|
| No power to the mixer | USB cable not connected or faulty; computer USB port not supplying power. | Ensure the USB cable is securely connected to both the mixer and a working USB port on your computer. Try a different USB port or cable. |
| No sound output | Volume knobs are down; incorrect output connection; computer audio settings. | Check MAIN and PHONES volume knobs. Ensure speakers/headphones are correctly connected. Verify the mixer is selected as the output device in your computer's sound settings. |
| No input signal (SIG indicator off) | Microphone/instrument not connected; faulty cable; incorrect input selection (e.g., Hi-Z for mic). | Ensure microphone/instrument is properly connected. Try a different cable. Check if +48V PHANTOM is on for condenser mics. Ensure Hi-Z is only for instruments. |
| Distorted audio (PEAK indicator constantly lit) | Input level is too high. | Reduce the LEVEL 1 or LEVEL 2 knob for the affected channel until the PEAK indicator only flashes occasionally. |
| Cannot record computer audio | REC switch not engaged. | Ensure the REC switch is pressed to enable recording of both microphone and computer sound. |
6. Specifications
Technical specifications for the Dpofirs 2-Channel USB Audio Mixer.
| Feature | Detail |
|---|---|
| Model Number | Dpofirsu5azcrhg9k |
| Material | Plastic, Alloy |
| Frequency Response | 20Hz-20KHz |
| Maximum Input Level | +10dBu |
| Input Impedance | 18.5kΩ |
| Gain Range | -10dB to +40dB |
| Audio Resolution | 16 BIT, 48KHz |
| Power Source | Corded Electric (USB Powered) |
| Number of Channels | 2 |
| Connectivity Technology | USB |
| Item Weight | 0.3 Kilograms (10.6 ounces) |
| Package Dimensions | 6.18 x 5 x 2.32 inches |
7. Warranty & Support
7.1 Warranty Information
Please refer to the warranty card included with your product for specific warranty terms and conditions. Dpofirs products typically come with a standard manufacturer's warranty covering defects in materials and workmanship from the date of purchase. Keep your proof of purchase for warranty claims.
7.2 Customer Support
For technical assistance, troubleshooting beyond this manual, or warranty inquiries, please contact Dpofirs customer support through the retailer where you purchased the product or visit the official Dpofirs website for contact information.
When contacting support, please have the following information ready:
- Product Model: Dpofirsu5azcrhg9k
- Date of Purchase
- Description of the issue

