Introduction
This manual provides detailed instructions for the setup, operation, and maintenance of your Gochanmi ER2020Y Professional Wireless Audio UHF In-Ear Monitoring System. This system is designed for professional audio monitoring applications, offering reliable wireless performance with UHF frequency technology and Bluetooth connectivity.
Package Contents
Before beginning, please ensure all components are present:
- 1 x Transmitter
- 2 x TNC Antennas
- 1 x Power Supply
- 2 x Bodypack Receivers
- 2 x Headphones
- 1 x 6.35m Audio Cable
- 1 x User Guide (this manual)
Setup
1. System Overview and Connections
Familiarize yourself with the main transmitter unit's controls and connection ports.
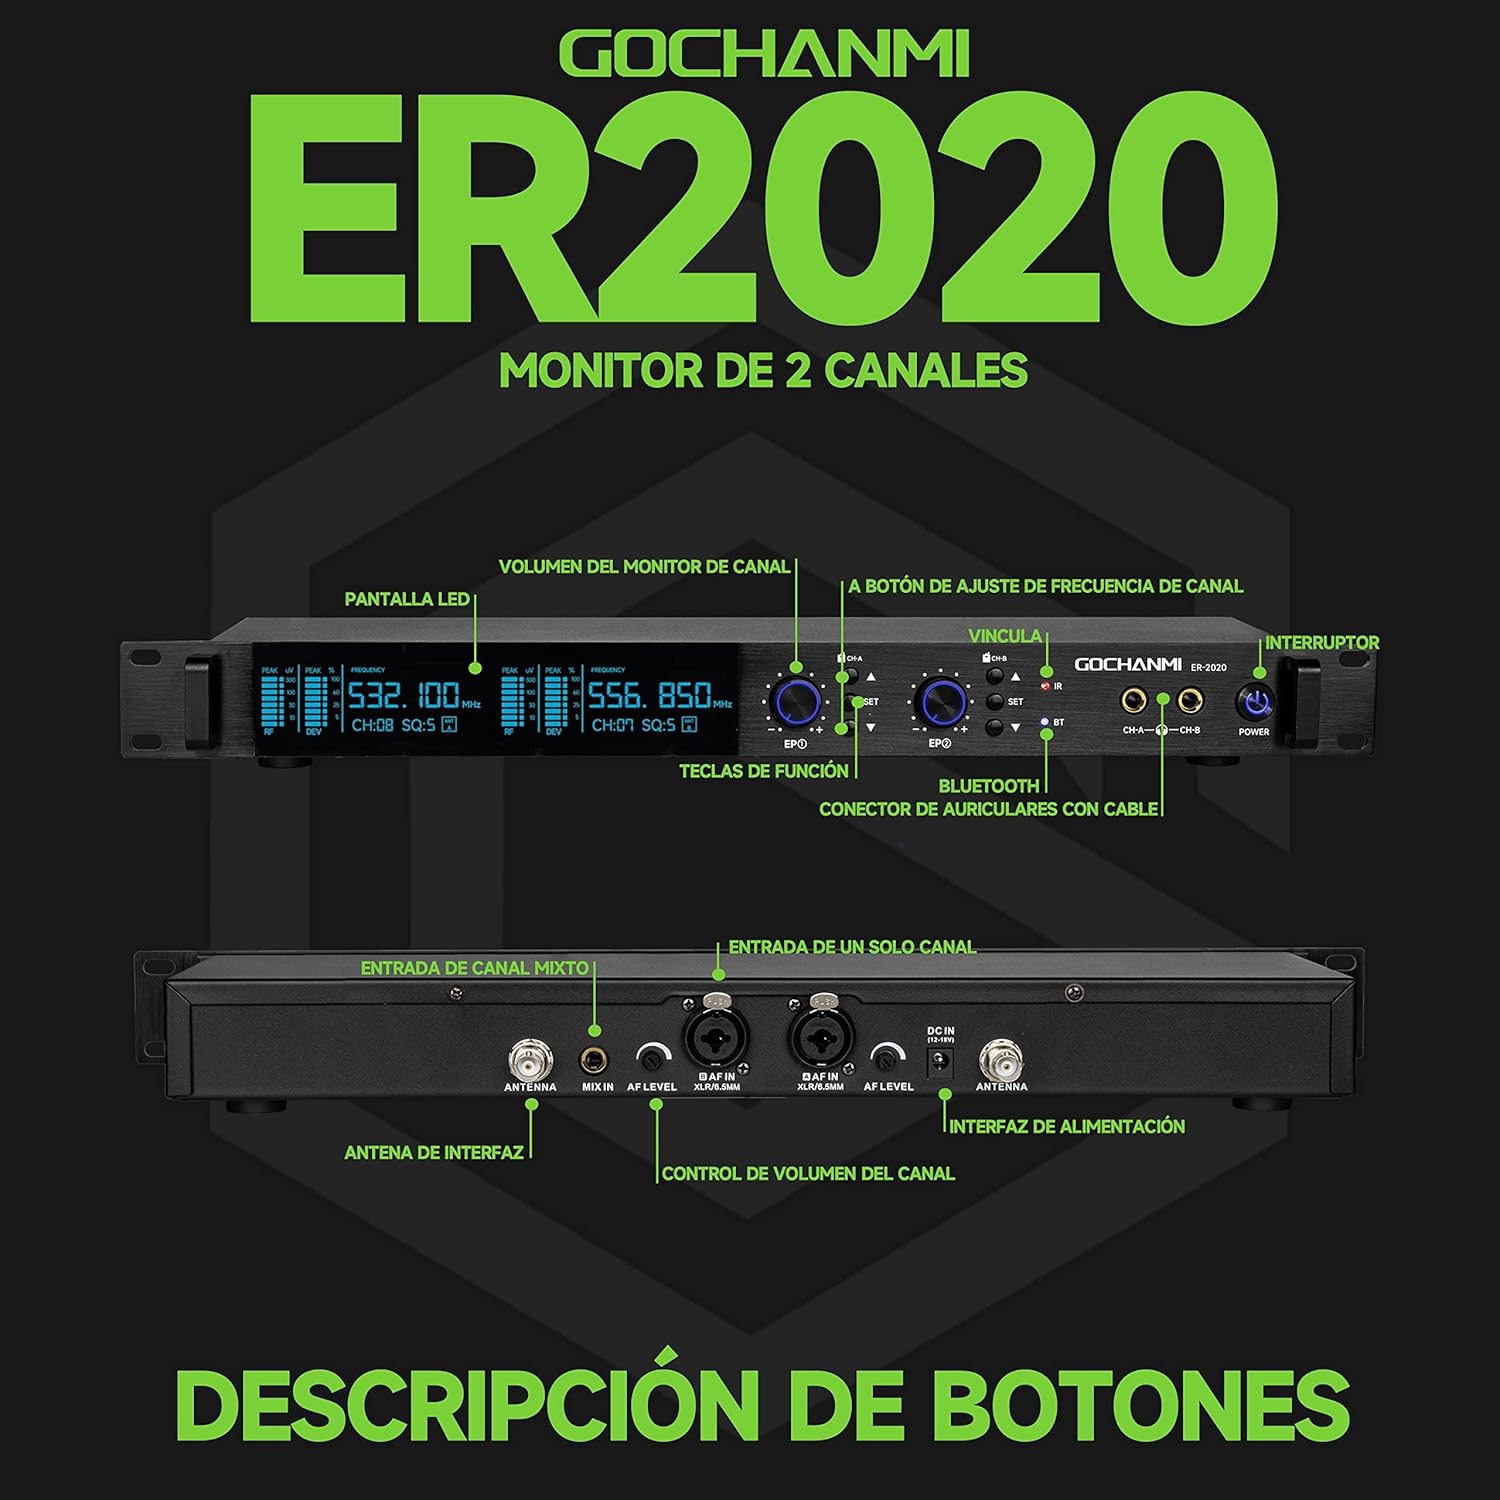
Image Description: This image displays the front and rear panels of the Gochanmi ER2020Y transmitter. The front panel shows the LED display, channel monitor volume knobs, channel frequency adjustment buttons, IR sync port, Bluetooth indicator, and power switch. The rear panel illustrates the antenna interfaces, MIX IN input, AF IN (single channel) inputs (6.35mm and XLR), power interface, and channel volume controls. This overview helps identify all physical controls and connection points.
Transmitter Features:
- Power Switch: Mechanical switch for turning the unit on/off.
- LCD Display: Shows channel, frequency, and other working parameters.
- IR Port (Infrared): Used for synchronizing frequencies with bodypack receivers.
- UP/DOWN Buttons: Adjusts frequency, channel and group settings.
- SYNC Button: Initiates IR frequency pairing.
- Volume Control: Adjusts headphone output level.
- Headphone Connector: 6.35 mm output jack for wired headphones.
- Power Socket (DC12-18V / 500mA): Connects to the power unit.
- 6.35mm (1/4") Audio Input Jack: Connects external audio sources like mixers or computers.
- XLR Balance Input: Professional audio input for balanced signals.
- TNC Antenna Socket: Connects high-gain antennas for signal transmission.
2. Connecting Antennas and Power
- Attach the two TNC antennas to the corresponding sockets on the rear of the transmitter.
- Connect the power supply to the DC12-18V power socket on the transmitter and plug it into a power outlet.
3. Audio Input Connection
The system supports various audio input methods:
- 6.35mm (1/4") Audio Input: Use the provided 6.35mm audio cable to connect your audio source (e.g., mixer, computer) to the 6.35mm input jack on the transmitter.
- XLR Balance Input: For professional audio equipment, use an XLR cable to connect to the XLR input.
- Bluetooth Input: Refer to the "Bluetooth Connection" section below.

Image Description: This image highlights the universal input ports on the rear of the Gochanmi ER2020Y transmitter, showing both XLR and 6.35mm (1/4 inch) audio input jacks. Cables are depicted connected to these ports, illustrating how external audio sources can be integrated into the system.
4. Bodypack Receiver Setup
- Insert appropriate batteries into each bodypack receiver.
- Connect the provided headphones to the headphone jack on the bodypack receiver. The system supports 6.35mm headphone input and binaural audio.

Image Description: This image shows a user holding headphones connected to a bodypack receiver, with the main transmitter unit in the background. It emphasizes the 6.35mm headphone input on the bodypack and its support for binaural audio, indicating the connection point for personal monitoring.
5. Frequency Synchronization (IR Sync)
To establish a wireless connection between the transmitter and bodypack receivers, perform IR synchronization:
- Ensure both the transmitter and bodypack receiver are powered on.
- On the transmitter, select the desired channel using the UP/DOWN buttons.
- Press the SYNC button on the transmitter.
- Open the battery cover of the bodypack receiver to expose its IR sensor.
- Align the IR sensor on the bodypack receiver with the IR port on the transmitter, keeping them within approximately 2 cm of each other.
- The frequency pairing will complete automatically. The pairing light on the bodypack will flash during the process.

Image Description: This image demonstrates the automatic frequency linking process using infrared (IR) technology. A bodypack receiver is shown with its battery cover open, aligning its IR sensor with the IR port on the main transmitter unit. Text indicates that pairing completes automatically when the devices are brought close, about 2 cm apart.
6. Bluetooth Connection
To use Bluetooth as an audio input source:
- Ensure the transmitter is powered on.
- Activate the Bluetooth function on your mobile phone or other Bluetooth-enabled device.
- Search for new devices. The system will appear as "ER102".
- Select "ER102" to connect. Once connected, audio from your device will be transmitted wirelessly to the monitoring system.

Image Description: This image illustrates the steps for connecting a mobile phone via Bluetooth to the Gochanmi ER2020Y system. It shows a hand interacting with a smartphone screen, with instructions to enable Bluetooth, search for "ER102", and connect. The main transmitter unit is visible in the background.
Operating Instructions
1. Adjusting Frequencies
The UHF frequency can be adjusted independently to avoid interference:
- Press the ▲ button on the corresponding channel panel of the transmitter.
- Observe the channel number (CH) and frequency on the display panel.
- Press the ▲ or ▼ buttons again to cycle through and select your desired frequency.

Image Description: This image provides a step-by-step guide on how to independently adjust the frequency on the Gochanmi ER2020Y transmitter. It shows a hand pressing the adjustment buttons and highlights the corresponding changes on the LCD display, illustrating the process of selecting a new frequency.
2. Volume Control
- Transmitter Headphone Output: Use the dedicated volume control knob on the transmitter's front panel to adjust the volume for wired headphones connected directly to the transmitter.
- Bodypack Receiver: Each bodypack receiver has its own volume control for the connected headphones. Adjust this to your preferred listening level.
3. Using MIX IN and AF IN
- AF IN (Single Channel Input): There are two AF IN ports, corresponding to channels A and B. Audio input to Channel A's AF IN will only be heard by wireless headphones assigned to Channel A. Similarly for Channel B.
- MIX IN (Mixed Input): After connecting an audio source to the MIX IN port, the monitor headphones of both Channel A and Channel B can listen to this mixed input. This is suitable for scenarios where a common audio feed is required for multiple monitors.
4. Multiple Bodypack Connection
The Gochanmi ER2020Y system is capable of connecting a large number of bodypack receivers. Each channel can support up to 100 units, making it suitable for large-scale events such as concerts, conferences, or multi-person gatherings.

Image Description: This image visually represents the system's capacity, showing a large array of bodypack receivers stacked together, with the main transmitter unit below. The text clearly states that "Each channel can connect 100 units," highlighting the system's scalability for extensive monitoring setups.
Maintenance
- Cleaning: Use a soft, dry cloth to clean the surfaces of the transmitter and bodypack receivers. Avoid using liquid cleaners or solvents.
- Battery Replacement: Replace batteries in bodypack receivers as needed. Always use fresh, high-quality batteries for optimal performance.
- Storage: When not in use for extended periods, store the system in a cool, dry place away from direct sunlight and extreme temperatures. Disconnect the power supply and remove batteries from bodypacks.
- Antenna Care: Handle antennas carefully to prevent bending or damage. Ensure they are securely attached during operation.
Troubleshooting
If you encounter issues with your Gochanmi ER2020Y system, refer to the following common problems and solutions:
| Problem | Possible Cause | Solution |
|---|---|---|
| No sound from headphones |
|
|
| Interference or poor audio quality |
|
|
| Bluetooth connection issues |
|
|
Specifications
System Features:
- UHF Frequency Range: 530-580MHz (2x100 Channels)
- Audio Input: 6.35 mm / XLR / Bluetooth
- Audio Output: Mono
- Preset Channels: 100 selectable frequencies
- Synchronization: IR synchronization
- Display: LCD screen and LED digital tube
- Chassis: EIA standard 1/2U or 1U rack-mounted metal chassis
- Operation Range: Up to 150 meters (line of sight)
Transmitter Specifications:
- Frequency Range: 530-580 MHz
- Transmission Method: FM
- Channels: 100
- RF Output Power: 10mW / 50mW
- Frequency Response: 60Hz-17KHz +/- 3dB
- T.H.D: > 0.5% at 1KHz
- Display: Backlit LCD
- Antenna: TNC
- Power Supply: DC12V-18V / 1000mA or DC12-18V / 1500mA
- Dimensions: 212x177x44mm (Dual) or 483x177x44mm (4 channels)
Monitoring System Parameters:
- Modulation Method: 4-DQPSK
- Frequency Range: A/B 530-580MHz (2x100 Channels)
- Sampling Ratio: 48 KHz
- Transmission Speed: 204.8Kbps
- Dynamic Range: > 90dB
- Total Harmonic Distortion: 0.1%
- Audio Transmission Delay Time: 3ms
- Signal-to-Noise Ratio: >96dB
- Frequency Response: 20Hz-20KHz
- RX Sensitivity: <-94dBm
- Unique ID Address: Yes
General Specifications:
- Model Name: ER2020Y
- Connectivity Technology: Wireless, Bluetooth
- Wireless Communication Technology: Bluetooth 5.1
- Bluetooth Range: 10 Metres
- Headphones Jack: 6.35 mm Jack
- Noise Control: None
- Material: Metal Plastic
- Item Weight: 4.5 kg
- Batteries Required: Yes (for bodypacks)
- Maximum Operating Distance: 100 Metres
- UPC: 786194843660
Warranty and Support
Seller Warranty: This product comes with a 1-month seller warranty from the date of purchase. Please retain your proof of purchase for any warranty claims.
For technical support or warranty inquiries, please contact your retailer or the manufacturer directly. Refer to the product packaging or purchase documentation for specific contact details.