1. Introduction
Thank you for choosing the GGM Gastro KTBI157#2#7SBI1313 PREMIUM PLUS Refrigerated Counter. This appliance is designed for professional use in commercial kitchens and catering environments, providing efficient refrigeration and practical workspace. This manual provides essential information for the safe and efficient installation, operation, and maintenance of your unit. Please read this manual thoroughly before installation and use, and keep it for future reference.

Figure 1: Front view of the GGM Gastro KTBI157#2#7SBI1313 PREMIUM PLUS Refrigerated Counter, showcasing its stainless steel construction, six drawers, and integrated sink.
2. Safety Instructions
Always observe the following safety precautions to prevent injury and damage to the appliance:
- Ensure the appliance is connected to a properly grounded electrical outlet.
- Do not operate the appliance with a damaged power cord or plug.
- Keep ventilation openings clear of obstructions.
- Do not store explosive substances such as aerosol cans with a flammable propellant in this appliance.
- Only qualified personnel should perform repairs or maintenance.
- Disconnect the appliance from the power supply before cleaning or maintenance.
- This appliance is not intended for use by persons (including children) with reduced physical, sensory or mental capabilities, or lack of experience and knowledge, unless they have been given supervision or instruction concerning use of the appliance by a person responsible for their safety.
3. Setup
3.1 Unpacking
Carefully remove the appliance from its packaging. Inspect for any shipping damage. Report any damage to your supplier immediately. Retain packaging materials for potential future transport.
3.2 Placement
Place the refrigerated counter on a firm, level surface capable of supporting its weight (approximately 145.87 kg). Ensure adequate ventilation around the unit, especially at the rear and sides, to allow for proper heat dissipation. Avoid direct sunlight or proximity to heat sources. The appliance dimensions are 1468 mm (width) x 700 mm (depth) x 950 mm (height).

Figure 2: Diagram illustrating the dimensions of the refrigerated counter: 1468mm width, 700mm depth, and 950mm height.
3.3 Electrical Connection
Connect the appliance to a dedicated, grounded electrical outlet that matches the voltage and frequency specified on the rating label. Do not use extension cords or adapters.
3.4 Initial Cleaning
Before first use, clean the interior and exterior of the unit with a mild detergent and warm water. Rinse thoroughly and dry completely. Allow the unit to stand for at least 2 hours after moving before plugging it in to allow refrigerants to settle.
4. Operating Instructions
4.1 Powering On/Off
Plug the unit into the electrical outlet. The digital display will illuminate. To turn the refrigeration system on or off, press and hold the power button on the control panel.
4.2 Temperature Control
The unit features a digital temperature control panel. The current internal temperature is displayed. To adjust the set temperature:
- Press the 'SET' button once. The set temperature will flash.
- Use the 'Up' (▲) or 'Down' (▼) arrows to adjust the desired temperature.
- Press 'SET' again to confirm the new temperature, or wait a few seconds for it to save automatically.

Figure 3: Close-up of the digital control panel, showing temperature display and control buttons (SET, Power, Up, Down, Defrost, Light).
4.3 Loading Drawers
The refrigerated counter is equipped with six drawers designed to accommodate various Gastronorm (GN) container sizes. Ensure food items are properly sealed to maintain freshness and prevent cross-contamination. Do not overload drawers, as this can impede air circulation and cooling efficiency.
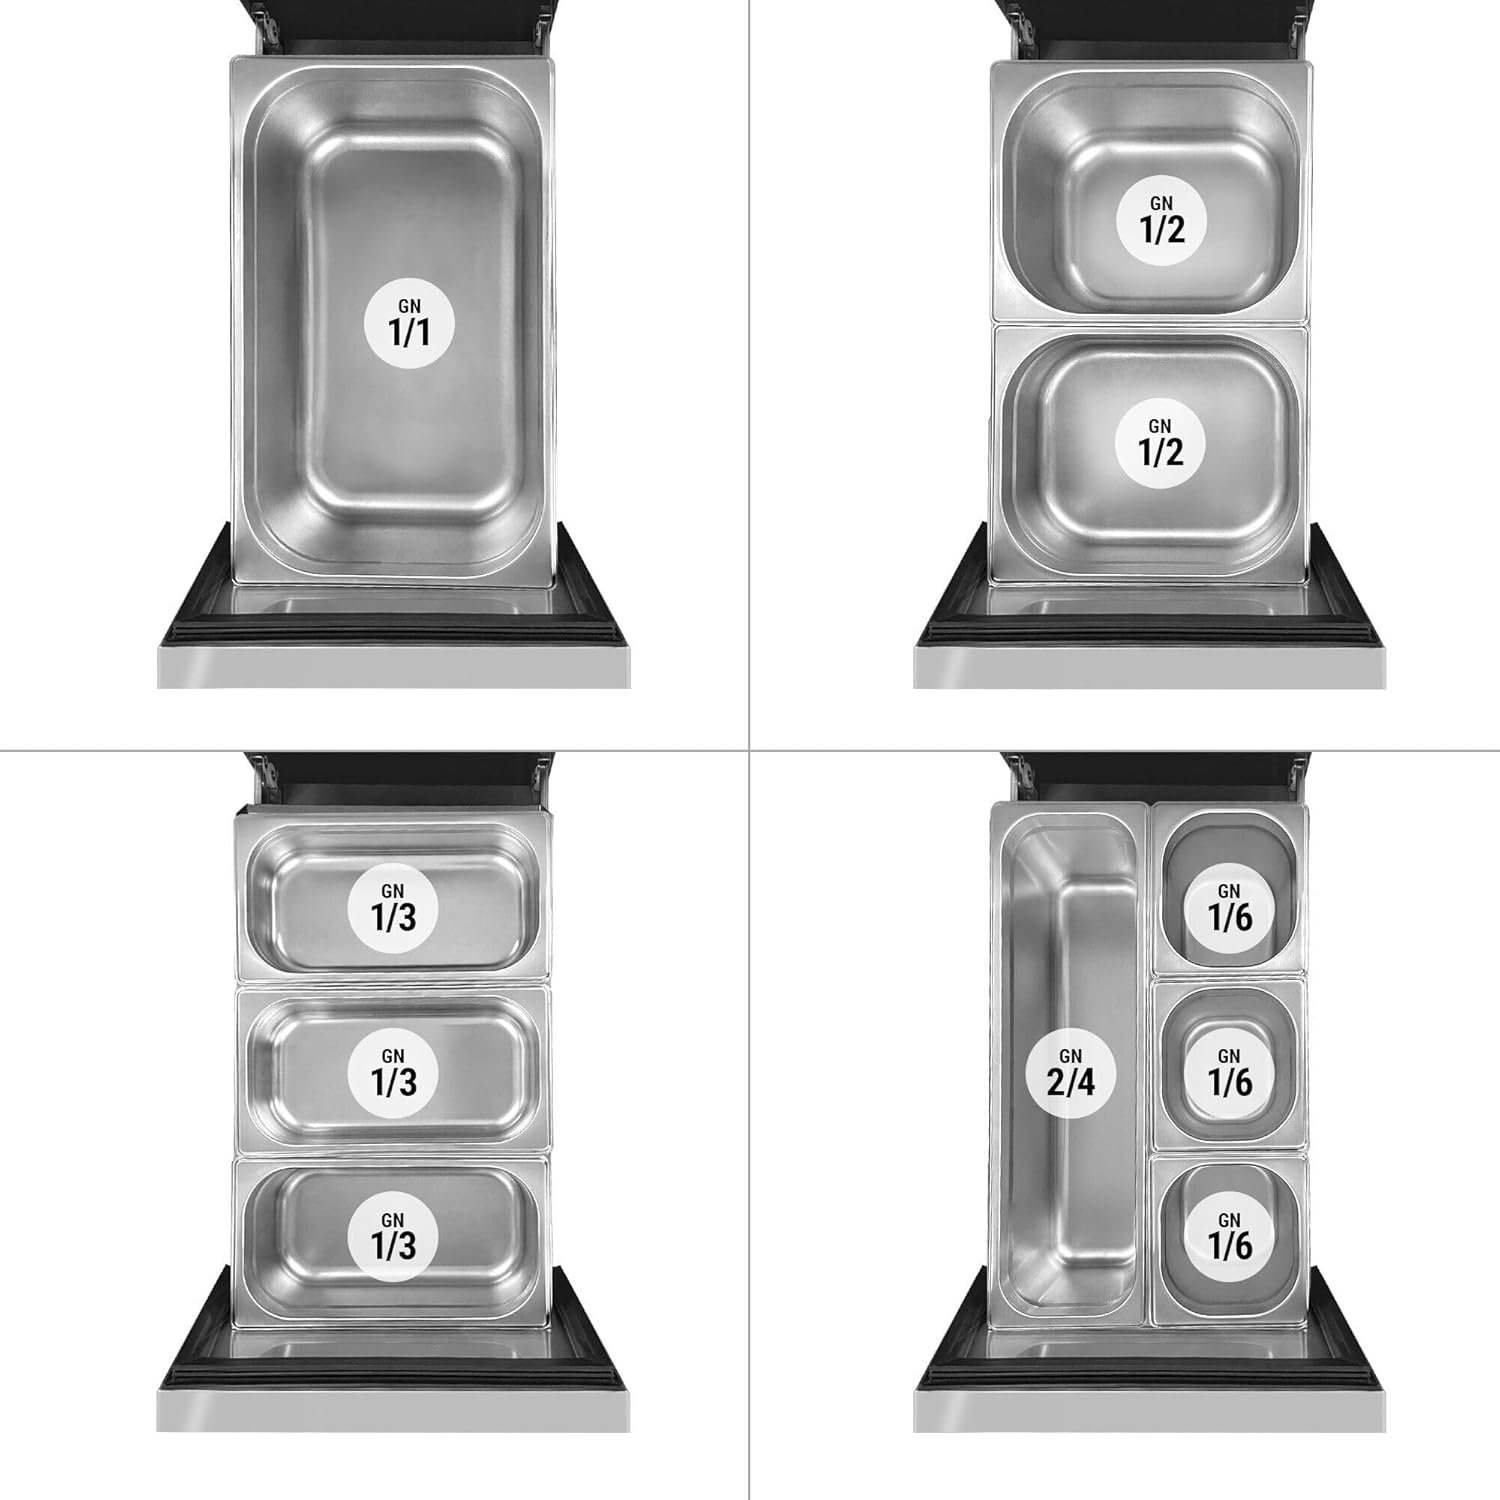
Figure 4: Examples of Gastronorm (GN) container configurations within the drawers, showing compatibility with GN 1/1, GN 1/2, GN 1/3, GN 2/4, and GN 1/6 sizes.
4.4 Using the Integrated Sink
The unit includes an integrated sink for convenience. Ensure proper plumbing connections are made according to local codes. Use the sink for light washing tasks, such as rinsing utensils or small food items. Do not dispose of large food waste or grease down the sink to prevent blockages.
5. Maintenance
Regular maintenance ensures optimal performance and longevity of your refrigerated counter.
5.1 Cleaning
- Interior: Clean regularly with a mild, food-safe detergent and warm water. Rinse and dry thoroughly. Do not use abrasive cleaners or sharp objects.
- Exterior: Wipe down stainless steel surfaces with a soft cloth and a stainless steel cleaner. Avoid harsh chemicals.
- Condenser Coil: The condenser coil should be cleaned periodically (e.g., monthly) to remove dust and debris. A clogged condenser reduces efficiency and can lead to compressor failure. Disconnect power before cleaning. Use a brush or vacuum cleaner.
5.2 Defrosting
This unit features an automatic defrost system. However, if excessive ice buildup occurs, manual defrosting may be necessary. To manually defrost, turn off the unit, remove all contents, and leave the drawers open until ice melts. Collect defrost water and dry the interior completely before restarting.
5.3 Gasket Inspection
Regularly inspect the door/drawer gaskets for cracks, tears, or signs of wear. Damaged gaskets compromise sealing and cooling efficiency. Replace worn gaskets promptly.
6. Troubleshooting
Before calling for service, check the following common issues:
| Problem | Possible Cause | Solution |
|---|---|---|
| Unit not cooling | Power supply issue Thermostat set too high Condenser coil dirty Drawers not closed properly | Check power connection and circuit breaker Adjust thermostat to a lower setting Clean condenser coil Ensure drawers are fully closed |
| Excessive noise | Unit not level Loose components Fan obstruction | Adjust leveling feet Inspect for loose parts (call service if unsure) Check for obstructions around fan (disconnect power first) |
| Water on floor | Clogged drain line Excessive humidity | Clear drain line Ensure drawers are closed; reduce ambient humidity if possible |
If problems persist after attempting these solutions, contact qualified service personnel.
7. Specifications
- Brand: GGM Gastro
- Model Number: KTBI157#2#7SBI1313
- Product Dimensions (W x D x H): 146.8 cm x 70 cm x 95 cm
- Weight: 145.87 kg
- Manufacturer: GGM Gastro
- ASIN: B0CTR191Q5
- First Available Date: October 7, 2022
8. Warranty and Support
For warranty information and technical support, please refer to the documentation provided at the time of purchase or contact your GGM Gastro dealer. Keep your purchase receipt as proof of purchase.