1. Introduction
This manual provides essential information for the installation, operation, and maintenance of your new Generic OEM LCD Touch Screen Display for commercial ice makers. This display is designed as a direct replacement part for various commercial ice maker models, including those from Vevor, Cotlin, and Coolski. Please read these instructions carefully before proceeding with installation or operation to ensure proper function and longevity of the product.
2. What's in the Box
Upon opening the package, please verify that all components are present and undamaged. The package should contain:
- One (1) Generic Ice Maker LCD Touch Screen Display
3. Compatibility
This LCD touch screen display is compatible with various commercial cube and crescent ice makers. It is crucial to compare your original ice maker screen with the images provided in this manual to confirm visual and connector compatibility before purchase and installation. This display is an English version, ensuring clear readability and operation for English-speaking users.
4. Setup and Installation
Important: Before beginning any installation, ensure the ice maker is completely powered off and unplugged from the electrical outlet to prevent electric shock or damage to the unit.
- Preparation: Gather necessary tools, which may include screwdrivers (Phillips and flathead), a plastic prying tool, and anti-static gloves.
- Access the Old Display: Carefully locate and remove any screws or clips securing the control panel housing or the old display unit. Use a plastic prying tool if necessary to gently separate components without causing damage.
- Disconnect Old Display: Once the old display is accessible, carefully disconnect its ribbon cables and power connectors. Note the orientation and connection points for reassembly.
- Remove Old Display: Remove the old display from its mounting.
- Install New Display: Position the new Generic LCD Touch Screen Display into the vacant slot. Ensure it fits securely.
- Connect New Display: Carefully connect the ribbon cables and power connectors to the new display, ensuring they are seated correctly and in the proper orientation. Avoid forcing connections.
- Secure the Display: Reattach any screws or clips to secure the new display and the control panel housing. Ensure all components are firmly in place.
- Test Functionality: Plug the ice maker back into the electrical outlet and power it on. Test the touch screen responsiveness and verify that all display elements are functioning correctly.
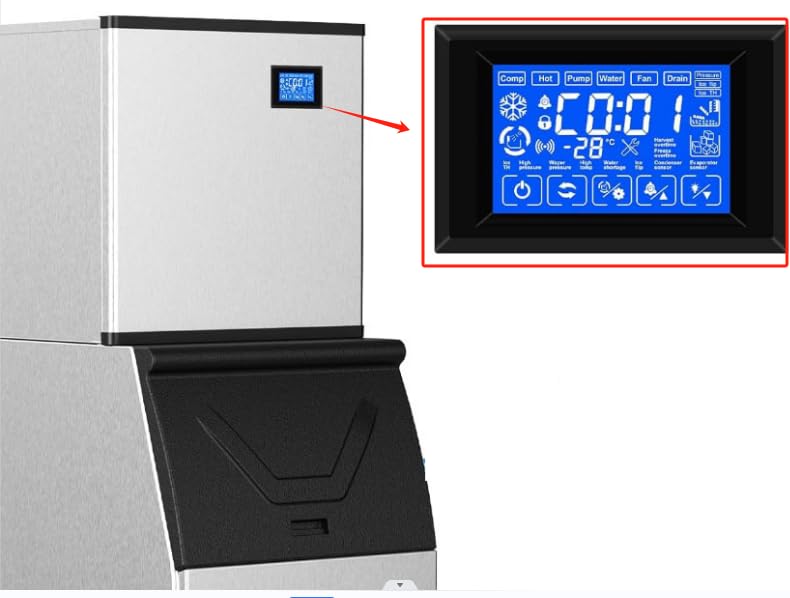
Figure 1: The Generic LCD Touch Screen Display shown installed within a commercial ice maker unit. This image illustrates the typical placement of the display on the appliance's control panel.
5. Operating Instructions
The LCD touch screen display provides visual feedback and control for your ice maker. Familiarize yourself with the various icons and indicators:

Figure 2: A detailed view of the Generic LCD Touch Screen Display, highlighting its various icons and digital readouts. This includes indicators for operational status, warnings, and settings.
Display Elements and Functions:
- Digital Readout (e.g., "00:00", "-88°C"): Displays time, temperature, or error codes.
- Comp (Compressor): Indicates compressor operation.
- Hot: May indicate a hot gas defrost cycle or high temperature.
- Pump: Indicates water pump operation.
- Water: Indicates water filling or circulation.
- Fan: Indicates condenser fan operation.
- Drain: Indicates the unit is draining water.
- Pressure (High/Low): Indicates refrigerant pressure status.
- Ice TH (Ice Thickness): Indicates ice thickness sensor status or setting.
- Ice Flip: Indicates the ice harvest mechanism is active.
- Snowflake Icon: General ice making indicator.
- Bell Icon: Alarm or notification indicator.
- Lock Icon: Indicates control panel lock function is active.
- Wi-Fi Icon: May indicate network connectivity (if applicable to your ice maker model).
- Wrench Icon: Indicates a service or maintenance alert.
- Harvest Overtime: Warning for extended ice harvest cycle.
- Freeze Overtime: Warning for extended freezing cycle.
- Condenser Sensor: Indicates an issue with the condenser temperature sensor.
- Evaporator Sensor: Indicates an issue with the evaporator temperature sensor.
- High Temp: High temperature warning.
- Water Shortage: Indicates low water level or no water supply.
- Power Button: Turns the ice maker on/off.
- Cycle Button: Initiates or changes operational cycles.
- Settings/Gear Icon: Accesses system settings or parameters.
- Alarm/Triangle Icon: Acknowledges or silences alarms.
- Light Bulb Icon: Controls internal lighting (if applicable).
Refer to your ice maker's specific user manual for detailed instructions on how to interact with these display elements and adjust settings.
6. Maintenance
To ensure the longevity and optimal performance of your LCD touch screen display, follow these general maintenance guidelines:
- Cleaning: Gently wipe the screen surface with a soft, lint-free cloth. For stubborn smudges, slightly dampen the cloth with water or a screen-safe cleaner. Avoid abrasive materials or harsh chemicals.
- Protection: Avoid direct impact or excessive pressure on the screen. Keep the display free from dust and debris.
- Environmental Conditions: Ensure the ice maker operates within its recommended environmental temperature and humidity ranges to prevent display issues.
7. Troubleshooting
If you encounter issues with your new LCD touch screen display, consider the following troubleshooting steps:
- Display Not Turning On:
- Ensure the ice maker is properly plugged in and receiving power.
- Check all cable connections to the display for looseness or improper seating.
- Verify that the ice maker's main power switch is in the 'ON' position.
- Touch Screen Unresponsive:
- Clean the screen surface to remove any dirt or moisture that might interfere with touch detection.
- Restart the ice maker by unplugging it for a few minutes and then plugging it back in.
- Ensure the display is securely mounted and not experiencing any physical stress.
- Incorrect or Flickering Display:
- Check ribbon cable connections for proper seating.
- Ensure there is no electromagnetic interference from other devices nearby.
- If the issue persists, the display may be faulty and require replacement.
- Error Codes Displayed:
- Refer to your specific ice maker's user manual for the meaning of any displayed error codes and recommended solutions.
If these steps do not resolve the issue, it is recommended to contact a qualified technician or the seller for further assistance.
8. Specifications
| Brand | Generic |
| Model Name | Ice maker touch screen |
| Product Dimensions | 1.18"D x 4.5"W x 2.6"H |
| Material | Acrylonitrile Butadiene Styrene |
| Item Weight | 6.4 ounces |
| Voltage | 12 Volts |
| Wattage | 3 watts |
9. Warranty and Support
This product is intended as a replacement part. For specific warranty information, please refer to the terms and conditions provided by your original point of purchase or contact the seller directly. For technical support or further assistance with installation and troubleshooting, please reach out to the seller or a qualified appliance technician.


