HUANUO HNSS21B
HUANUO Heavy Duty Monitor Arm HNSS21B User Manual
Model: HNSS21B
1. Introduction
Thank you for choosing the HUANUO Heavy Duty Monitor Arm HNSS21B. This monitor arm is designed to provide a stable and adjustable mounting solution for large ultrawide and curved monitors, enhancing your workspace ergonomics and organization. Please read this manual carefully before installation and use to ensure proper setup and safe operation.
2. Safety Information
- Do not exceed the maximum weight capacity of 35 lbs (15.8 kg).
- Ensure the desk surface is strong enough to support the combined weight of the monitor arm and your monitor.
- Always follow the assembly instructions carefully. Incorrect installation may result in equipment damage or personal injury.
- Keep small parts away from children.
- If you have any questions or encounter issues during installation, contact HUANUO customer support.
3. Package Contents
Please verify that all components are present and undamaged before proceeding with installation.
- Monitor Arm Assembly (Upper and Lower Arms)
- Desk Clamp Base
- Grommet Mount Option
- VESA Plate
- USB 3.0 Cable
- Cable Management Clips
- Hardware Kit (screws, washers, Allen keys)
- Instruction Manual

Image: Overview of the HUANUO Heavy Duty Monitor Arm components, including the arm, base, and included accessories.
4. Specifications
| Feature | Specification |
|---|---|
| Brand | HUANUO |
| Model Number | HNSS21B |
| Material | Aluminum |
| Color | Black |
| Monitor Size Compatibility | 27-49 inches (Ultrawide & Curved) |
| Weight Capacity | 13-35 lbs (5.9-15.8 kg) |
| VESA Compatibility | 75x75mm, 100x100mm |
| Tilt Angle | -60° to +15° |
| Swivel Angle | ±90° |
| Rotation | 360° |
| Height Range | Up to 18.5 inches |
| Max Arm Extension | 25.2 inches |
| Desk Thickness (C-Clamp) | 0.79-3.15 inches |
| Desk Thickness (Grommet) | 0.79-3.35 inches |
| Grommet Hole Diameter | 0.39-0.86 inches |
| USB Port | Integrated USB 3.0 |

Image: The monitor arm supporting a 49-inch ultrawide monitor, illustrating its load capacity and VESA compatibility.
5. Setup and Installation
This section guides you through the installation of your HUANUO monitor arm. Ensure you have all necessary tools and components before starting.
5.1 Choose Your Mounting Option
The monitor arm supports two installation methods: C-Clamp and Grommet Mount. Select the method suitable for your desk.
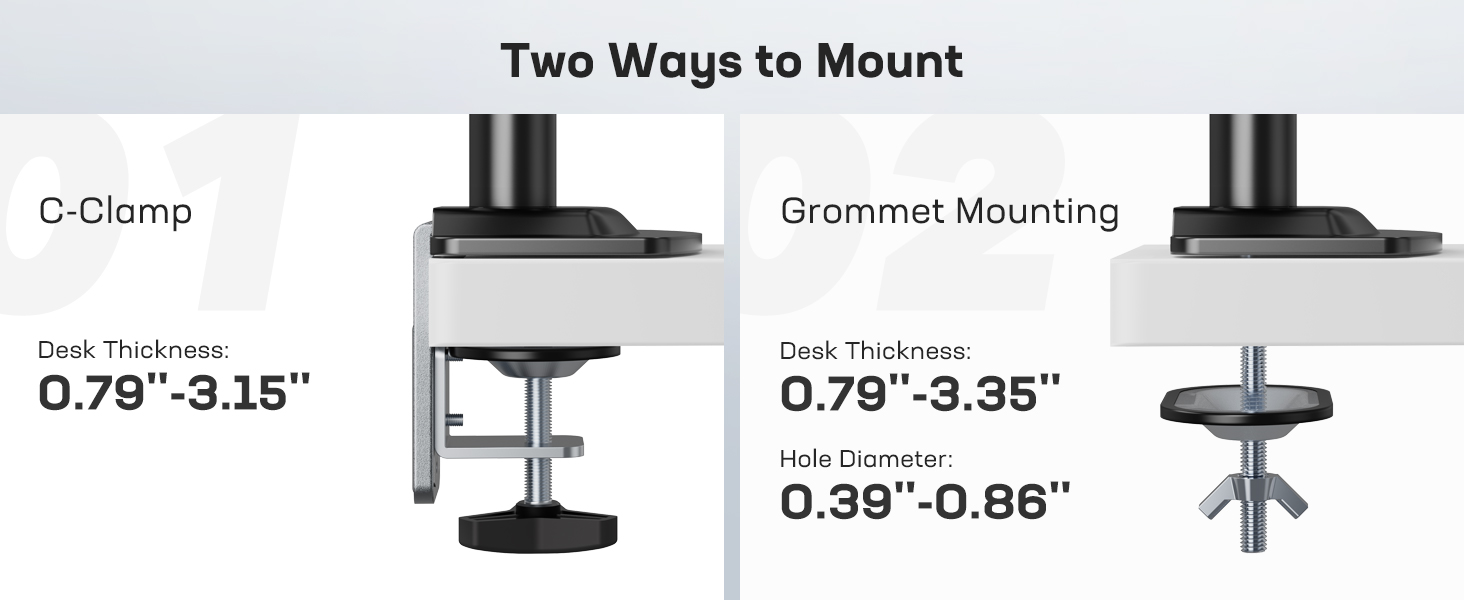
Image: Visual guide for C-Clamp and Grommet mounting options, including compatible desk thickness and hole diameter.
5.1.1 Desk Compatibility Check
Before mounting, ensure your desk meets the compatibility requirements for the chosen method.

Image: Guidelines for C-clamp installation on desks with various edge and back panel configurations.
5.2 Assemble the Monitor Arm
Follow these steps to assemble the monitor arm and attach it to your desk.
Video: This video demonstrates the step-by-step assembly process of the HUANUO HNSS21B monitor arm, including attaching the base, assembling the arm segments, and securing the VESA plate.
5.3 Attach Monitor to Arm
Ensure your monitor is VESA compatible (75x75mm or 100x100mm). For certain monitors like the Samsung Odyssey G9, a VESA adapter may be required (often included with the monitor).

Image: Instructions on how to check your monitor's VESA compatibility and what to do if it lacks standard VESA holes.
5.3.1 Special Instructions for Samsung Odyssey G9 Monitors
If you are mounting a Samsung Odyssey G9 monitor, you will likely need to use the VESA adapter provided with your monitor. Follow these steps:
- Remove the original Samsung monitor stand.
- Attach the VESA adapter (included in the Samsung packaging) to the screen.
- Secure the VESA adapter with screws.
- Attach the VESA plate of the HUANUO monitor arm to the Samsung VESA adapter.
- Tighten the screws to secure the VESA plate.
- Mount the screen to the HUANUO monitor arm.

Image: Steps 1-2 for attaching a VESA adapter to a Samsung monitor.

Image: Steps 3-4 for attaching a VESA adapter to a Samsung monitor.

Image: Steps 5-6 for attaching a VESA adapter to a Samsung monitor.
5.4 Cable Management
Route your monitor cables through the integrated cable management channels on the arm to maintain a clean and organized workspace.

Image: Cables are routed through the arm's channels for a tidy setup.
Video: This video provides a detailed guide on installing the HUANUO HNSS21B monitor arm onto a desk using the C-clamp method and attaching a monitor.
6. Operation and Adjustment
The HUANUO HNSS21B monitor arm offers full-motion adjustability for optimal viewing comfort.

Image: A complete desk setup featuring the HUANUO monitor arm with an ultrawide display.
Video: This video illustrates the various adjustment capabilities of the HUANUO HNSS21B monitor arm, including height, tilt, swivel, and rotation, to achieve optimal ergonomic positioning.
6.1 Height Adjustment
The arm allows for vertical movement to position your monitor at the desired height, up to 18.5 inches.

Image: The monitor arm demonstrating its height adjustment range and maximum extension.
6.2 Tilt Adjustment
Adjust the monitor's vertical angle from -60° to +15° to reduce glare and find your optimal viewing angle.

Image: Demonstrating the monitor's tilt capabilities on the arm.
6.3 Swivel Adjustment
Swivel the monitor ±90° left or right to share your screen with others or adjust for different tasks.

Image: Two individuals adjusting the monitor's swivel for collaborative viewing.
6.4 Rotation (Landscape/Portrait)
Rotate your monitor 360° to switch between landscape and portrait orientations as needed.

Image: The monitor arm supporting a display in both landscape and portrait modes.
6.5 Tension Adjustment
The mechanical spring structure allows for precise tension adjustment. Adjust the tension to ensure the monitor stays in place at your desired height and position.
- If the monitor rises up, turn the adjustment screw in the '-' direction to reduce tension.
- If the monitor drops down, turn the adjustment screw in the '+' direction to increase tension.

Image: Detail of the tension adjustment screw on the monitor arm.
6.6 Integrated USB 3.0 Port
The base of the monitor arm features an integrated USB 3.0 port for convenient access to charging and data transfer for your devices.

Image: The USB 3.0 port located on the base of the monitor arm.
7. Maintenance
- Regularly check all screws and connections to ensure they are tight and secure.
- Clean the monitor arm with a soft, damp cloth. Avoid abrasive cleaners or solvents.
- Do not attempt to disassemble the internal components of the arm.
8. Troubleshooting
8.1 Monitor Sags or Does Not Stay at Desired Height
- Solution: Adjust the tension of the mechanical spring. Turn the adjustment screw in the '+' direction to increase tension until the monitor holds its position. Refer to Section 6.5.
8.2 Monitor is Difficult to Move Up or Down
- Solution: Adjust the tension of the mechanical spring. Turn the adjustment screw in the '-' direction to decrease tension. Refer to Section 6.5.
8.3 Monitor is Not Level
- Solution: Check the VESA plate attachment to the monitor and ensure it is securely fastened and level. Adjust the tilt mechanism if necessary.
9. Warranty and Support
The HUANUO Heavy Duty Monitor Arm HNSS21B comes with a manufacturer's warranty. Please refer to the warranty card included in your package for specific terms and conditions. For technical support, replacement parts, or any inquiries, please contact HUANUO customer service through their official website or the retailer where you purchased the product.
10. Product Overview Video
Video: This video highlights the overall design, features, and benefits of the HUANUO HNSS21B Heavy Duty Monitor Arm, demonstrating its use with a large ultrawide monitor.
Video: A short preview video showcasing the key features and flexibility of the HUANUO HNSS21B monitor arm, demonstrating its ease of adjustment and clean cable management.