Suuim B0CTQ42CG7
Suuim Portable Ice Maker Machine User Manual
Model: B0CTQ42CG7
1. Introduction
Thank you for choosing the Suuim Portable Ice Maker Machine. This manual provides essential information for the safe and efficient operation, maintenance, and troubleshooting of your new appliance. Please read it thoroughly before first use and keep it for future reference.

Front view of the Suuim Portable Ice Maker Machine, showcasing its sleek silver and black design with a visible control panel and side ventilation.
2. Important Safety Instructions
To reduce the risk of fire, electric shock, or injury when using your ice maker, follow these basic precautions:
- Read all instructions before use.
- Do not touch the evaporator or ice cubes when the machine is operating to avoid frostbite.
- Do not immerse the appliance, power cord, or plug in water or other liquids.
- Close supervision is necessary when any appliance is used by or near children.
- Avoid contact with children.
- Stay away from sources of fire.
- Store in a dry environment.
- Unplug the appliance from the outlet when not in use, before cleaning, and before servicing.
- Do not operate any appliance with a damaged cord or plug, or after the appliance malfunctions or has been damaged in any manner.
- Use only manufacturer-recommended attachments.
- Do not use outdoors.
- Ensure the appliance is placed on a stable, level surface.
- Do not block ventilation openings.

Safety warnings indicating to keep away from children, fire, and to store in a dry environment.
3. Package Contents
Please check that all items are present and in good condition:
- 1 × Ice Maker Machine
- 1 × Ice Bucket
- 1 × Ice Scoop
- 1 × User Manual (this document)
4. Product Features and Components
Familiarize yourself with the various parts of your ice maker:

Detailed view of the ice maker's features: control panel with indicators, 0.7kg ice storage capacity, 2.2L water tank, transparent viewing window, and stainless steel material. The noise level is approximately 40dB.

Exploded view highlighting key structural and functional elements: pure copper nickel plating evaporation column, stainless steel metal case for durability, transparent window for viewing the ice making process, back vents for accelerated cooling, and round side vents for quick cooling and efficient ice making.

Internal components and features of the ice maker, including thickened cyclopantane foam insulation layer to effectively shield external heat, copper aluminum fin condenser for efficient heat removal, and R600a refrigerant for eco-friendly, low-noise operation.
5. Setup
- Unpacking: Carefully remove the ice maker from its packaging. Remove all packing materials, including tape and labels.
- Placement: Place the ice maker on a flat, stable, and heat-resistant surface. Ensure there is at least 15 cm (6 inches) of space around the unit for proper ventilation, especially at the back and sides where the vents are located. Avoid direct sunlight or heat sources.
- Initial Cleaning: Before first use, clean the interior of the ice maker. Refer to the "Maintenance and Cleaning" section for detailed instructions.
- Power Connection: Ensure the voltage specified on the rating label matches your household voltage. Plug the power cord into a grounded electrical outlet.
6. Operating Instructions
6.1. Ice Making Process
Follow these steps to produce ice:

Visual guide illustrating the three main steps for ice production.
- Step 1: Add Water. Open the lid and pour clean, potable water into the water reservoir up to the MAX fill line. Do not overfill. The water can be recycled within the machine during operation.
- Step 2: Power On and Select Ice Size. Close the lid. Plug in the ice maker. Press the ON/OFF button on the control panel to start the ice making cycle. Use the Select button to choose your desired ice cube size: Small Ice or Big Ice. The corresponding indicator light will illuminate.
- Step 3: Ice Production. The ice maker will begin producing ice. A batch of 9 bullet-shaped ice cubes will be ready in approximately 6-10 minutes, depending on the selected size and ambient temperature.
- Ice Collection: Once ice is made, it will automatically be shoveled into the ice storage basket. Use the provided ice scoop to retrieve ice.
6.2. Control Panel Indicators
The control panel features indicator lights for easy operation:
- Add Water: Illuminates when the water reservoir is low and needs refilling.
- Ice Full: Illuminates when the ice storage basket is full, and the machine will pause ice production.
- Small Ice / Big Ice: Indicates the currently selected ice cube size.
- ON/OFF: Power button to start or stop the ice making process.

Diagram illustrating the two available bullet ice sizes (S size: 20mm width, 25mm length; L size: 25mm width, 30mm length) and highlighting the 6-minute ice production time.
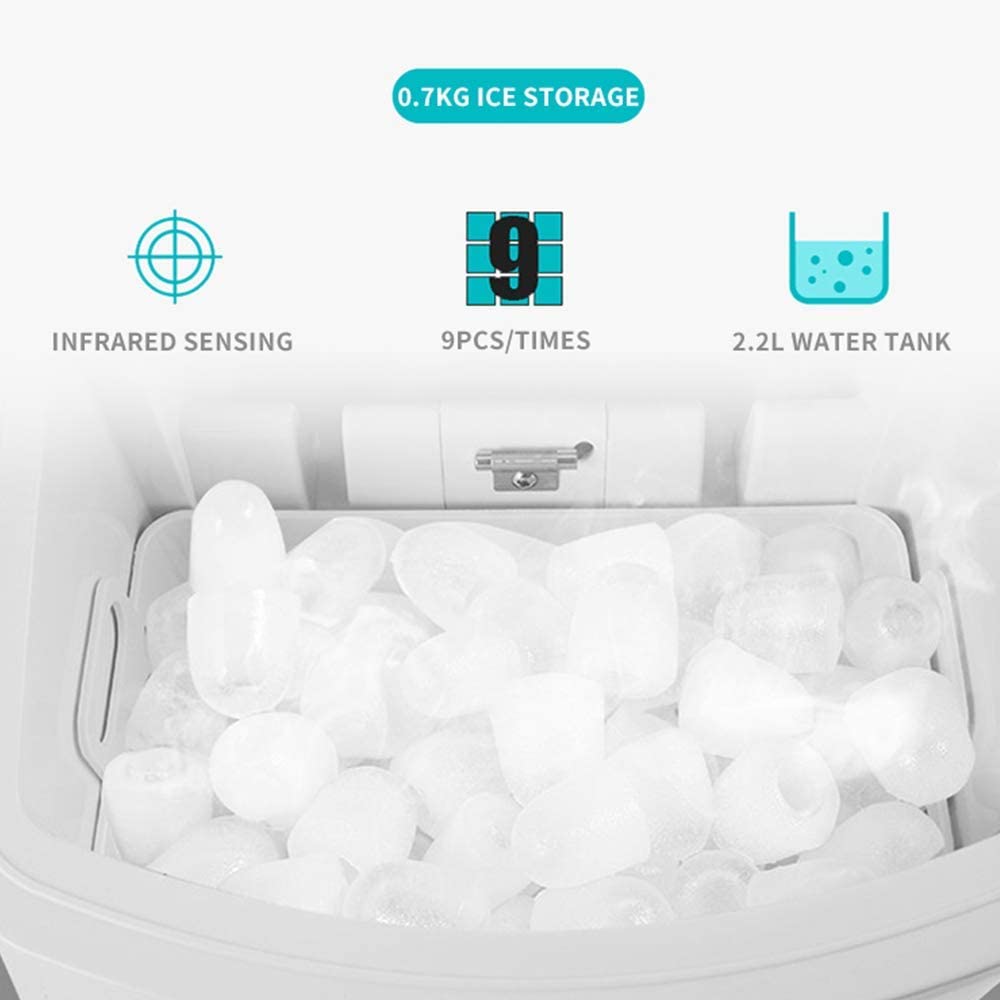
Close-up of the ice storage area, showing bullet-shaped ice cubes, infrared sensing mechanism to detect ice fullness, the capacity to produce 9 pieces per cycle, and the 2.2L water tank.
7. Maintenance and Cleaning
Regular cleaning and maintenance will ensure the longevity and optimal performance of your ice maker.
- Daily Cleaning: After each use, remove any remaining ice from the basket. Drain any leftover water from the reservoir by unplugging the drain plug located at the bottom of the unit. Wipe the interior with a soft, damp cloth.
- Weekly Cleaning: For a more thorough cleaning, prepare a solution of water and a mild detergent or vinegar. Clean the water reservoir, ice basket, and other internal surfaces. Rinse thoroughly with clean water. Ensure all detergent residue is removed.
- External Cleaning: Wipe the exterior of the ice maker with a soft, damp cloth. Do not use abrasive cleaners or solvents.
- Descaling: If hard water is used, mineral deposits may accumulate. Descale the unit periodically using a descaling solution suitable for ice makers, following the product's instructions.
- Storage: If storing the ice maker for an extended period, ensure it is completely dry inside and out. Drain all water, clean thoroughly, and leave the lid slightly ajar to prevent mold and mildew growth. Store in a cool, dry place.
8. Troubleshooting
Refer to this section for common issues and their solutions:
| Problem | Possible Cause | Solution |
|---|---|---|
| Ice maker does not turn on. | No power supply. | Check if the power cord is securely plugged into a working outlet. Check circuit breaker. |
| "Add Water" indicator is on. | Water reservoir is empty or low. | Add water to the reservoir up to the MAX fill line. |
| "Ice Full" indicator is on. | Ice basket is full. | Remove ice from the basket. The machine will resume operation. |
| Ice cubes are too small or melt quickly. | Ambient temperature is too high; water temperature is too high; insufficient ventilation. | Ensure the ice maker is in a cool, well-ventilated area. Use cold water. Clean vents if blocked. Select "Big Ice" size. |
| No ice production. | Lack of water; compressor issue; refrigerant leak. | Check water level. If problem persists after checking water, contact customer support. |
| Unusual noise during operation. | Normal operation sounds (compressor, water pump); loose part. | Some operational noise is normal. If the noise is excessive or unusual, unplug and inspect. Contact support if necessary. |
9. Specifications
| Model | B0CTQ42CG7 |
| Brand | Suuim |
| 24-Hour Ice Production | Up to 15 KG (33 Lbs) |
| Power | 105 W |
| Voltage | 110V/220V (Please check product label for specific voltage) |
| Ice Storage Capacity | 0.7 KG (approx. 70-80 pieces) |
| Single Ice Production | 9 pieces per cycle |
| Water Inlet Method | Manual Add Water |
| Ice Cube Shape | Bullet Type |
| Ice Cube Weight | 7-9 g |
| Water Tank Capacity | 2.2 Liters |
| Single Ice Cycle Time | 6-10 minutes |
| Net Weight | 7.8 KG |
| Dimensions (W x D x H) | 24.2 cm (9.5 in) x 35.8 cm (14 in) x 32.8 cm (12.9 in) |
| Noise Level | Approx. 40 dB |

Diagram showing the dimensions of the ice maker: 24.2cm (9.5 inches) width, 35.8cm (14 inches) depth, and 32.8cm (12.9 inches) height.
10. Customer Support
If you have any questions about your Suuim ice maker, require assistance, or encounter issues not covered in this manual, please feel free to contact us. We are committed to serving you.
For support, please refer to the contact information provided at the point of purchase or on the product packaging.
Ask a question about this manual
Ask about setup, troubleshooting, compatibility, parts, safety, or missing instructions. Manuals+ will review the question and use this page’s manual context to help answer it.