1. Introduction
This manual provides detailed instructions for the installation, operation, and maintenance of your CHIUEAST UK MSF Atomic Radio Controlled Quartz Clock Movement Repair Kit. This kit is designed for repairing or creating wall clocks, featuring automatic synchronization with the official UK MSF time signal for accurate timekeeping.
Please read these instructions carefully before proceeding with installation to ensure proper function and longevity of the product.
2. Product Components
The CHIUEAST clock movement repair kit includes the following components:
- Quartz Clock Movement (HD-1688)
- Hour Hand
- Minute Hand
- Second Hand
- Mounting Hardware (Washer, Spring Washer, Hex Nut)

Figure 2.1: Overview of the clock movement, hour hand, minute hand, second hand, and mounting hardware.
3. Specifications
| Feature | Specification |
|---|---|
| Movement Type | Quartz, UK MSF Atomic Radio Controlled |
| Quartz Crystal Frequency | 32.768KHz |
| Run Time Accuracy | ±30 seconds / month (at 1.5V, 25°C) |
| Power Consumption | Less than 190µA (at 1.5V) |
| Operating Voltage | 1.3V to 1.7V |
| Nominal Voltage | 1.5V (UM-3 battery recommended) |
| Operating Temperature | -10°C to 50°C |
| Battery Life (Approx.) | One year (with UM-3 battery) |
| Second Hand Output Torque | 0.6 gf-cm (at 1.5V) |
| Minute Hand Output Torque | 30 gf-cm (at 1.5V) |
| Movement Dimensions | Approx. 56 x 56 x 19mm (2.20 x 2.20 x 0.75 inches) |
| Shaft Length | Approx. 17mm (0.67 inches) |
| Thread Length | 17mm (0.67 inches) |
| Suitable Clock Panel Thickness | Up to 5mm |

Figure 3.1: Detailed dimensions of the clock movement, including shaft and thread length.

Figure 3.2: Lengths of the hour, minute, and second hands provided with the kit.
4. Setup and Installation
Follow these steps to install the clock movement and hands into your clock panel.
- Prepare the Clock Panel: Ensure your clock panel has a central hole suitable for the movement shaft. The shaft length is 17mm, suitable for panels up to 5mm thick.
- Insert the Movement: Insert the clock movement shaft through the central hole from the back of the clock panel.
- Secure the Movement:
- Place the rubber washer (if included) over the shaft on the front side of the clock panel.
- Thread the brass washer onto the shaft.
- Secure with the hex nut, tightening gently to hold the movement firmly in place without overtightening.
- Install the Hands:
- First, gently press the hour hand onto the hour shaft (the wider, shorter shaft). Ensure it is seated firmly.
- Next, gently press the minute hand onto the minute shaft (the narrower, longer shaft). Ensure it is seated firmly and parallel to the hour hand.
- Finally, press the second hand onto the central pin.
Important: Ensure all hands are parallel to each other and do not touch when rotating. If they touch, gently bend them slightly to create clearance.
- Insert Battery: Insert one UM-3 (AA) 1.5V battery into the battery compartment on the back of the movement, observing the correct polarity (+/-).
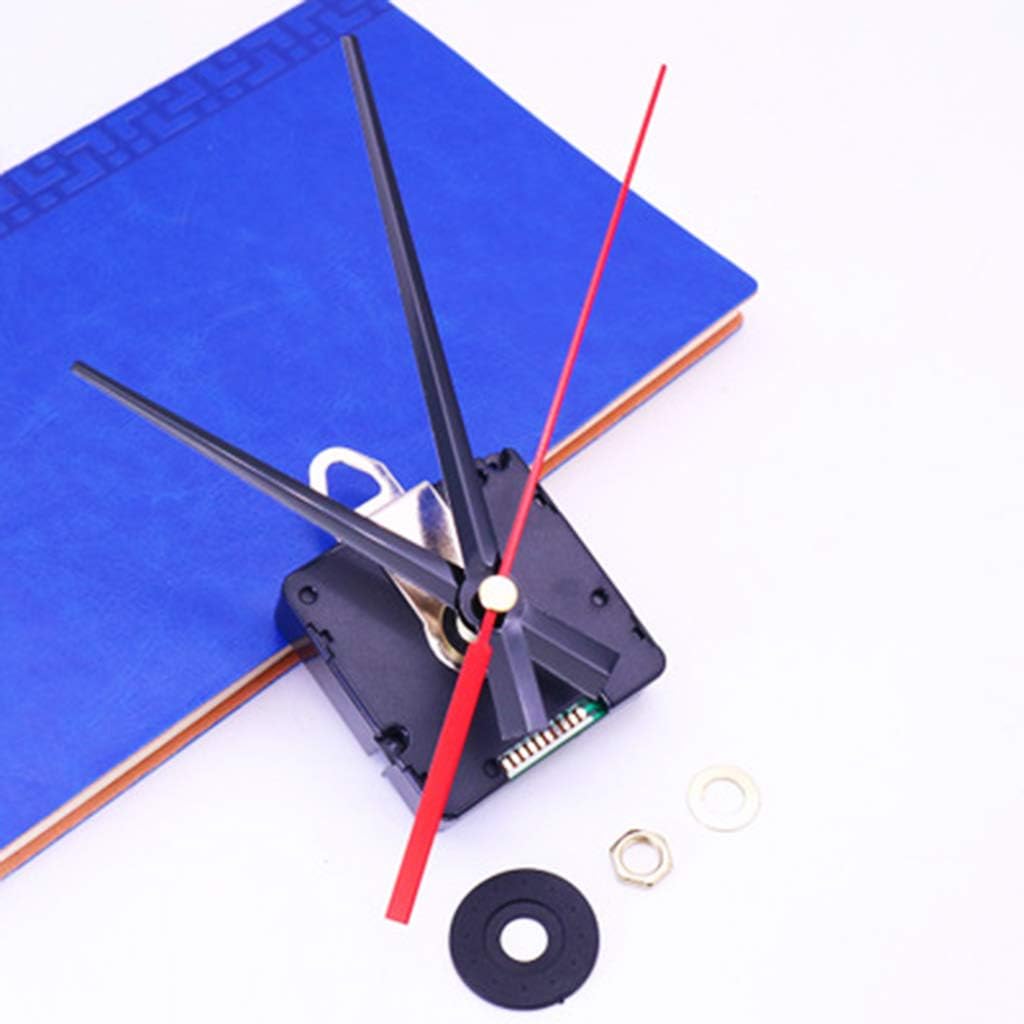
Figure 4.1: The clock movement with all hands correctly installed and aligned.
5. Operating Instructions
Once the battery is inserted, the clock movement will begin to operate.
5.1 Initial Time Setting and MSF Synchronization
The clock movement is designed to automatically synchronize with the UK MSF radio time signal. This process typically occurs within 24 hours after battery insertion, especially during nighttime hours when signal reception is usually stronger.
- After inserting the battery, the hands will typically move to the 12 o'clock position and wait for the MSF signal.
- Place the clock in a location with good reception, away from large metal objects or electronic devices that may cause interference.
- The movement will attempt to receive the MSF signal and set the correct time automatically. This may take several minutes to several hours.
- A small red LED indicator on the back of the movement (if present, refer to Figure 3.1) may flash to indicate signal reception attempts.
5.2 Manual Time Adjustment (if necessary)
While automatic synchronization is the primary method, a manual adjustment wheel is usually present on the back of the movement (refer to Figure 3.1). This can be used for initial setup or if the automatic synchronization is taking too long or failing.
- Locate the small adjustment wheel or knob on the back of the movement.
- Gently turn the wheel to move the minute and hour hands to the correct time.
- The second hand will continue to operate independently.
- After manual adjustment, the movement will continue to attempt MSF synchronization and may override manual settings once a strong signal is received.
6. Maintenance
The CHIUEAST clock movement is designed for low maintenance. Follow these guidelines to ensure optimal performance:
- Battery Replacement: Replace the UM-3 (AA) 1.5V battery approximately once a year, or when the clock hands stop moving or become sluggish. Always use a fresh, good quality battery.
- Cleaning: Keep the movement free from dust and debris. Use a soft, dry cloth to gently wipe the exterior of the movement. Do not use liquid cleaners or immerse the movement in water.
- Environment: Avoid exposing the clock movement to extreme temperatures, high humidity, or strong magnetic fields, as these can affect accuracy and lifespan.
7. Troubleshooting
| Problem | Possible Cause | Solution |
|---|---|---|
| Clock hands do not move. |
|
|
| Clock is not keeping accurate time. |
|
|
| Hands are loose or fall off. |
|
|
8. Warranty and Support
This product is manufactured by CHIUEAST. For any issues or inquiries regarding your clock movement repair kit, please refer to your purchase documentation or contact the retailer from whom you purchased the product. Keep your proof of purchase for warranty claims.
Please note that specific warranty terms and conditions may vary by region and retailer. Damage caused by improper installation, misuse, or unauthorized modifications is not covered under warranty.


