Introduction
This user manual provides detailed instructions for the installation, operation, and maintenance of your YOLLKY Tire Pressure Monitoring System (TPMS). This system is designed to enhance driving safety by providing real-time monitoring of your vehicle's tire pressure and temperature, alerting you to potential issues before they become critical. Please read this manual thoroughly before using the product to ensure proper function and longevity.
Product Overview
Components
- 1 x TPMS Monitor Display Unit
- 4 x External Tire Pressure Sensors (labeled F.L, F.R, R.R, R.L for Front Left, Front Right, Rear Right, Rear Left)
- 1 x USB Charging Cable
- 4 x Anti-theft Nuts
- 1 x Wrench for Sensor Installation
Key Features
- Real-Time Precision Monitoring: Utilizes high-precision automotive chips for accurate and low-latency data on tire pressure and temperature.
- Dual Charging Methods: Equipped with a solar panel for continuous charging in sunlight and a USB port for charging in low-light conditions or indoors.
- 4 High-Precision External Sensors: Durable, low power consumption, quick transmission, and high accuracy (error range ≈3 PSI).
- 5 Safe and Reliable Alarm Modes: Includes fast leak alarm, high/low-pressure alarm, high-temperature alarm, and low battery alarm, providing immediate visual and audible warnings.
- Customizable Limits: Allows personalization of pressure and temperature alarm thresholds.
Product Visuals

Image: The complete YOLLKY TPMS kit, showing the solar-powered monitor, four external sensors, USB charging cable, anti-theft nuts, and a wrench.

Image: The TPMS monitor display mounted on a vehicle dashboard, highlighting the various indicators such as tire temperature, tire pressure, pressure unit, temperature unit, and battery power.

Image: Close-up view of the TPMS monitor's high-efficiency solar panel and a detailed view of a built-in sensor highlighting its airtightness.

Image: An illustration of the five alarm modes: Fast Leak Alarm, High-Pressure Alarm, Low-Pressure Alarm, High-Temperature Alarm, and Low Battery Alarm, shown alongside the monitor unit.

Image: Depiction of the dual charging capabilities of the TPMS monitor, showing both solar charging under sunlight and USB charging for convenience.

Image: Examples of vehicle types compatible with the TPMS, including Sedan, SUV, MPV, Pickup Truck, Mini Van, and ORV.
Setup Instructions
Monitor Placement and Charging
Place the TPMS monitor on your vehicle's dashboard in a location where it receives direct sunlight for optimal solar charging and is easily visible to the driver. Ensure the view is not obstructed. For initial setup or when solar charging is insufficient, connect the monitor to a USB power source using the provided cable until fully charged.
Sensor Installation
Follow these steps to install the external sensors on your vehicle's tires:
- Prepare the Valve Stem: Remove the original valve cap from the tire's valve stem. Screw one of the anti-theft nuts onto the valve stem.
- Attach the Sensor: Identify the correct sensor for each tire (F.L for Front Left, F.R for Front Right, R.R for Rear Right, R.L for Rear Left). Screw the corresponding sensor onto the valve stem until it is hand-tight.
- Secure the Sensor: Use the provided wrench to tighten the anti-theft nut against the sensor. This prevents the sensor from being easily removed and helps secure it in place.
- Check for Leaks: After installation, apply soapy water around the valve stem and sensor connection point. Look for bubbles, which indicate an air leak. If a leak is detected, re-tighten the sensor and nut.
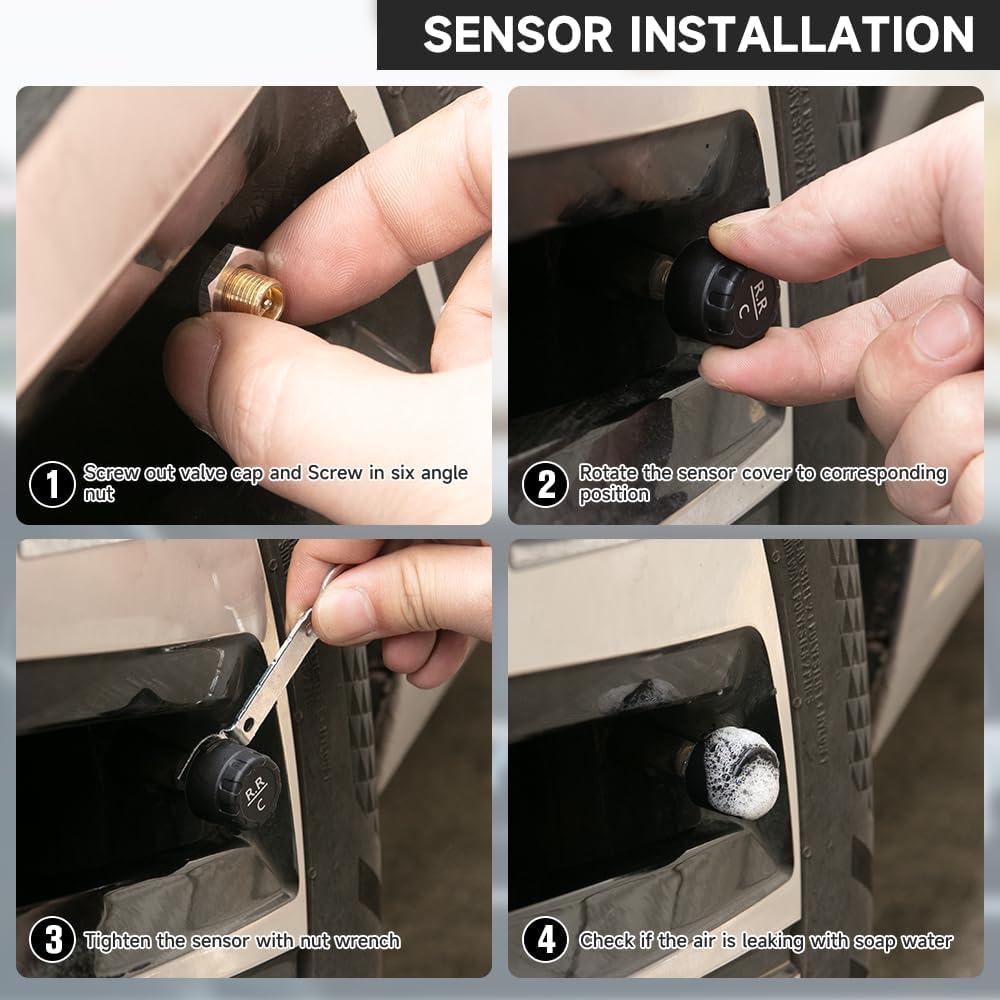
Image: A four-step visual guide demonstrating the sensor installation process: 1) Screwing on the anti-theft nut, 2) Rotating the sensor cover to the correct position, 3) Tightening the sensor with the wrench, and 4) Checking for air leaks with soapy water.
Once all sensors are installed and the monitor is powered on, the system should automatically begin displaying tire pressure and temperature readings. It may take a few minutes for all sensors to register, especially during initial setup or after a long period of inactivity.
Operating Instructions
Understanding the Display
The colorful LCD display provides real-time information for all four tires. The screen typically shows:
- Tire Pressure: Displayed in PSI or Bar (user-selectable).
- Tire Temperature: Displayed in Celsius or Fahrenheit (user-selectable).
- Vehicle Icon: A central icon representing your vehicle, with indicators for each tire's status.
- Battery Level: Indicates the charge level of the monitor's internal battery.
- Sensor Battery Status: Small icons near each tire's reading may indicate the battery status of individual sensors.
Image: The TPMS monitor display on a dashboard, illustrating the various data points and controls, including tire temperature, tire pressure, pressure unit, temperature unit, and battery power indicators.
Alarm Modes and Warnings
The system is equipped with 5 alarm modes to alert you to abnormal tire conditions:
- Fast Leak Alarm: Activates when a rapid drop in tire pressure is detected.
- High-Pressure Alarm: Sounds when tire pressure exceeds the preset high limit.
- Low-Pressure Alarm: Sounds when tire pressure falls below the preset low limit.
- High-Temperature Alarm: Activates when tire temperature exceeds the preset high limit.
- Low Battery Alarm: Alerts when the monitor's or a sensor's battery is low.
When an alarm is triggered, the monitor will typically emit an audible warning and visually highlight the affected tire(s) on the display. Address any alarms promptly to ensure driving safety.
Setting Pressure and Temperature Limits
Refer to the specific buttons on your monitor (usually labeled 'M' for Menu/Mode and arrow buttons for adjustment) to enter the settings menu. From there, you can adjust the high and low pressure thresholds and the high temperature threshold according to your vehicle's recommended tire specifications and your preferences. Consult your vehicle's owner's manual for recommended tire pressure values.
Maintenance
Monitor Charging
Ensure the monitor's solar panel is kept clean and unobstructed to maximize solar charging efficiency. If the monitor's battery level is consistently low, charge it via the USB port.
Sensor Battery Replacement
The external sensors are designed for long battery life. When a sensor's battery is low, the monitor will display a low battery warning for that specific tire. To replace the battery:
- Unscrew the sensor from the tire valve stem.
- Carefully open the sensor casing (some models may require a small tool or twisting).
- Remove the old button cell battery (e.g., CR1632).
- Insert a new battery of the same type, ensuring correct polarity.
- Close the sensor casing securely and re-install the sensor on the tire valve stem, following the installation steps in the Setup section.
Cleaning
Wipe the monitor and sensors with a soft, dry cloth. Avoid using abrasive cleaners or solvents, which can damage the surfaces or internal components.
Troubleshooting
| Problem | Possible Cause | Solution |
|---|---|---|
| Monitor not turning on or display is blank. | Low battery or no power. | Charge the monitor using the USB cable. Ensure it's placed in direct sunlight for solar charging. |
| Sensor readings are not displayed or are inaccurate. | Sensor not properly installed, sensor battery low, or interference. |
|
| Alarm sounds frequently. | Tire pressure/temperature is genuinely outside limits, or alarm limits are set too narrowly. |
|
| Display shows "---" or "LO" for a tire. | Sensor signal loss or sensor battery low. |
|
Specifications
| Attribute | Value |
|---|---|
| Brand | YOLLKY |
| Model | Tire Pressure Monitoring System |
| Item Model Number | 231001gu0044 |
| Item Weight | 7.8 ounces |
| Package Dimensions | 6.81 x 4.61 x 2.24 inches |
| Batteries | 4 Lithium Ion batteries required (included) |
| Monitoring Range (Pressure) | Error range ≈3 PSI |
Warranty and Support
Warranty Information
Your YOLLKY Tire Pressure Monitoring System comes with a 365 Days of Unrestricted Mileage Guarantee. This warranty covers defects in materials and workmanship under normal use. Please retain your proof of purchase for warranty claims.
Customer Support
For any questions, technical assistance, or warranty claims, please contact YOLLKY customer support. Contact details are typically found on the product packaging or the seller's official website. We are committed to ensuring your satisfaction with our product.