Introduction
Thank you for choosing the LetCart 505A Portable Electric Sewing Machine. This manual provides essential information for the safe and efficient operation of your new sewing machine. Please read it thoroughly before use and keep it for future reference. This machine is designed for various sewing tasks, offering 12 stitch patterns, pedal control, a thread cutter, and a work light, making it suitable for beginners and DIY enthusiasts.
Product Overview and Functional Analysis
Familiarize yourself with the components of your sewing machine to ensure proper operation.

Figure 1: Functional diagram of the LetCart 505A sewing machine, highlighting key parts such as the stitch selector, handwheel, upper thread tension adjustment knob, take-up rod, thread cutter, illumination light, presser foot switch, lock cylinder cover, scale, cylinder groove, backstitch button, body switch, and storage drawer.
- Stitch Selector: Dial to choose from 12 different stitch patterns.
- Handwheel: Manually raises and lowers the needle.
- Upper Thread Tension Adjustment Knob: Controls the tension of the upper thread.
- Take-up Rod: Guides the upper thread during stitching.
- Thread Cutter: Conveniently cuts threads after sewing.
- Illumination Light: Provides light to the sewing area.
- Presser Foot Switch: Controls the presser foot.
- Lock Cylinder Cover: Secures the bobbin area.
- Scale: Measurement guide on the sewing plate.
- Cylinder Groove: Allows for sewing tubular items like sleeves and trouser legs.
- Backstitch Button: Engages reverse stitching for securing seams.
- Body Switch: Main power switch for the machine.
- Storage Drawer: Pull-out compartment for accessories.
Product Components
The following items are typically included with your LetCart 505A sewing machine.
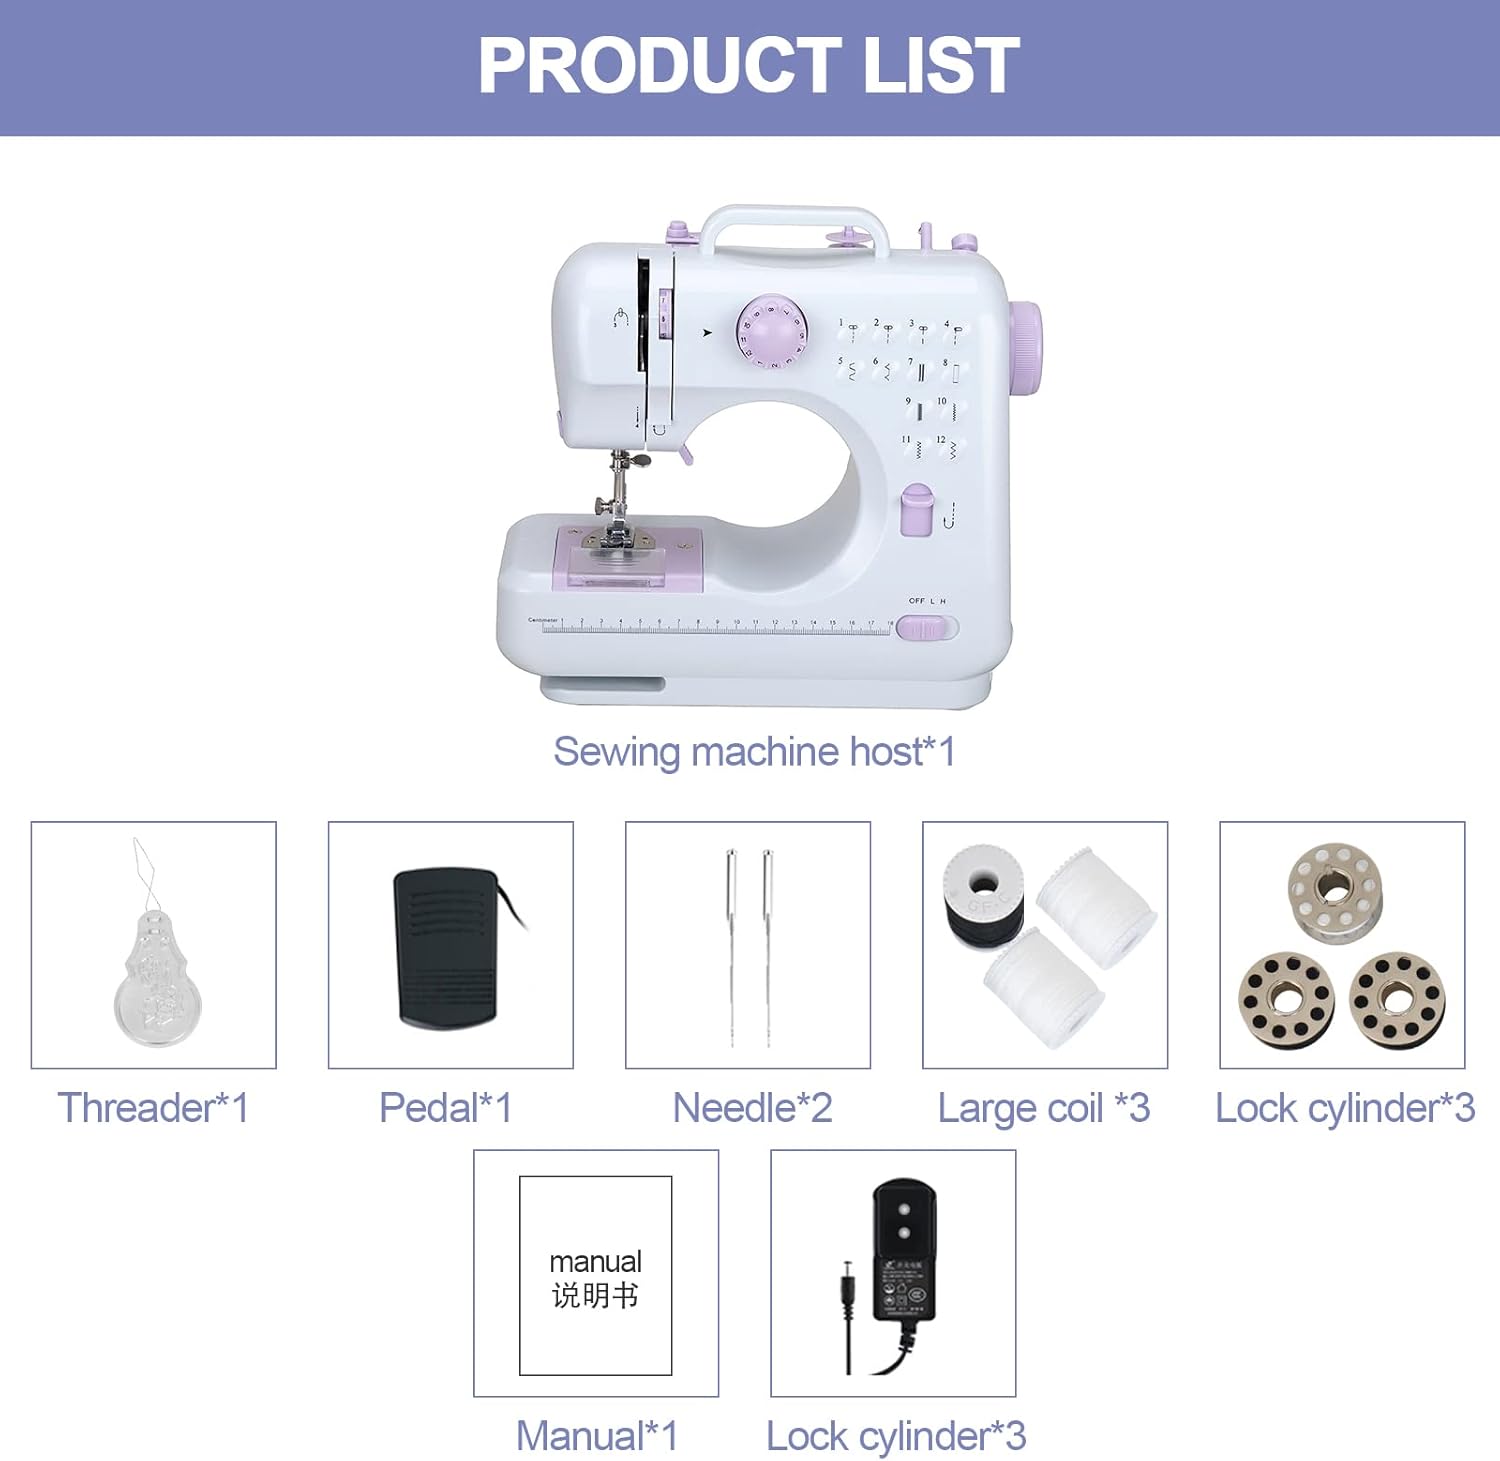
Figure 2: Image showing the main sewing machine unit and included accessories: Threader (x1), Pedal (x1), Needle (x2), Large Coil (x3), Lock Cylinder (x3), User Manual (x1), and Power Adapter (x1).
- Sewing Machine Host (x1)
- Threader (x1)
- Foot Pedal (x1)
- Needles (x2)
- Large Thread Coils (x3)
- Bobbins (x3)
- User Manual (x1)
- Power Adapter (x1)
Setup
1. Powering the Machine
Your sewing machine can be powered by either the included external power adapter or 4 AA batteries (not included).
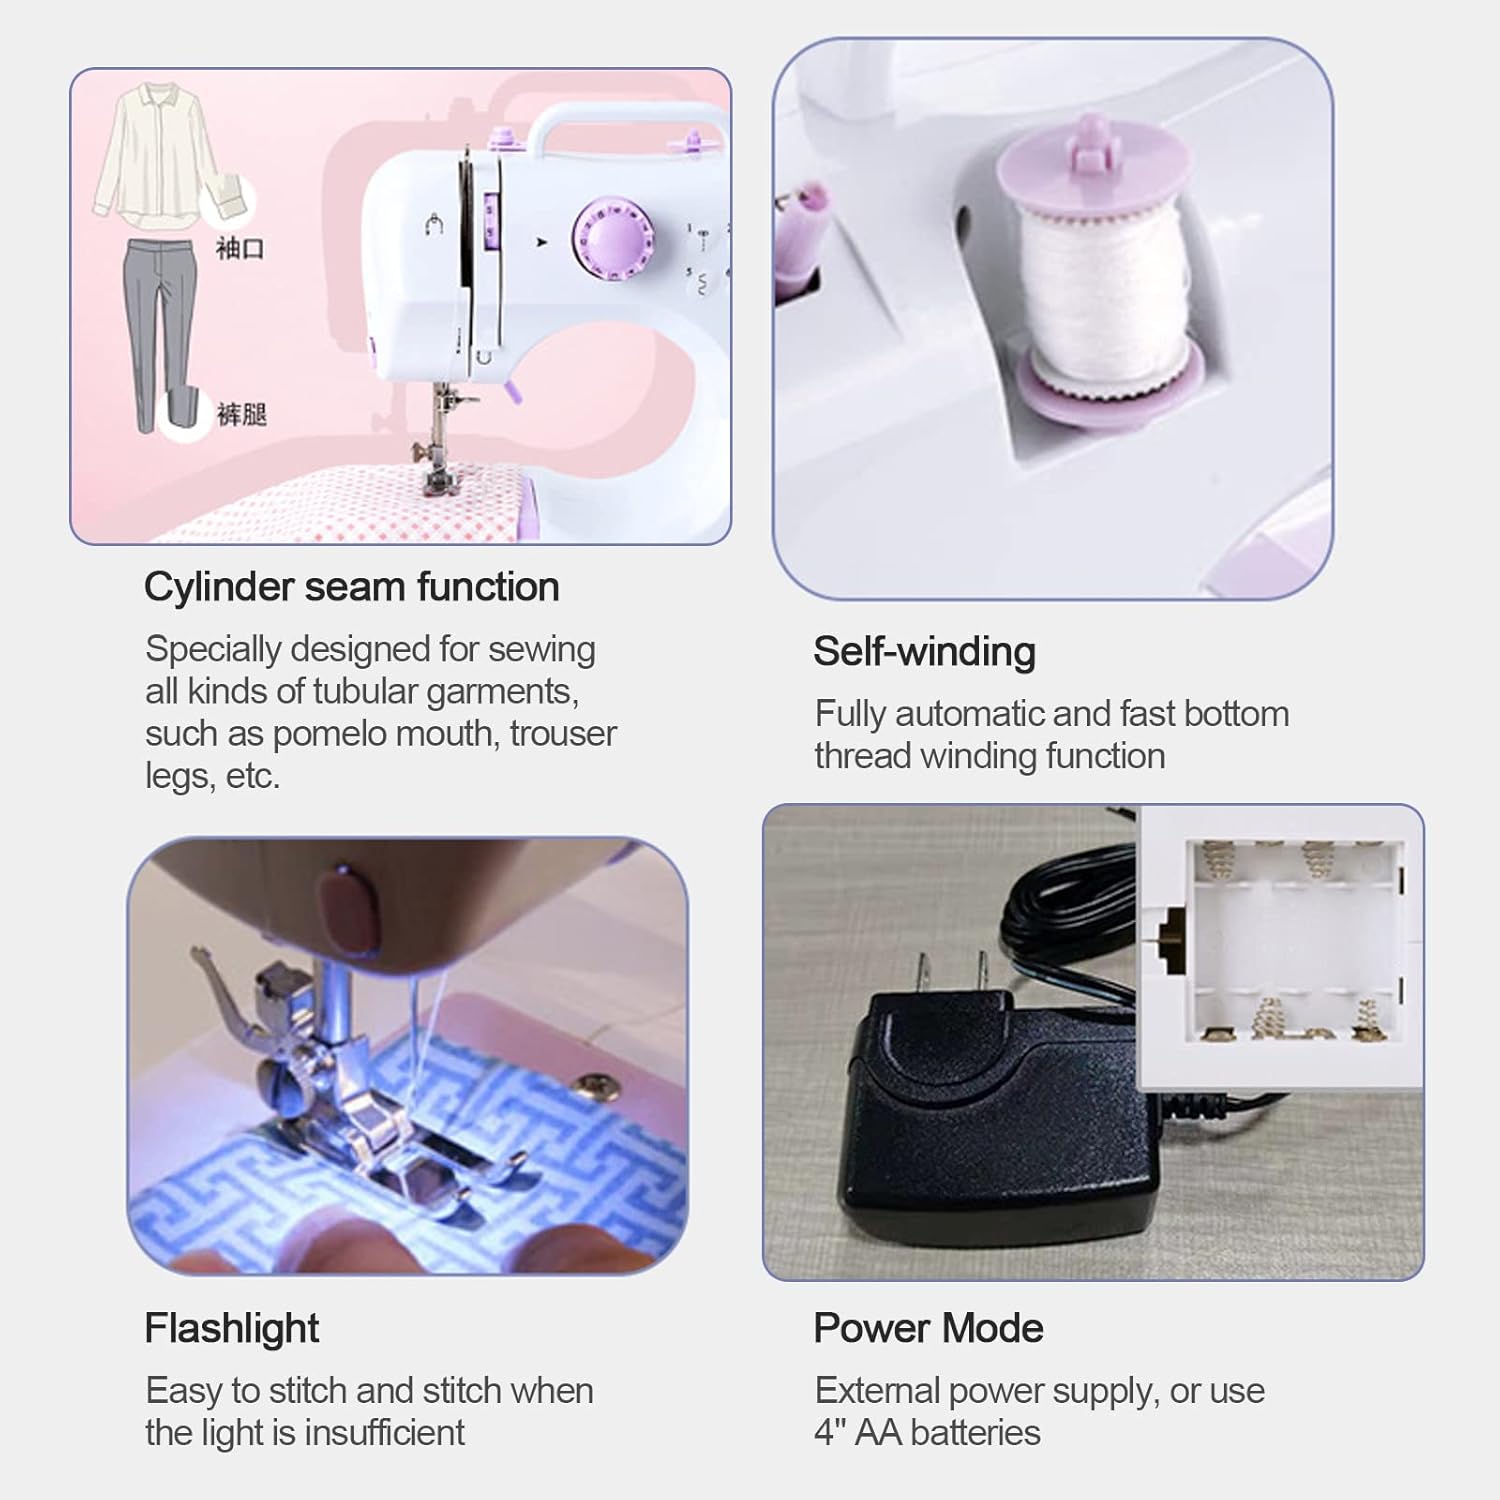
Figure 3: This image illustrates the power mode options (external power supply or 4 AA batteries), the cylinder seam function for tubular garments, the self-winding feature for bobbins, and the built-in flashlight for improved visibility.
- Using the Power Adapter: Insert the adapter plug into the DC input jack on the machine and then plug the adapter into a standard wall outlet.
- Using Batteries: Open the battery compartment cover on the bottom of the machine and insert 4 AA batteries, ensuring correct polarity. Close the cover securely.
2. Bobbin Winding (Self-Winding Function)
The machine features an automatic bobbin winding function.
- Place a spool of thread on the spool pin.
- Guide the thread through the bobbin winding tension disc.
- Place an empty bobbin onto the bobbin winder spindle.
- Wrap the thread around the bobbin a few times clockwise.
- Push the bobbin winder spindle to the right.
- Turn on the machine. The bobbin will automatically wind.
- Once the bobbin is full, turn off the machine, cut the thread, and push the spindle back to the left.
3. Threading the Machine
Proper threading is crucial for good stitch quality. Refer to the detailed diagrams in the included physical manual for precise threading steps.
- Raise the needle to its highest position using the handwheel.
- Place a spool of thread on the spool pin.
- Guide the thread through the upper thread guide.
- Pass the thread through the tension discs.
- Thread the take-up lever from right to left.
- Guide the thread down through the needle bar thread guide.
- Thread the needle from front to back using the provided threader if needed.
- Pull about 6 inches of thread through the needle eye.
- Insert the wound bobbin into the bobbin case under the needle plate. Ensure the thread comes out in the correct direction (refer to manual).
- Close the bobbin cover.
- Hold the upper thread, turn the handwheel towards you to lower and raise the needle, catching the bobbin thread. Pull both threads to the back under the presser foot.
Operating Instructions
1. Stitch Selection
Your machine offers 12 different stitch patterns. Turn the stitch selector dial to choose your desired stitch.

Figure 4: The stitch selector dial allows you to choose from 12 stitch patterns, including straight stitches, curves, simple overlock, and buttonhole stitches. The image also shows the machine in operation, demonstrating its compact size.
- Patterns include straight stitches, zigzag stitches, decorative stitches, and a buttonhole stitch.
- Always select the stitch pattern before you begin sewing.
2. Speed Adjustment
Control your sewing speed using the manual speed adjustment switch or the foot pedal.

Figure 5: This image displays the manual speed adjustment switch (OFF, L for Low, H for High), the foot pedal for variable speed control (press harder for faster speed), the upper thread tension adjustment knob, and the convenient pull-out storage box for accessories.
- Manual Speed: Use the "OFF L H" switch on the machine body to select between Low (L) and High (H) speeds.
- Foot Pedal: Connect the foot pedal to the machine. Press the pedal to start sewing; the harder you press, the faster the machine will sew. Release the pedal to stop.
3. Backstitch Function
To secure the beginning and end of a seam, use the backstitch function.
- While sewing, press and hold the backstitch button (refer to Figure 1) to sew in reverse.
- Release the button to resume forward stitching.
- Perform a few backstitches at the start and end of your seam to prevent unraveling.
4. Cylinder Seam Function
The machine's design allows for easy sewing of tubular items.
- Remove the accessory storage drawer to reveal the free arm (cylinder groove).
- Slide the tubular garment (e.g., sleeve, trouser leg) onto the free arm.
- This feature simplifies sewing cuffs, pant hems, and other small, circular items.
5. Fabric Compatibility
The LetCart 505A is suitable for a variety of fabrics.

Figure 6: This image demonstrates the machine's ability to sew various fabrics, including plain denim, cotton, stretch fabrics, thin fabric, and chiffon. It also notes that for thin, soft, and elastic fabrics, a special needle may be required to prevent skipped stitches.
- The machine can handle fabrics such as plain denim, cotton, stretch fabrics, thin fabrics, and chiffon.
- Important: For very thin, soft, or elastic fabrics, it is recommended to use a special needle designed for those materials to prevent skipped stitches and ensure smooth operation.
Maintenance
Regular maintenance ensures the longevity and optimal performance of your sewing machine.
- Cleaning: Regularly clean lint and dust from the bobbin area and feed dogs using a small brush. Disconnect power before cleaning.
- Needle Replacement: Replace needles frequently, especially when they become dull or bent, to prevent skipped stitches and fabric damage.
- Lubrication: Refer to the detailed physical manual for specific lubrication points and frequency, if applicable.
- Storage: When not in use, store the machine in a dry, dust-free environment.
Troubleshooting
If you encounter issues, consult this section for common solutions.
| Problem | Possible Cause | Solution |
|---|---|---|
| Machine not turning on | No power supply; power switch off; batteries depleted or incorrectly inserted. | Check power adapter connection or battery installation. Ensure the body switch is ON. |
| Skipped stitches | Incorrect needle for fabric; bent or dull needle; improper threading; incorrect thread tension. | Replace needle with appropriate type; re-thread machine carefully; adjust thread tension. |
| Thread breaking | High thread tension; poor quality thread; needle bent or dull; incorrect threading. | Reduce upper thread tension; use good quality thread; replace needle; re-thread machine. |
| Fabric not feeding | Presser foot not lowered; feed dogs clogged with lint. | Lower the presser foot; clean the feed dog area. |
For further assistance, please refer to the "Warranty and Support" section.
Specifications
| Feature | Detail |
|---|---|
| Brand | LetCart |
| Model | 505A |
| Color | Purple |
| Material | Metal |
| Product Dimensions | 31P x 15l x 29H cm (approximately 12.2 x 5.9 x 11.4 inches) |
| Item Weight | 2 Kilograms (approximately 4.4 lbs) |
| Power Source | Corded Electric or 4x AA Batteries |
| Stitch Patterns | 12 built-in stitch patterns |
| Features | Double thread sewing, tubular sewing, backstitch, automatic bobbin winding, one-step buttonhole, work light, thread cutter, foot pedal. |
Warranty and Support
LetCart is committed to providing excellent customer service.
- For any questions regarding your LetCart 505A sewing machine, please contact our customer support team.
- Detailed instructions and video guides are available to assist you with product usage.
- Our support team is available 24/7 to address your inquiries.
Please refer to your purchase documentation for specific warranty terms and contact information.