
1. Introduction
Thank you for choosing the Valex Te 1501 Electric Lawn Mower. This manual provides important information for the safe and efficient operation, maintenance, and troubleshooting of your new lawn mower. Please read this manual thoroughly before first use and keep it for future reference.

Figure 1: Valex Te 1501 Electric Lawn Mower, front-side view.
2. Safety Instructions
Always observe basic safety precautions to reduce the risk of fire, electric shock, and personal injury. Keep this manual handy for quick reference.
- Read all instructions carefully before operating the appliance.
- Wear appropriate personal protective equipment (PPE), including safety glasses, sturdy footwear, and hearing protection.
- Ensure the safety switch is functioning correctly to prevent accidental startup.
- Do not operate the lawn mower in wet conditions or rain.
- Keep children and bystanders away from the operating area.
- Disconnect from power supply before cleaning, adjusting, or servicing.
- The lawn mower is equipped with overload protection. If the motor stops due to overload, disconnect power and allow it to cool before restarting.
3. Package Contents
Upon unpacking, ensure all items listed below are present and undamaged:
- Valex Te 1501 Electric Lawn Mower Unit
- Grass Collection Basket (50 L capacity)
- Handle Assembly (foldable)
- Blade (pre-installed)
- User Manual
If any parts are missing or damaged, contact Valex customer support immediately.
4. Product Overview and Components
Familiarize yourself with the various parts of your Valex Te 1501 Electric Lawn Mower.

Figure 2: Key components of the Valex Te 1501 Electric Lawn Mower.
- Safety Switch: Prevents accidental startup.
- Foldable Handle: For compact storage and transport.
- Transport Handle: For easy lifting and carrying.
- Motor Overload Protection: Automatically shuts off the motor if overloaded.
- Centralized Cutting Height Adjustment: Lever for quick and easy adjustment of cutting height.
- Grass Collection Basket: 50-liter capacity for collecting grass clippings.
- Cable Clip: Secures the power cable during operation.
5. Setup
Follow these steps to assemble and prepare your lawn mower for first use.
5.1 Handle Assembly
- Unfold the handle assembly and secure it in the upright position using the provided fasteners.
- Ensure all connections are tight and stable.
5.2 Attaching the Grass Collection Basket
- Lift the rear flap of the lawn mower.
- Hook the grass collection basket onto the designated points under the flap. Ensure it is securely attached.

Figure 3: The 50-liter grass collection basket attached to the lawn mower.
5.3 Power Connection
- Use an outdoor-rated extension cord suitable for the mower's power requirements (1500W).
- Secure the power cord using the integrated cable clip on the handle to prevent accidental disconnection during operation.

Figure 4: The cable clip helps manage the power cord safely.
6. Operating Instructions
6.1 Adjusting Cutting Height
The Valex Te 1501 offers 5 centralized cutting height adjustments (20mm, 30mm, 50mm, 60mm, 70mm).
- Ensure the lawn mower is disconnected from the power supply before adjusting the cutting height.
- Locate the centralized height adjustment lever on the side of the mower.
- Move the lever to select the desired cutting height. Refer to the markings for specific height settings.

Figure 5: The lever for centralized cutting height adjustment.
6.2 Starting and Stopping the Lawn Mower
- To Start: Press and hold the safety button, then pull the operating lever towards the handle. The motor will start.
- To Stop: Release the operating lever. The motor will stop automatically.

Figure 6: The safety switch and operating lever for starting the mower.
6.3 Mowing Tips
- Mow only dry grass for best results and to prevent clogging.
- Overlap each cutting path slightly to ensure even coverage.
- Empty the grass collection basket regularly to maintain optimal performance.
7. Maintenance
Regular maintenance ensures the longevity and optimal performance of your lawn mower.
- Cleaning: After each use, disconnect the power and clean the underside of the mower deck and the grass collection basket. Remove any grass clippings or debris.
- Blade Inspection: Periodically check the blade for sharpness and damage. A dull or damaged blade can affect cutting performance. Blade replacement should be performed by a qualified technician.
- Storage: Store the lawn mower in a dry, secure place, away from direct sunlight and moisture. The foldable handle allows for compact storage.
8. Troubleshooting
Refer to the table below for common issues and their solutions.
| Problem | Possible Cause | Solution |
|---|---|---|
| Mower does not start. | No power supply; Safety switch not engaged; Overload protection activated. | Check power connection; Ensure safety button is pressed and lever pulled; Allow motor to cool if overloaded. |
| Poor cutting performance. | Dull or damaged blade; Grass collection basket full; Mowing wet grass. | Inspect/replace blade; Empty grass basket; Mow only dry grass. |
| Excessive vibration. | Damaged or unbalanced blade; Loose components. | Inspect blade for damage; Check all fasteners for tightness. If problem persists, contact service. |
9. Specifications
| Feature | Detail |
|---|---|
| Model | Te 1501 |
| Manufacturer Model Number | 1496218 |
| Power | 1500 W |
| Cutting Width | 36 cm |
| Cutting Height Adjustment | 5 centralized positions (20mm, 30mm, 50mm, 60mm, 70mm) |
| Grass Collection Basket Capacity | 50 Liters |
| Material | Alloy Steel |
| Power Source | Corded Electric |
| Product Dimensions (L x W x H) | 66 x 40 x 30 cm |
| Weight | 11.44 kg |
| Color | Red |
| Style | Rotary |
| Operating Mode | Automatic |

Figure 7: Rear view of the Valex Te 1501 Electric Lawn Mower.

Figure 8: Side view of the Valex Te 1501 Electric Lawn Mower.
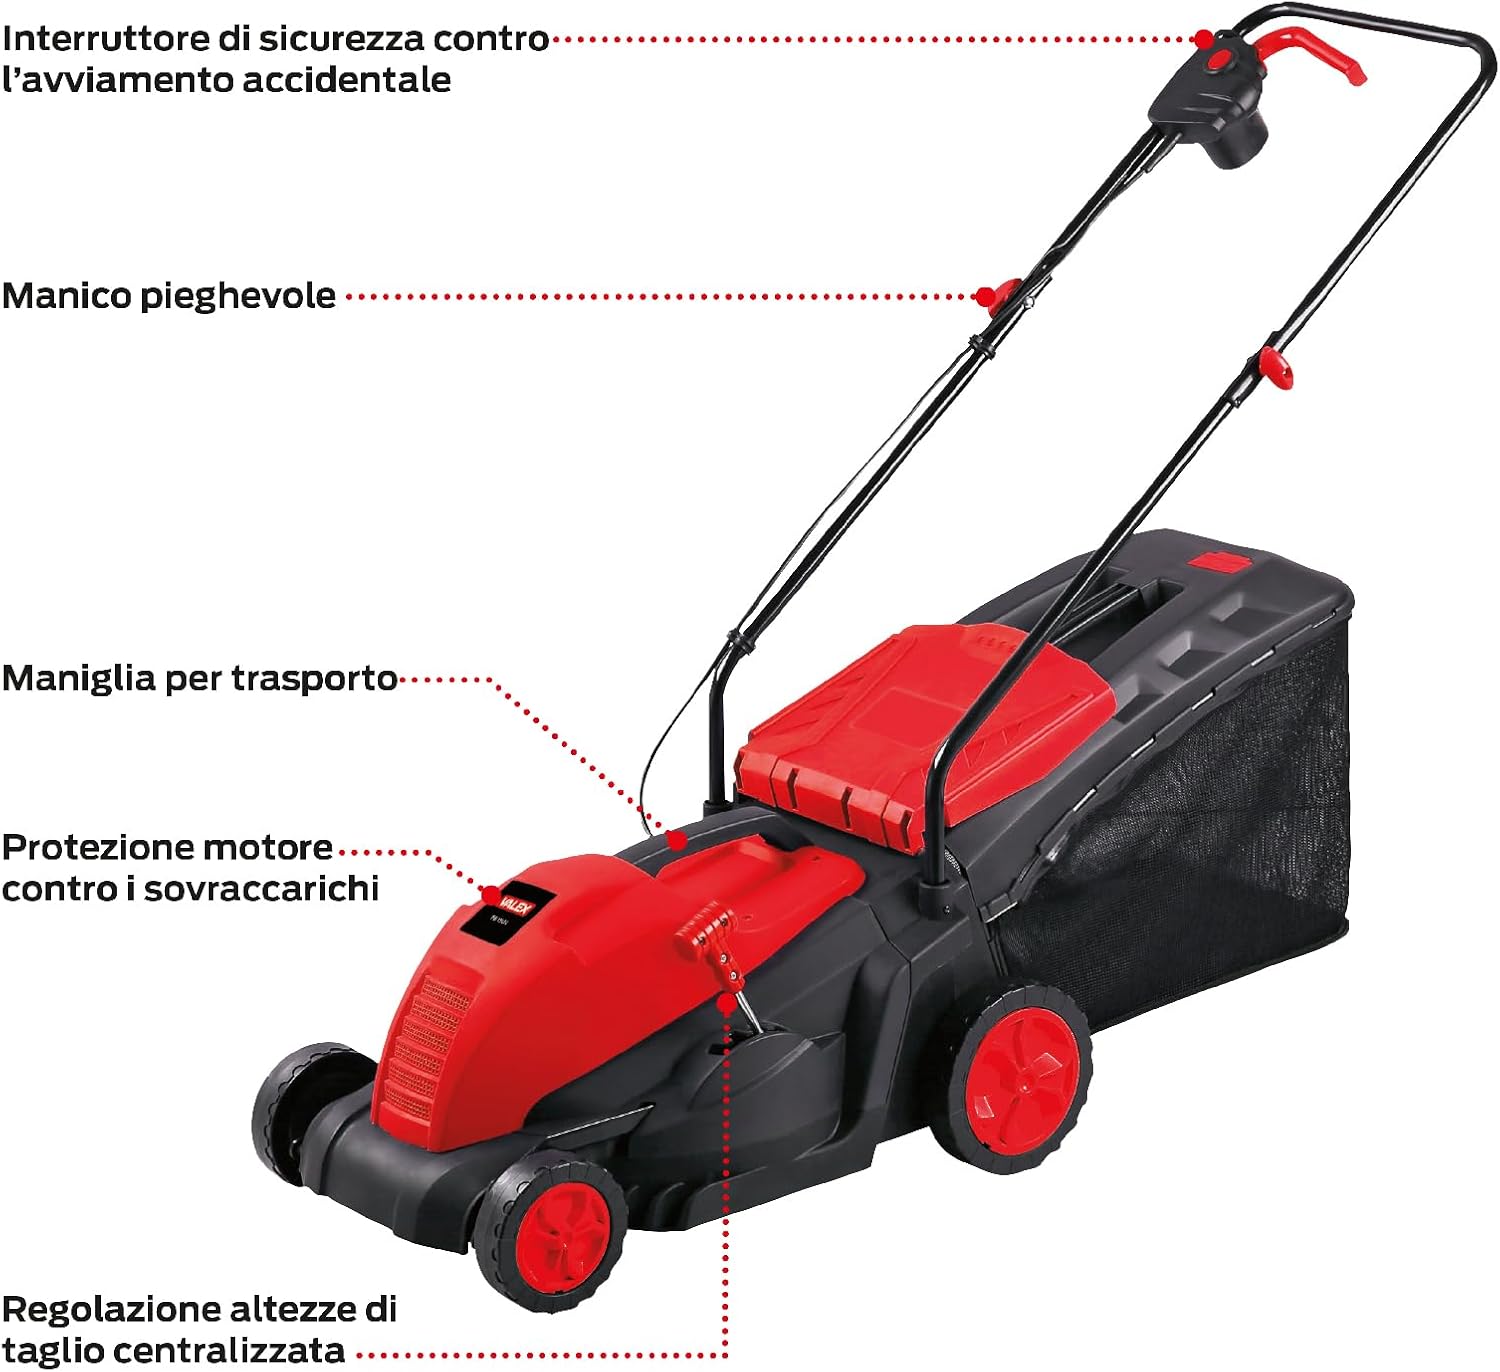
Figure 9: Front view of the Valex Te 1501 Electric Lawn Mower.
Figure 10: Dimensions of the Valex Te 1501 Electric Lawn Mower.
10. Warranty and Support
Information regarding warranty and availability of spare parts is not explicitly provided in the product details. For warranty claims, technical support, or spare parts inquiries, please contact your retailer or the manufacturer directly.
Manufacturer: Valex
For further assistance, please visit the official Valex website or contact their customer service department. You can often find contact information on the product packaging or the manufacturer's website.

Figure 11: Valex brand logo.