1. Introduction
Thank you for choosing the EZGHAR Portable Electric Juicer Cup. This manual provides essential information for the safe and efficient operation, maintenance, and troubleshooting of your new juicer. Please read these instructions carefully before first use and retain them for future reference.
2. Safety Information
To ensure safe operation and prevent injury or damage, please observe the following safety precautions:
- Automatic Shut-off: The juicer is equipped with a safety mechanism that automatically halts operation if the lid is opened during juicing. Ensure the lid is securely closed before starting the blending cycle.
- Leak Prevention: The bottle features a safety lock designed to prevent leaks. Always ensure the lid is properly sealed and locked before transport or operation.
- Water Immersion: DO NOT immerse the motor base in water or any other liquid. Clean the motor base by wiping its exterior with a damp cloth.
- Blade Safety: The blades are sharp. Exercise extreme caution when cleaning the blade assembly to avoid injury. Keep fingers clear of the blades.
- Children: Keep the juicer and its components out of reach of children. This appliance is not intended for use by children.
- Charging: Use only the provided USB charging cable. Do not attempt to charge with damaged cables or non-compatible chargers.
- Overfilling: Do not exceed the maximum juicing capacity of 500mL to prevent spills and ensure proper blending.
- Disassembly: Do not attempt to disassemble the motor base or repair the appliance yourself. Contact customer support for assistance.
3. Package Contents
Verify that all items are present in your package:
- Juicing Cup (with motor base and blade assembly)
- Straw
- Straight Drink Lid
- Juicer Lid
- Cup Strap
- USB Charging Cable
- User Manual

Image: The EZGHAR Portable Electric Juicer Cup shown with its various components including the cup, lids, straw, and cleaning brush.
4. Product Overview and Components
Familiarize yourself with the parts of your EZGHAR Portable Electric Juicer Cup:
- Motor Base: Contains the motor, battery, charging port, and start button.
- Blade Assembly: Integrated into the motor base, featuring a 10-blade three-dimensional cutter head.
- Juicing Cup: The main container for ingredients, with an 800mL total capacity and 500mL juicing capacity.
- Juicer Lid: Designed for blending, includes the safety lock mechanism.
- Straight Drink Lid: For direct drinking, often includes a straw opening.
- Straw: For convenient drinking.
- Cup Strap: For easy portability.
- USB Type-C Charging Port: Located on the motor base for recharging the internal battery.
- Start Button: Activates the blending cycle (double-click to start).
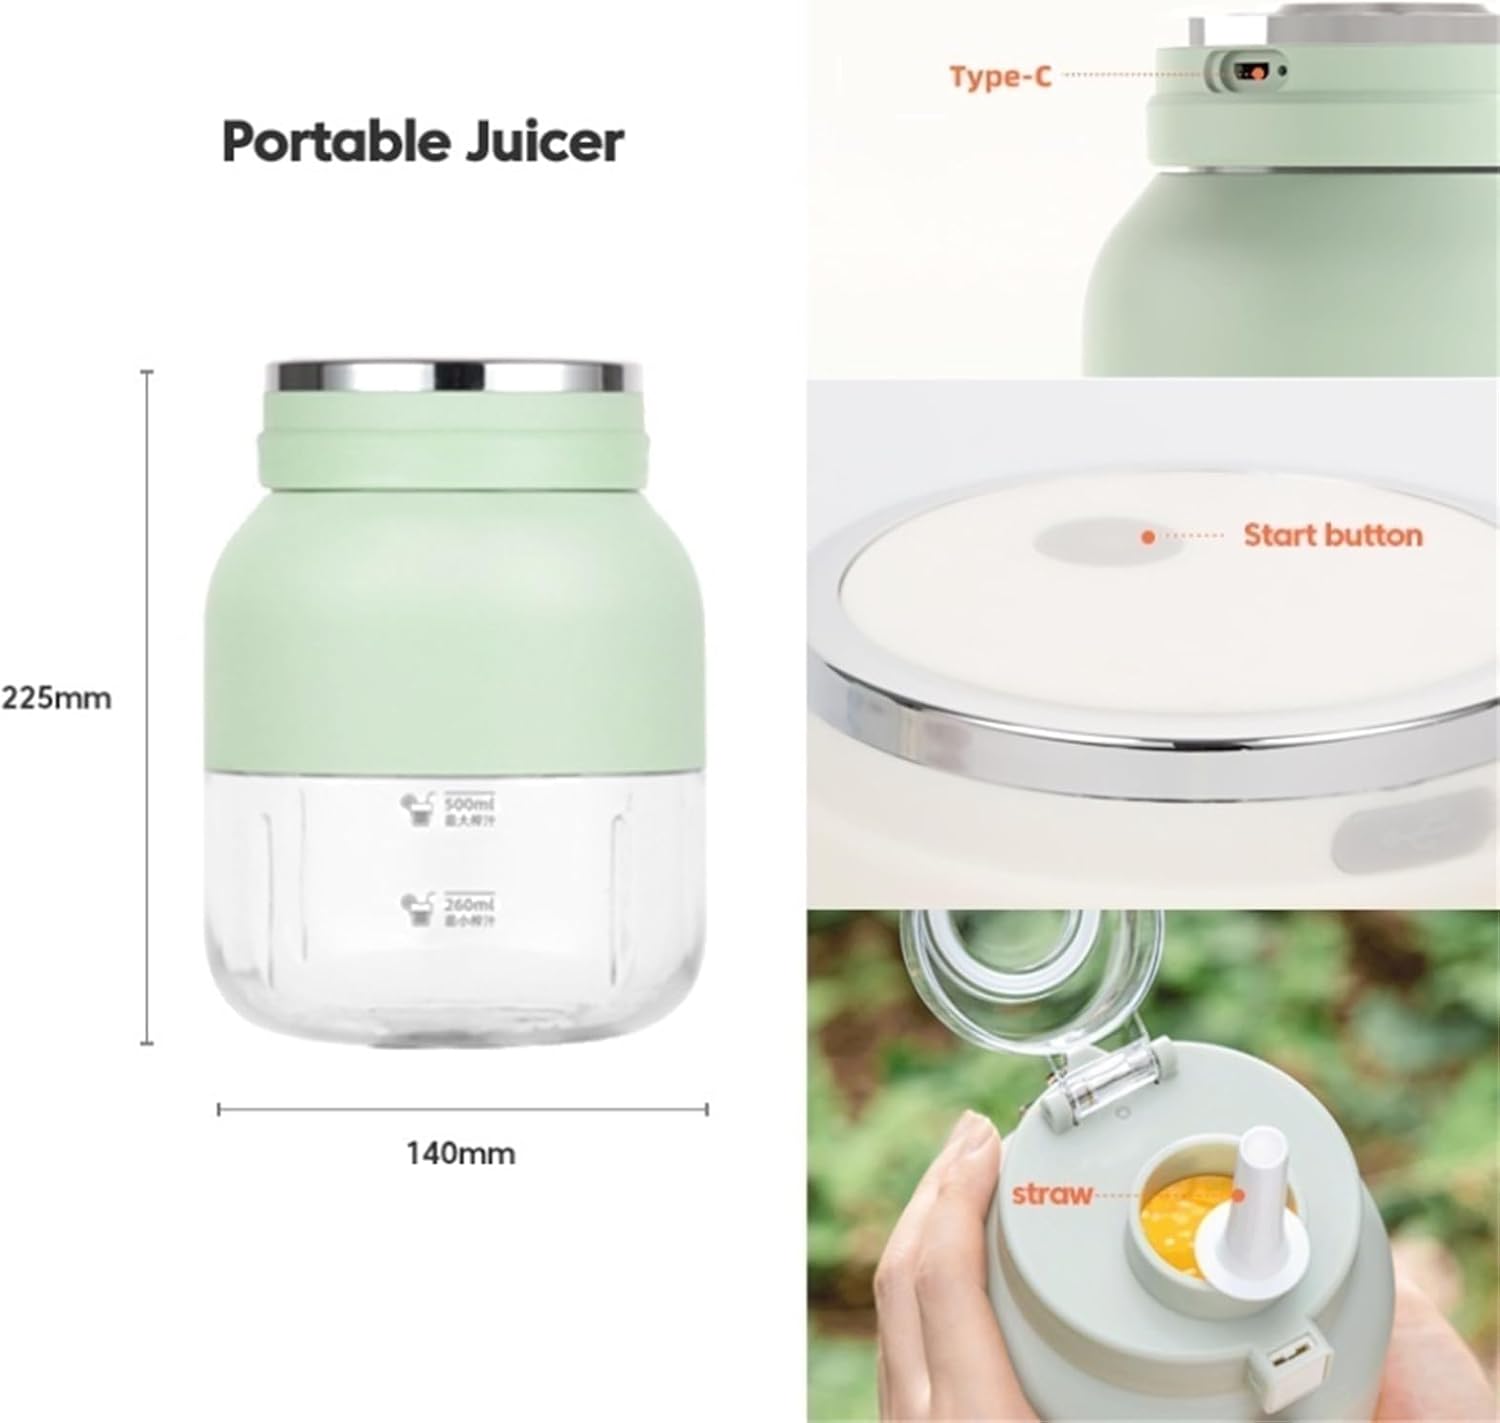
Image: A detailed diagram highlighting the dimensions (140mm x 140mm x 225mm), the Type-C charging port, the start button, and the straw feature of the portable juicer.
5. Setup
5.1 Initial Charging
- Before first use, fully charge the juicer. Connect the provided USB charging cable to the Type-C port on the motor base.
- Connect the other end of the USB cable to a compatible power source (e.g., AC adapter, car charger, power bank, or computer USB port).
- Charging typically takes approximately 4 hours for a full charge. The indicator light will show charging status (refer to product specific light indicators if available, otherwise assume a standard charging light).
- A fully charged battery provides power for up to 10 blending cycles.

Image: The portable juicer cup connected to a USB charging cable, illustrating the charging process. A battery icon indicates a 1500mAh*2 capacity and long battery life.
5.2 Assembly
- Ensure the blade assembly is securely attached to the motor base.
- Place the motor base with the blade assembly onto the juicing cup, twisting clockwise until it is firmly sealed.
- Attach the desired lid (Juicer Lid for blending, Straight Drink Lid for drinking) to the top of the cup, twisting clockwise until secure.

Image: A user's hands demonstrating the assembly of the juicer cup, specifically showing the lid being opened and placed onto the main body of the cup.
6. Operation
- Prepare Ingredients: Wash and cut fruits or vegetables into small pieces, approximately 1-2 cm (0.4-0.8 inches).
- Add Liquids: Add sufficient liquid (water, milk, juice) to cover the blades and ensure smooth blending. Do not exceed the 500mL juicing capacity mark on the cup.
- Secure Lid: Ensure the Juicer Lid is securely fastened and locked. The juicer will not operate if the lid is not properly closed due to the built-in safety mechanism.
- Start Blending: Double-click the start button located on the motor base to begin the blending cycle.
- Blending Cycle: The juicer will operate for approximately 40 seconds and then automatically stop. For thicker mixtures, you may gently shake the cup during blending.
- Enjoy: Once blending is complete, open the lid and pour your fresh juice, or swap to the Straight Drink Lid and use the straw for on-the-go consumption.

Image: A four-panel collage demonstrating various uses of the portable juicer: disassembling the cup, holding the blended drink, carrying the juicer in a picnic basket, and drinking from the straw.
7. Cleaning and Maintenance
Regular cleaning ensures optimal performance and extends the lifespan of your juicer.
- Disassembly: After each use, turn off the juicer and carefully separate the motor base from the cup. Remove the blade assembly from the cup.
- Cleaning the Cup, Lids, and Straw: Wash the juicing cup, both lids, and the straw with warm, soapy water. Rinse thoroughly under running water.
- Cleaning the Blade Assembly: Exercise extreme caution. Carefully clean the blades and the surrounding area using a small brush (if provided) and warm, soapy water. Avoid direct contact with the sharp blades. Rinse thoroughly.
- Cleaning the Motor Base: Wipe the exterior of the motor base with a damp cloth. DO NOT immerse the motor base in water or rinse it under running water.
- Drying: Ensure all components are completely dry before reassembly or storage to prevent mold or mildew growth.
- Storage: Store the clean and dry juicer in a cool, dry place, away from direct sunlight.
8. Troubleshooting
If you encounter issues with your juicer, refer to the following common problems and solutions:
| Problem | Possible Cause | Solution |
|---|---|---|
| Juicer does not start | Low battery Lid not securely closed Incorrect button press | Recharge the battery fully Ensure the lid is properly aligned and tightened Double-click the start button firmly |
| Ingredients not blending smoothly | Ingredients too large Insufficient liquid Overfilled cup | Cut ingredients into smaller pieces (1-2 cm) Add more liquid to cover blades Do not exceed 500mL juicing capacity |
| Juicer is leaking | Lid or base not properly sealed Damaged seal | Ensure all parts are tightly secured Inspect seals for damage; contact support if damaged |
| Motor stops unexpectedly | Overload protection activated Low battery | Reduce ingredients, add more liquid, or cut ingredients smaller. Restart after a few minutes. Recharge the battery. |
9. Specifications
| Brand | EZGHAR |
| Model | B0CTKDB1NC |
| Function | Juicing |
| Motor Speed | 15001-18000 RPM |
| Blade Type | 10-blade three-dimensional cutter head |
| Liner Material | PP Food Grade Plastic |
| Battery Capacity | 2 x 1500mAh (Total 3000mAh) |
| Power | 80W |
| Voltage | 7.4V |
| Total Capacity | 800mL |
| Juicing Capacity | 500mL |
| Product Dimensions | 140mm (D) x 140mm (W) x 225mm (H) / 5.51"D x 5.51"W x 8.86"H |
| Charging Time | Approx. 4 hours |
| Usage Per Charge | Up to 10 cups of juice |
| Special Features | Portable, Safety Lock, USB Rechargeable, Automatic Shut-off |
10. Warranty and Support
The EZGHAR Portable Electric Juicer Cup comes with a limited warranty. For specific details regarding warranty coverage, terms, and conditions, please refer to the warranty card included with your purchase or contact EZGHAR customer support.
For technical assistance, troubleshooting not covered in this manual, or to inquire about replacement parts, please contact EZGHAR customer support through the retailer where you purchased the product or visit the official EZGHAR brand store: