1. Introduction
This instruction manual provides comprehensive guidance for the safe and efficient operation, installation, maintenance, and troubleshooting of your PAKROMAN Commercial Ice Maker, Model FASK39C. Please read this manual thoroughly before operating the appliance and retain it for future reference.
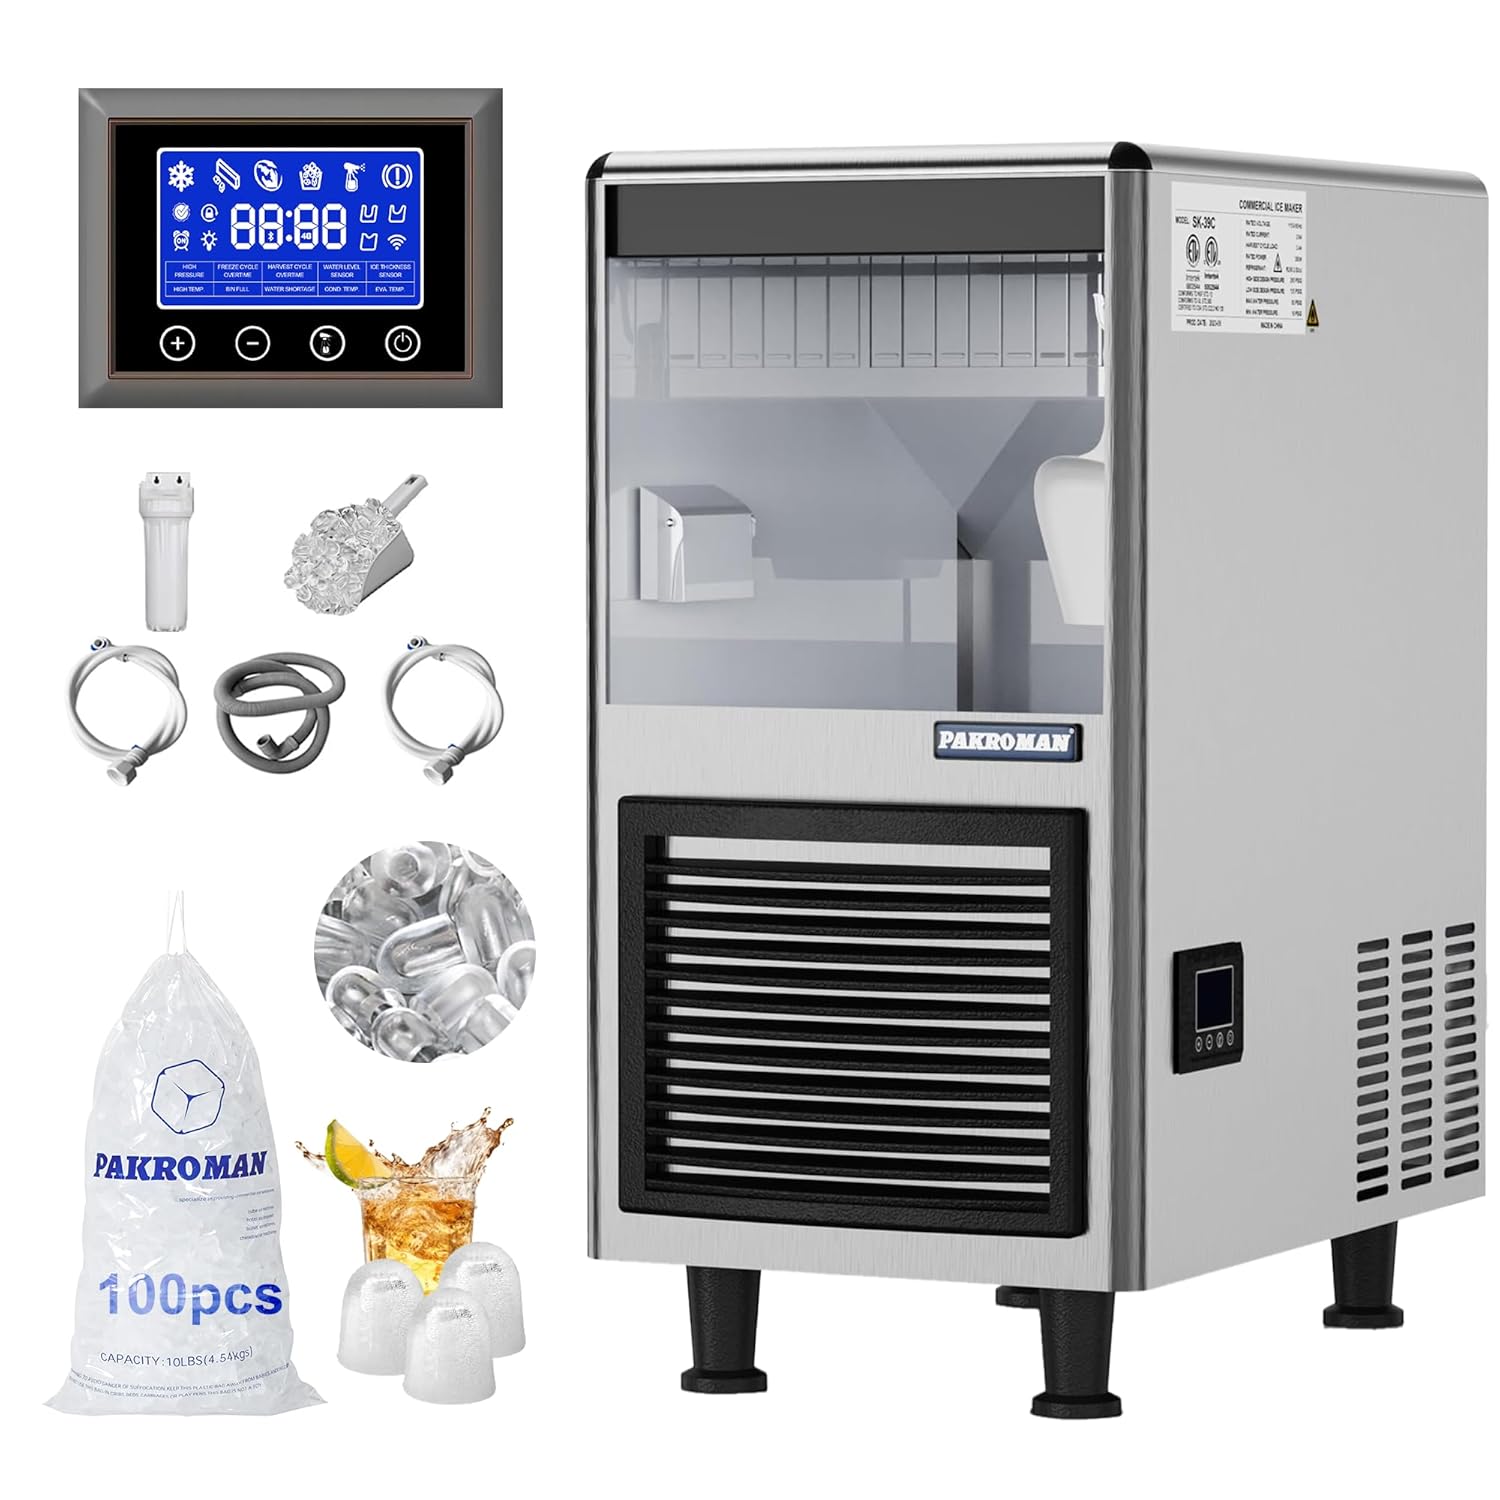
Figure 1.1: PAKROMAN Commercial Ice Maker Model FASK39C and included accessories.
2. Safety Information
Always adhere to the following safety precautions to prevent injury or damage to the appliance.
- Ensure the ice maker is connected to a grounded power outlet with the correct voltage.
- Do not operate the appliance with a damaged power cord or plug.
- Keep ventilation openings clear of obstructions.
- Do not store explosive substances such as aerosol cans with a flammable propellant in this appliance.
- Only qualified personnel should perform repairs or servicing.
- Disconnect the power supply before cleaning or performing maintenance.
- This appliance is designed for commercial use.
3. What's in the Box
Upon unpacking, verify that all components are present:
- Commercial Ice Maker Unit
- Ice Scoop
- Water Filter
- Water Inlet Hose
- Drain Hose
- Hose Clamps
- Instruction Manual
4. Product Features
The PAKROMAN Commercial Ice Maker FASK39C is engineered for high performance and reliability:
- Compact Design: Designed to fit comfortably under most counters, with a width of 14.8 inches, ideal for space-limited establishments.
- High Ice Production & Storage: Capable of producing up to 90 pounds of bullet ice per 24 hours, with a storage bin capacity of up to 35 pounds, ensuring a continuous supply of ice.
- Bullet Ice: Produces bullet-shaped ice cubes that are approximately 2 times larger than standard cube ice. This ice cools beverages quickly and is easy to chew, suitable for cocktails and bagged ice.
- Air-Cooled System: Features an efficient air-cooled system that conserves water while maintaining optimal ice-making performance.
- Certifications: Energy Star certified for energy efficiency and ETL certified for sanitation standards, ensuring high quality and safety.

Figure 4.1: Comparison illustrating the larger size and transparency of PAKROMAN bullet ice compared to standard cube ice.

Figure 4.2: Detail of bullet ice dimensions, showing 1 1/2 inch length and 1 1/10 inch width.
5. Setup and Installation
Proper installation is crucial for the performance and longevity of your ice maker. Follow these steps carefully:
- Unpacking: Carefully remove the ice maker from its packaging. Inspect for any shipping damage.
- Placement: Position the ice maker on a flat, stable surface. Ensure adequate clearance around the unit for proper air circulation, especially at the rear and sides where ventilation grilles are located.
- Water Connection: Connect the water inlet hose to a potable water supply. Install the included water filter in line with the water supply to ensure clean ice production. Connect the other end of the water inlet hose to the designated water inlet on the back of the ice maker.
- Drain Connection: Connect the drain hose to the water outlet (pre-installed) on the back of the unit. Route the drain hose to a suitable floor drain or sink, ensuring a continuous downward slope for proper drainage.
- Power Connection: Plug the power cord into a dedicated, grounded electrical outlet. Ensure the voltage matches the appliance's requirements.

Figure 5.1: Rear view of the ice maker, highlighting the power cord, water inlet, and pre-installed water outlet for fast installation.
6. Operating Instructions
Familiarize yourself with the control panel for efficient operation.

Figure 6.1: Straightforward control panel with four operation buttons: Power (⏻), Self-cleaning (Ὣf;), Adjust data +, and Adjust data -.
6.1 Initial Startup
- After connecting water and power, press the Power button (⏻) to turn on the unit.
- The machine will automatically begin the ice-making cycle. The display will show the current status and time.
6.2 Ice Production
The ice maker produces up to 90 pounds of bullet ice per 24 hours. Each ice-making cycle typically takes 11-18 minutes. The storage bin can hold up to 35 pounds of ice. The machine will automatically stop when the ice bin is full and resume when ice is removed.
6.3 Adjusting Settings
Use the + and - buttons to adjust default data or settings as indicated on the control panel display. Refer to the display icons for specific adjustments such as ice thickness or cycle duration, if applicable.
6.4 Self-Cleaning Function
To initiate the self-cleaning cycle, press the Self-cleaning button (🚿). Follow any on-screen prompts. This function helps maintain hygiene and efficiency.
7. Maintenance and Cleaning
Regular maintenance ensures optimal performance and extends the lifespan of your ice maker.
7.1 Daily Cleaning
- Wipe down the exterior of the unit with a soft, damp cloth.
- Clean the ice storage bin with a mild detergent and rinse thoroughly.
- Ensure the ice scoop is clean before use.
7.2 Weekly/Bi-Weekly Cleaning
- Run the self-cleaning cycle as described in Section 6.4.
- Inspect and clean the air filter located on the front grille. Remove the filter and wash it with warm, soapy water. Allow it to dry completely before reinserting.

Figure 7.1: Removing the air filter for cleaning.
7.3 Monthly/Quarterly Maintenance
- Water Filter Replacement: Replace the water filter every 3-6 months, or more frequently depending on water quality and usage, to ensure optimal ice quality and prevent scale buildup.
- Condenser Coil Cleaning: Periodically clean the condenser coils at the back of the unit using a brush or vacuum cleaner to remove dust and debris. This improves efficiency and prevents overheating.
- Drain System Check: Ensure the drain hose is free of kinks and blockages. Clean the drain pan if necessary.

Figure 7.2: Internal water pump component, which should be checked for cleanliness during maintenance.

Figure 7.3: The compressor unit, a key component for ice production, requires proper ventilation and occasional inspection.
8. Troubleshooting
Refer to this section for common issues and their solutions. If the problem persists, contact customer support.
| Problem | Possible Cause | Solution |
|---|---|---|
| Ice maker not producing ice. | No water supply; clogged water filter; power issue; high ambient temperature. | Check water connection and supply valve; replace water filter; ensure power cord is securely plugged in; move unit to a cooler environment. |
| Ice production is slow. | Dirty condenser coils; high ambient temperature; low water pressure. | Clean condenser coils; ensure proper ventilation; check water supply pressure. |
| Ice cubes are small or hollow. | Low water flow; dirty evaporator; water quality issues. | Check water supply and filter; clean the evaporator plate; consider water treatment if water quality is poor. |
| Unit is leaking water. | Loose drain hose connection; clogged drain; damaged water line. | Secure drain hose connections; clear any drain blockages; inspect water lines for damage. |
| Unusual noise during operation. | Loose components; fan obstruction; compressor issue. | Check for loose parts; ensure fan is clear; if compressor noise persists, contact service. |
9. Specifications
Key technical specifications for the PAKROMAN Commercial Ice Maker FASK39C:
| Attribute | Value |
|---|---|
| Model Number | FASK39C |
| Brand | PAKROMAN |
| Product Dimensions (D x W x H) | 13"D x 14.8"W x 25"H |
| Ice Production Capacity | Up to 90 lbs / 24 hours |
| Ice Storage Capacity | Up to 35 lbs |
| Wattage | 380 watts |
| Ice Type | Bullet Ice (approx. 1.5" x 1.1") |
| Cooling System | Air-Cooled |
| Certifications | Energy Star, ETL Certified |
| First Available Date | January 30, 2024 |

Figure 9.1: Dimensional overview of the PAKROMAN Commercial Ice Maker.
10. Warranty and Support
For warranty information or technical support, please contact PAKROMAN customer service. Keep your purchase receipt and model number handy for faster service.
You can visit the official PAKROMAN store for more information and support: PAKROMAN Store on Amazon.