
Introduction
This manual provides essential information for the safe and effective operation of your Seismic Audio Connect-Pair Portable PA Speaker System. Please read this manual thoroughly before using the product and retain it for future reference. The Connect-Pair system consists of two powered 8-inch, 2-way compact PA speakers designed for portability and versatility.
Safety Information
Always observe the following safety precautions to prevent electric shock, fire, or injury:
- Do not open the speaker enclosure. No user-serviceable parts are inside. Refer all servicing to qualified service personnel.
- Do not expose the unit to rain or moisture.
- Ensure proper ventilation. Do not block ventilation openings.
- Use only the specified power adapter and cables.
- Avoid placing the unit near heat sources or in direct sunlight.
- Do not operate the unit if the power cord is damaged.
- Keep out of reach of children.
- Disconnect power before cleaning or moving the unit.
Package Contents
Verify that all items are present in the package:
- 2 x Seismic Audio Connect-Pair Powered 8-inch PA Speakers
- 2 x IEC AC Power Cables
- User Manual (this document)
Product Overview
Control Panel
The control panel provides access to all input, output, and sound adjustment features.

Image: Side view of the Seismic Connect PA speaker, highlighting the integrated control panel. This panel includes volume controls, EQ knobs, input jacks, and DSP mode selectors.
Input/Output Connections
The rear panel features various connection options for audio sources and linking speakers.

Image: Rear view of the Seismic Connect PA speaker, detailing the input and output section. This includes XLR-1/4" combo jacks, RCA inputs, 1/8" TRS input, and an XLR mix out.
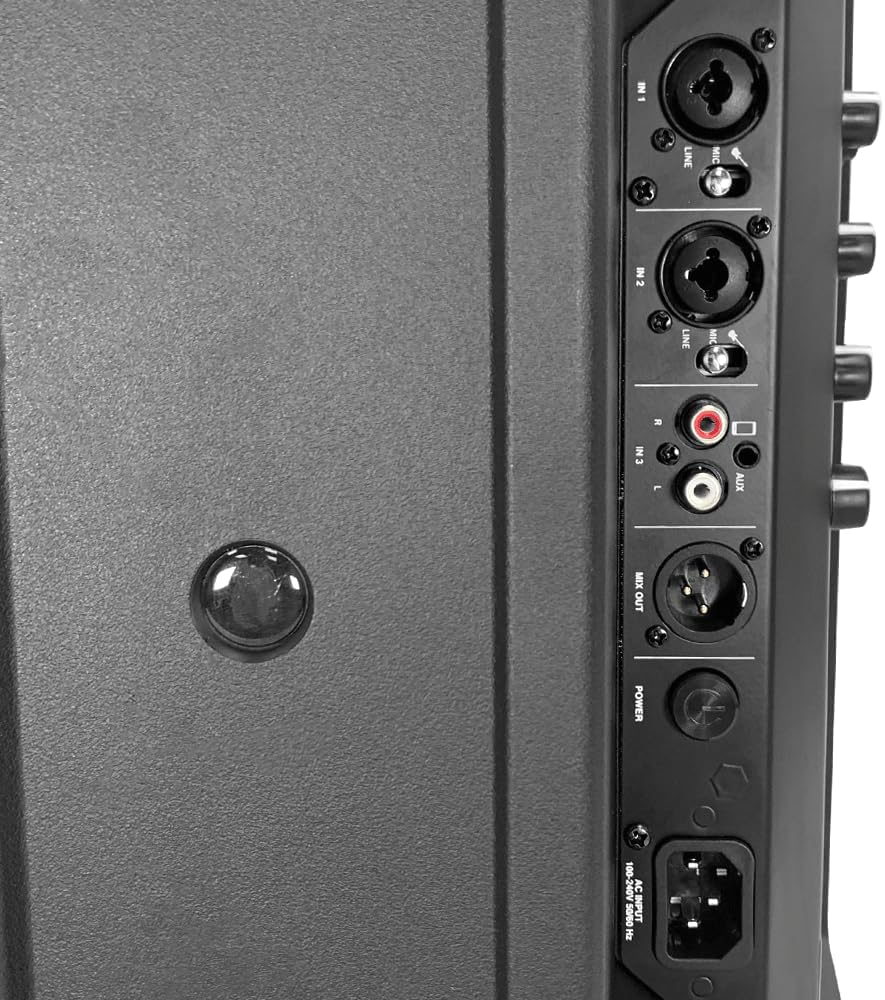
Image: Detailed close-up of the input/output panel, showing the labeling for each connection type, including MIC/LINE inputs, AUX input, and MIX OUT.
Setup
Initial Charging
Before first use, fully charge the internal lithium-ion battery. Connect the provided IEC AC power cable to the speaker's AC input and then to a standard AC outlet (100-240V, 50/60 Hz). The charging indicator will illuminate. A full charge takes approximately 4 hours of operation.
Powering On/Off
Locate the Power On/Off switch on the control panel. Press to turn the speaker on or off. The power indicator light will confirm the status.
Connecting Audio Sources
- Microphones/Instruments: Use the 2 x XLR-1/4" combo inputs (CH 1, CH 2) for microphones or line-level instruments. Adjust the respective channel volume knobs.
- Auxiliary Devices: Connect devices like smartphones or media players to the 1 x 1/8" TRS (stereo) input or the RCA input (CH 3). Adjust the CH 3 volume knob.
Bluetooth Pairing
- Ensure the speaker is powered on.
- Activate Bluetooth on your audio device.
- Press the Bluetooth button on the speaker's control panel. The Bluetooth indicator will flash.
- On your device, select "Seismic Connect" from the list of available Bluetooth devices.
- Once paired, the Bluetooth indicator will glow solid.
True Wireless Stereo (TWS) Pairing
TWS allows two Seismic Connect speakers to play in stereo wirelessly.

Image: Two Seismic Connect PA speakers shown with wireless signal icons between them, illustrating the True Wireless Stereo (TWS) connection feature.
- Power on both Seismic Connect speakers.
- Press the 'PAIR TWS' button on both speakers. The TWS indicator will flash.
- The speakers will automatically search and pair with each other. Once connected, one speaker will act as the master (left channel) and the other as the slave (right channel). The TWS indicator on both will glow solid.
- Now, pair your Bluetooth audio device to the master speaker as described in the Bluetooth Pairing section.
Mounting Options
The Seismic Connect speakers offer versatile placement:
- Pole Mount: Use the integrated pole mount socket for stand placement.
- Wedge Monitor: The cabinet design allows for use as a floor wedge monitor.
- Floor/Tabletop: Place directly on a flat surface.

Image: The Seismic Connect PA speaker shown lying on its side, illustrating its capability to function as a floor wedge monitor for stage applications.
Operating Instructions
Adjusting Volume and EQ
- Channel Volume: Use the 'VOLUME' knobs for CH 1, CH 2, and CH 3 to adjust the input level of each connected source.
- Master Volume: The 'MASTER VOLUME' knob controls the overall output level of the speaker.
- 2-Band Channel EQ: Each channel (CH 1, CH 2, CH 3) has 'BASS' and 'TREBLE' knobs to adjust the low and high frequencies of that specific input.
DSP Modes
The Digital Signal Processor (DSP) offers optimized sound profiles for different applications. Select a mode using the dedicated buttons:
- MUSIC: Optimized for general music playback.
- SPEECH: Enhances vocal clarity for presentations or public speaking.
- MONITOR: Suitable for use as a stage monitor.
- SUB: Configures the speaker for use with an external subwoofer, applying a high-pass filter.
Effects
The Connect-Pair includes several built-in effects:
- BASS BOOST: Increases low-frequency output.
- FEEDBACK ELIMINATOR: Helps reduce microphone feedback.
- REVERB: Adds a spacious, echoing effect to vocals or instruments.
- TALK OVER: Automatically lowers background music when a microphone signal is detected.
Using Mix Out
The 'MIX OUT' XLR output provides a balanced signal of the combined audio from all input channels. This can be used to link to additional PA systems, recording devices, or other powered speakers.
Maintenance
Cleaning
Clean the speaker cabinet with a soft, dry cloth. Do not use abrasive cleaners, solvents, or waxes. Ensure no liquids enter the speaker grille or control panel.
Battery Care
- For optimal battery life, avoid fully discharging the battery frequently.
- If storing the speaker for an extended period, charge the battery to approximately 50% every few months.
- Operating time on battery is approximately 4 hours, depending on volume and usage.
Storage
Store the speaker in a cool, dry place, away from direct sunlight and extreme temperatures. Protect the unit from dust and moisture.
Troubleshooting
| Problem | Possible Cause | Solution |
|---|---|---|
| No power | Power switch off, battery depleted, AC cable disconnected. | Ensure power switch is ON. Charge battery or connect to AC power. Check AC cable connection. |
| No sound output | Volume knobs low, incorrect input selected, faulty cable, muted source. | Increase Master Volume and channel volumes. Verify input connections. Test with different cables/sources. Check source device for mute. |
| Bluetooth not pairing | Speaker not in pairing mode, device too far, interference. | Press Bluetooth button on speaker. Move device closer. Turn off other Bluetooth devices. |
| TWS not connecting | Speakers not in TWS pairing mode, too far apart. | Ensure 'PAIR TWS' is pressed on both speakers. Place speakers within close range. |
| Feedback (howling) | Microphone too close to speaker, high gain, room acoustics. | Move microphone away from speaker. Reduce microphone gain. Activate Feedback Eliminator. |
Specifications
| Feature | Detail |
|---|---|
| Model | Connect-Pair |
| Power Rating (RMS) | LF: 70 Watts + HF: 30 Watts each speaker |
| Power Rating (Peak) | LF: 140 Watts + HF: 60 Watts each speaker |
| Amplifier Type | Class D |
| Low Frequency Driver | 8 Inch |
| High Frequency Driver | 1 Inch Titanium Compression Driver |
| Bluetooth Version | 5.0 |
| TWS Connectivity | Yes |
| Mixer Channels | 3 |
| Mic Preamps | 2 |
| EQ | 2-band Channel EQ (Bass, Treble) |
| Effects | Bass Boost, Feedback Eliminator, Reverb, Talk Over |
| DSP Features | 48kHz Sampling Frequency, MIC Howling Detector, Crossover, Limiter, Reverb, EQ |
| DSP Modes | Music, Speech, Monitor, Sub |
| Frequency Response | 60Hz - 19kHz |
| Max SPL | 115 dB |
| THD | <0.01% (20Hz - 20kHz) |
| Inputs | 2 x XLR-1/4" combo, 1 x 1/8" TRS (stereo), RCA Input |
| Outputs | 1 x XLR (mix out) |
| Controls | Master Volume, Power On/Off Switch |
| Battery Type | Rechargeable 11.1V 6.6AH Lithium-ion |
| Battery Operation Time | Approximately 4 Hours |
| AC Input | AC100-240V, 50/60 Hz |
| Dimensions (L x W x H) | 11 x 10.5 x 15.5 inches |
| Weight | 34.5 Pounds |
| Enclosure Material | Polypropylene (PP) |
Warranty and Support
Warranty Information
The Seismic Audio Connect-Pair Portable PA Speaker System is covered by a 1 Year Limited Parts and Labor Warranty from the date of purchase. This warranty covers manufacturing defects and workmanship under normal use. It does not cover damage caused by misuse, accident, unauthorized modification, or improper installation.
Customer Support
For technical assistance, warranty claims, or service inquiries, please contact Seismic Audio customer support. Refer to the official Seismic Audio website for current contact information.