1. Safety Information
Please read all instructions carefully before installation and use. Failure to follow these instructions may result in property damage or personal injury.
- Always turn off the main water supply before beginning any plumbing work.
- Wear safety glasses during installation.
- If you are unsure about any part of the installation process, consult a qualified plumber.
- Ensure all connections are tight to prevent leaks, but do not overtighten.
2. Package Contents
Verify that all components are present before beginning installation:
- Faucet Assembly with Pull-Down Sprayer
- Two Handles (Hot and Cold)
- Pop-up Drain Assembly
- Hot and Cold Water Supply Lines
- Mounting Hardware (washers, nuts, screws)
- Instruction Manual

Figure 1: All components of the Ryuwanku Brushed Nickel Widespread Bathroom Faucet, including the main faucet body with pull-down sprayer, two handles, and the pop-up drain assembly.
3. Tools Required (Not Included)
- Adjustable Wrench
- Phillips Head Screwdriver
- Plumber's Putty or Silicone Sealant
- Tape Measure
- Safety Glasses
4. Specifications
| Brand | Ryuwanku |
| Model Name | RY-20240129 |
| Color | Brushed Nickel |
| Material | Stainless Steel |
| Mounting Type | Deck Mount |
| Number of Handles | 2 |
| Hole Count | 3 |
| Special Feature | Pull Down Sprayer |
| Product Dimensions | 5.31"D x 8"W x 8.6"H |
| Hose Length | 75 Centimeters |
| UPC | 719910414561 |
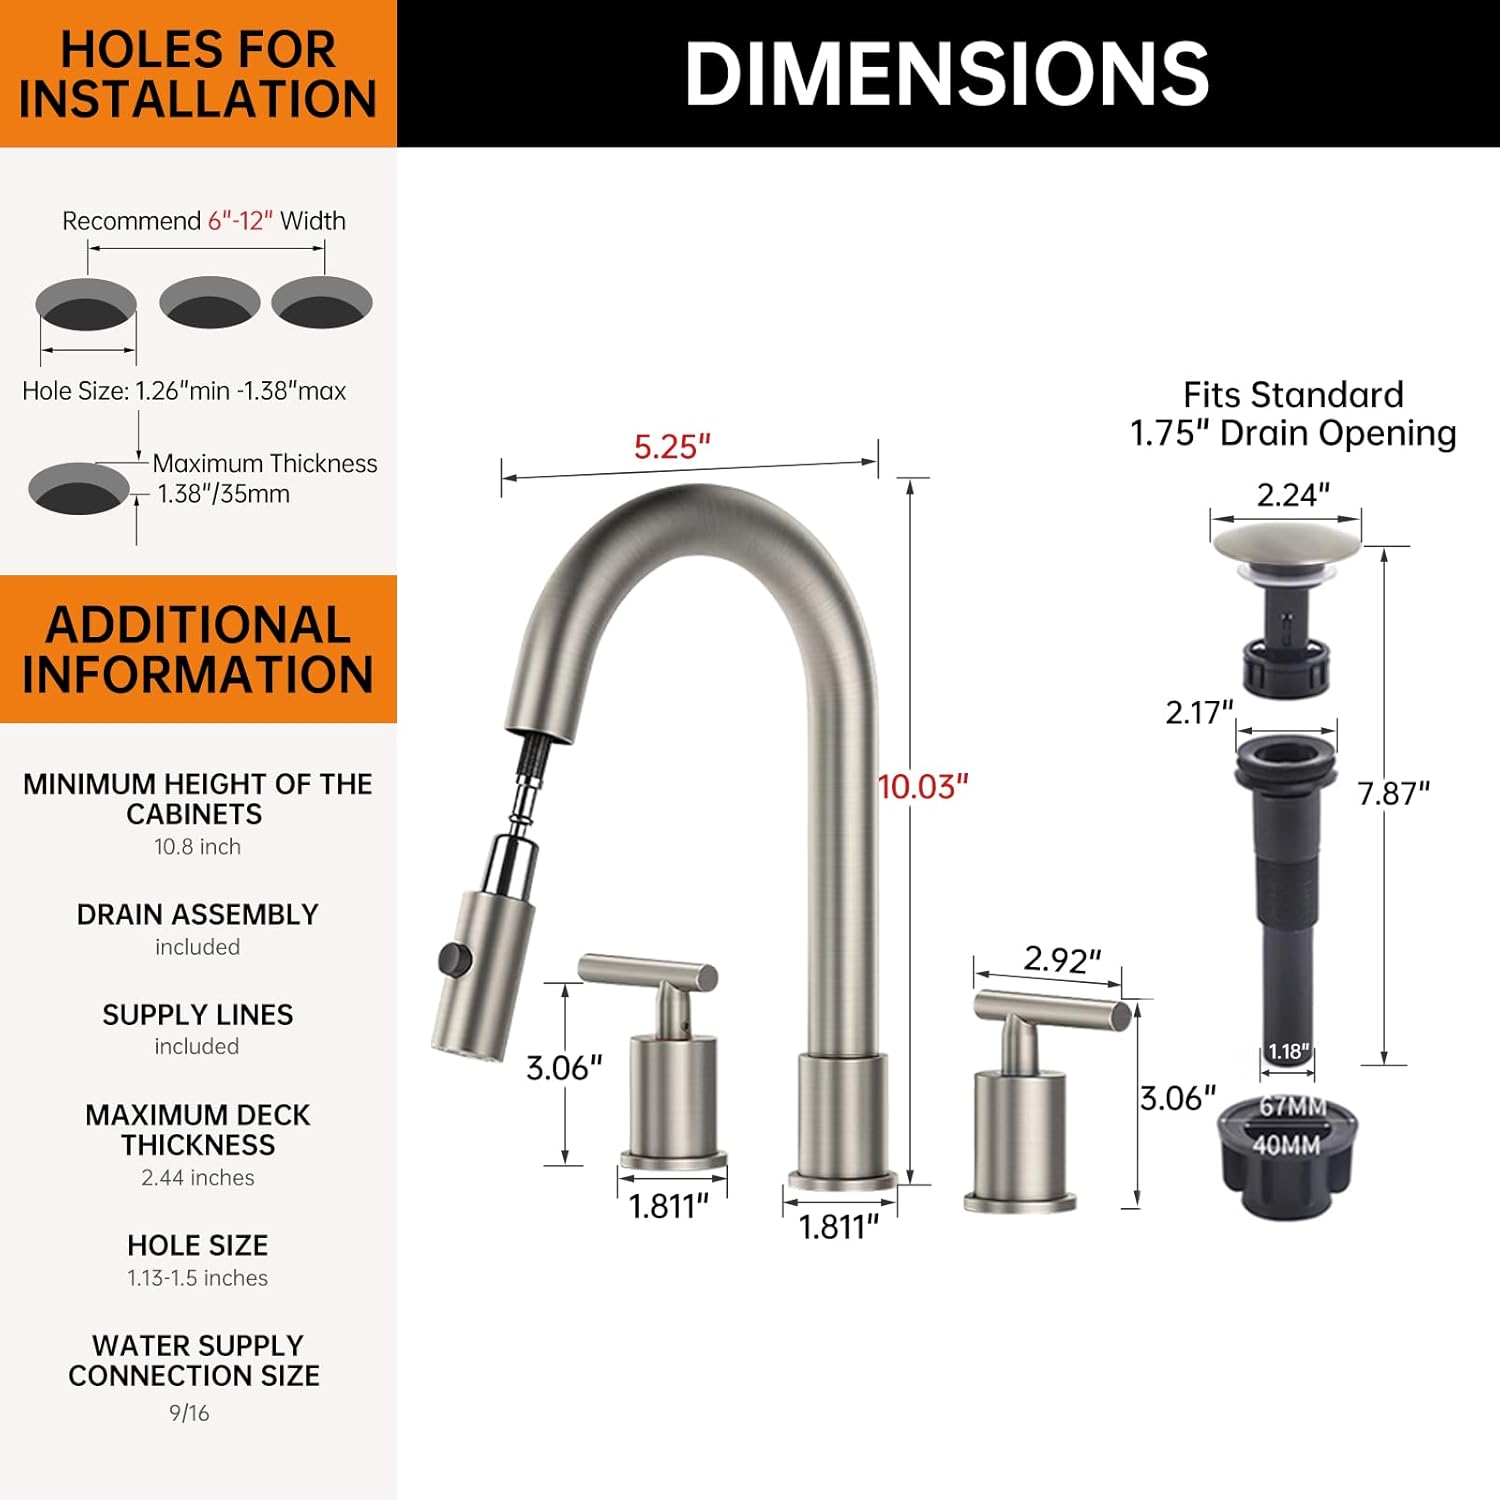
Figure 2: Detailed dimensions of the faucet and handles, along with recommended hole sizes and spacing for installation on a 3-hole widespread sink (6-12 inch width).
5. Installation Instructions
This faucet is designed for 3-hole widespread bathroom sinks, fitting widths from 6 to 12 inches. Refer to the detailed diagram and video for visual guidance.
5.1. Prepare for Installation
- Turn off the main water supply to the bathroom.
- Clear the area under the sink for access.
- Remove any existing faucet and clean the sink surface.
5.2. Install Faucet and Handles
- Remove the mounting nut and washer from the faucet body and handles.
- Insert the faucet body and handles through the corresponding holes in the sink deck. Ensure the hot handle is on the left and the cold handle is on the right.
- From underneath the sink, secure the faucet and handles using the washers and mounting nuts. Tighten the screws on the mounting nuts with a screwdriver to ensure stability.
5.3. Connect Water Supply Lines
- Connect the hot and cold water supply lines to the corresponding inlets on the faucet handles.
- Utilize the quick-connect hose system to connect the sprayer hose to the main water supply line. Push until an audible click is heard, ensuring a secure connection.
- Attach the gravity ball to the sprayer hose at the indicated position (typically 2 inches from the end of the hose) to ensure proper retraction of the pull-down sprayer.
- Connect the hot and cold water supply lines from the handles to your home's hot and cold water valves. Use an adjustable wrench to tighten connections, but do not overtighten.
5.4. Install Pop-up Drain
- Disassemble the pop-up drain. Apply plumber's putty or silicone sealant around the underside of the drain flange.
- Insert the drain flange into the sink drain hole.
- From underneath the sink, secure the drain body with the rubber washer and mounting nut. Tighten by hand, then use a wrench for a final snug fit.
5.5. Final Steps
- Turn on the main water supply.
- Check all connections for leaks. If leaks occur, tighten the connection slightly until the leak stops.
- Run water through the faucet for a few minutes to flush out any debris.

Figure 3: Comprehensive step-by-step installation diagram for the faucet, handles, and water connections.

Figure 4: Illustration of the wrench-free quick-connect hose system for simplified installation.
Video 1: Official installation guide demonstrating the steps for setting up the pull-down bathroom faucet.
6. Operating Instructions
6.1. Water Flow and Temperature Control
- The left handle controls the hot water. Turn it counter-clockwise to increase hot water flow.
- The right handle controls the cold water. Turn it counter-clockwise to increase cold water flow.
- Adjust both handles to achieve the desired water temperature and flow rate.
6.2. Pull-Down Sprayer Functionality
- To use the pull-down sprayer, gently pull the sprayer head from the main faucet body. The hose will extend, allowing for greater reach.
- The sprayer head features a button to switch between two modes: Stream for regular water flow and Spray for a wider, more powerful rinse.
- After use, release the sprayer head, and the gravity ball will assist in retracting it back into the faucet body.

Figure 5: Demonstration of the pull-down sprayer in use, highlighting the stream and spray modes for versatile cleaning.
7. Maintenance and Care
Proper care will ensure the longevity and appearance of your Ryuwanku faucet.
- Cleaning the Finish: The brushed nickel finish is designed to resist scratches and corrosion. Clean regularly with a soft, damp cloth and mild soap. Avoid abrasive cleaners, harsh chemicals, or scouring pads, as these can damage the finish.
- Aerator Maintenance: If water flow decreases, the aerator may be clogged. Unscrew the aerator from the sprayer head, clean any debris, and rinse thoroughly before reattaching.
- Material Quality: Made from SUS 304 stainless steel, this faucet is 100% lead-free, ensuring safe water usage.

Figure 6: Visual comparison demonstrating the high-performance ClearShield finish, which resists water spots and fingerprints.
8. Troubleshooting
| Problem | Possible Cause | Solution |
| Faucet leaks from connections | Loose connections or damaged washers. | Turn off water supply. Gently tighten connections with a wrench. Replace washers if damaged. |
| Low water flow | Clogged aerator or kinked supply lines. | Unscrew and clean the aerator. Check supply lines for kinks or obstructions. |
| Sprayer does not retract fully | Gravity ball improperly positioned or obstructed. | Ensure the gravity ball is correctly installed on the sprayer hose and has clear movement under the sink. |
9. Warranty and Support
Ryuwanku provides a lifetime warranty for this product, as stated in the specifications. Additionally, we offer a 100% satisfaction guarantee and replacement service within 12 months of purchase for any issues.
For any questions, concerns, or support needs, please contact Ryuwanku US customer service through your purchase platform or the official brand website.