1. Introduction
Thank you for choosing the CAMWORLD 4K 56MP Dual Lens Video Camcorder, Model AC09. This camcorder is designed to capture high-quality video at 4K resolution and still images up to 56 megapixels, featuring a dual-lens system for versatile recording. This manual provides essential information for the safe and effective use of your device. Please read it thoroughly before operation and retain it for future reference.
2. Safety Information
- Do not expose the camcorder to water or moisture.
- Avoid dropping the device or subjecting it to strong impacts.
- Keep the camcorder away from direct sunlight and high temperatures.
- Use only recommended accessories and power adapters.
- Do not attempt to disassemble or repair the camcorder yourself. Contact customer support for assistance.
- Dispose of batteries according to local regulations.
3. Package Contents
Verify that all items are present in your package:
- CAMWORLD 4K 56MP Dual Lens Video Camcorder (Model AC09)
- Microphone
- USB Cable
- User Manual
- Note: Lithium-ion batteries are not included and must be purchased separately.
4. Product Overview
Familiarize yourself with the main components of your camcorder.

Figure 4.1: Front view of the camcorder with the rotatable screen open, showing the main lens and controls.

Figure 4.2: Side view of the camcorder, highlighting ports for connectivity and additional controls.

Figure 4.3: Back view of the camcorder with the screen closed, revealing the secondary lens and the main body structure.

Figure 4.4: Top view of the camcorder, illustrating the microphone attachment point and hot shoe mount.
5. Setup
5.1. Battery Installation
- Open the battery compartment cover located on the bottom of the camcorder.
- Insert two (2) Lithium-ion batteries, ensuring correct polarity (+/-).
- Close the battery compartment cover securely.
5.2. Memory Card Insertion
This camcorder requires an SD card (not included) for storing recordings.
- Locate the SD card slot on the side of the camcorder.
- Insert the SD card with the metal contacts facing down until it clicks into place.
- To remove, gently press the card until it ejects.
5.3. Charging the Camcorder
Connect the camcorder to a power source using the provided USB cable. The charging indicator light will illuminate.
5.4. Attaching the Microphone
The external microphone enhances audio quality.
- Slide the microphone into the hot shoe mount on top of the camcorder.
- Connect the microphone cable to the designated microphone input port.
5.5. Attaching Tripod/Stabilizer
For stable shots, attach the camcorder to a tripod or handheld stabilizer.
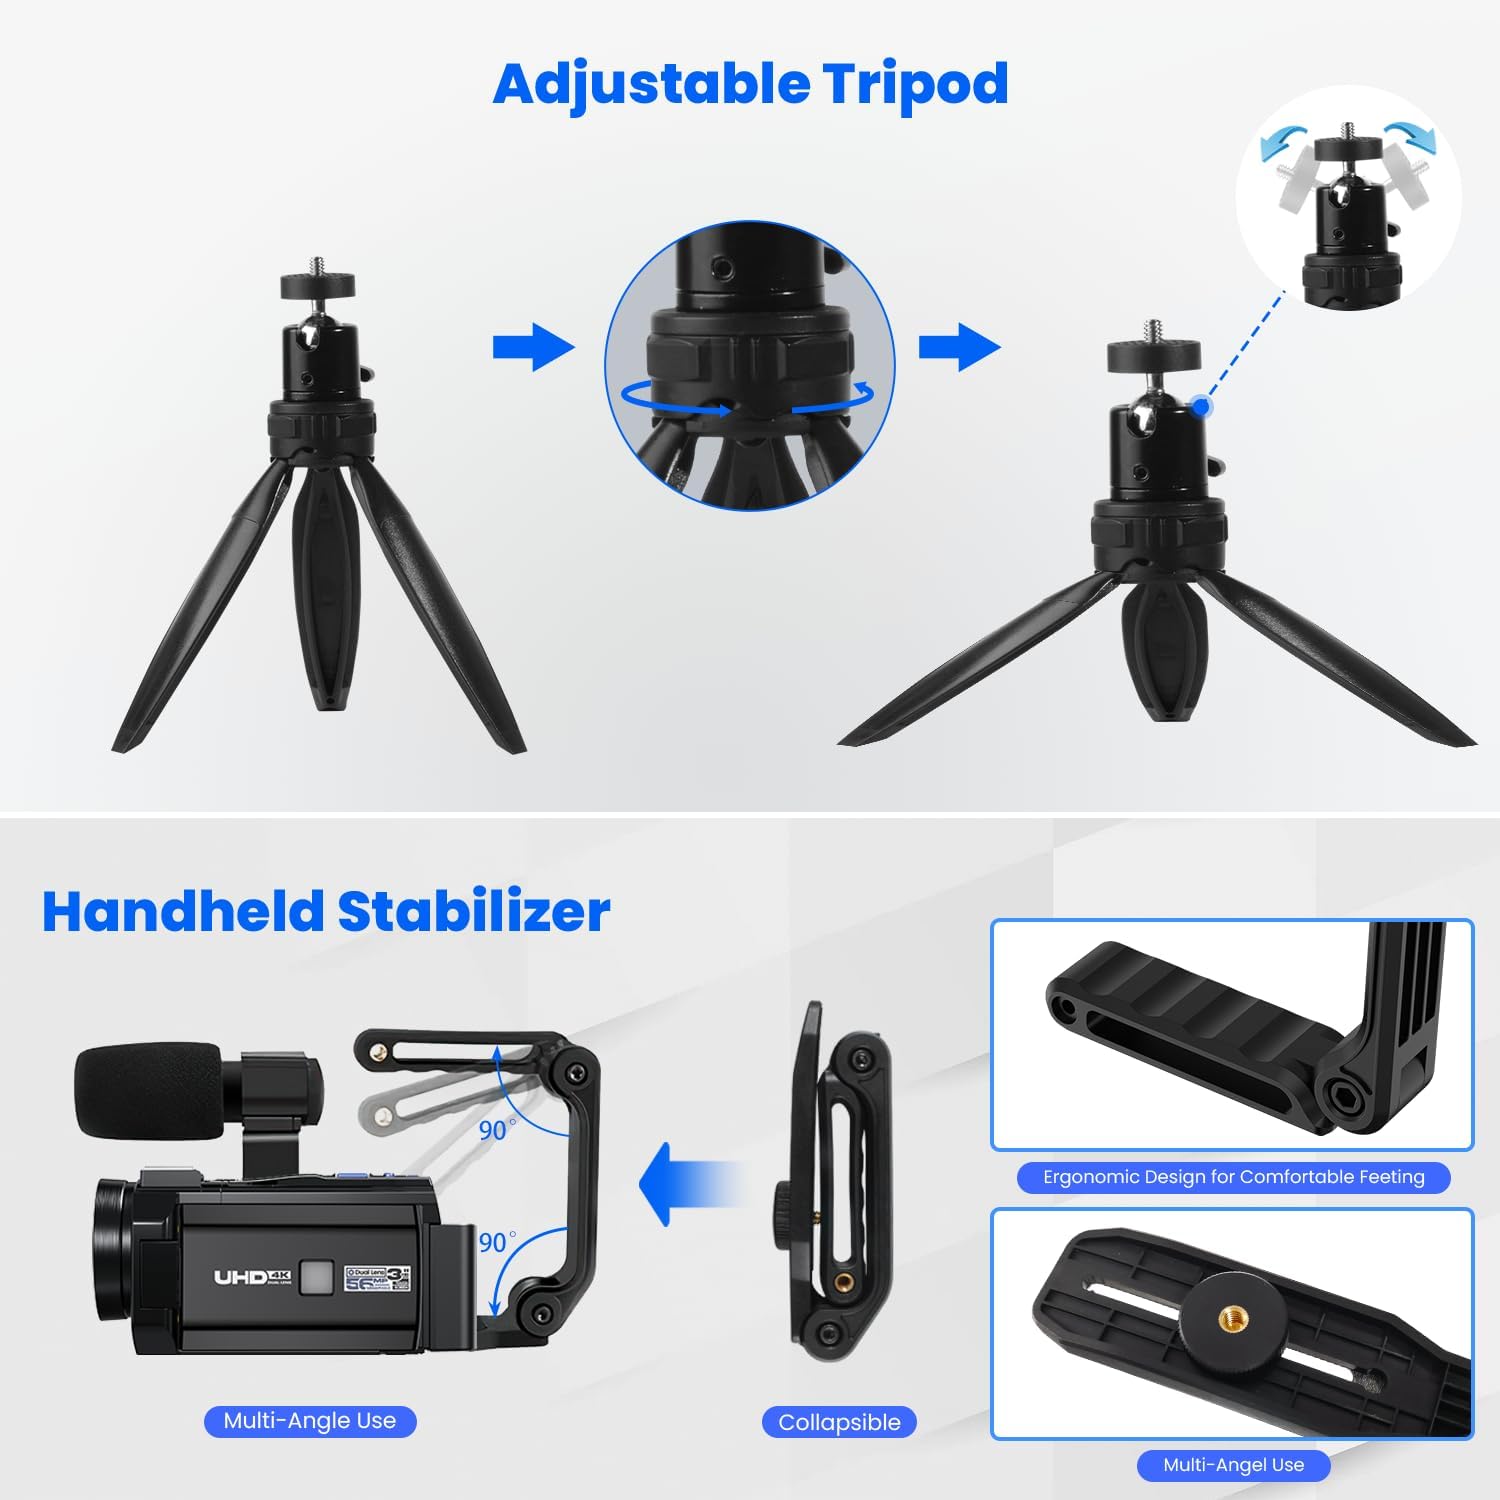
Figure 5.1: The camcorder mounted on an adjustable tripod, demonstrating stability.

Figure 5.2: The camcorder attached to a handheld stabilizer for ergonomic and steady recording.
6. Operating Instructions
6.1. Power On/Off
Press and hold the power button to turn the camcorder on or off.
6.2. Recording Video
The camcorder supports 4K UHD and 1080P FHD dual recording.
Figure 6.1: Illustration of the camcorder's dual recording capability, capturing both 4K and 1080P simultaneously.
- Turn on the camcorder.
- Select your desired recording resolution (4K or 1080P) via the menu.
- Press the Record button to start recording. Press again to stop.
6.3. Capturing Photos
Capture still images up to 56MP resolution.
- Switch to photo mode.
- Frame your shot and press the Shutter button to take a picture.
6.4. Zoom Function
Utilize the 16x optical and 16x digital zoom for close-up shots.
Figure 6.2: Visual representation of the camcorder's 4K video and 56MP image capabilities, including various zoom levels (4x, 8x, 16x).
Use the zoom rocker switch (usually near the top of the camcorder) to zoom in or out.
6.5. Touch Screen Operation
The 3-inch, 270° rotatable touch screen allows for intuitive control and flexible viewing angles.
Figure 6.3: The camcorder's 3-inch touch screen rotating 270 degrees, alongside a demonstration of its IR Night Vision capability.
Tap icons on the screen to navigate menus, change settings, and review footage.
6.6. Webcam Function
Connect the camcorder to your computer via USB to use it as a webcam.
Figure 6.4: The camcorder functioning as a webcam when connected to a laptop, and outputting video to a television via HDMI.
- Connect the camcorder to your computer using the USB cable.
- Select 'Webcam Mode' on the camcorder screen (if prompted).
- Your computer should recognize the camcorder as a webcam.
6.7. HDMI Output
View your recordings on a larger screen by connecting the camcorder to a TV or monitor via HDMI.
Connect an HDMI cable (not included) from the camcorder's HDMI port to your display device.
6.8. Wi-Fi Connection
Connect your camcorder to a smartphone or tablet via Wi-Fi using the "Lercenker" app.
Figure 6.5: The camcorder's 2.4G remote control and microphone, along with a smartphone displaying the Lercenker app for Wi-Fi connectivity.
- Download and install the "Lercenker" app on your mobile device.
- Enable Wi-Fi on the camcorder and your mobile device.
- Connect to the camcorder's Wi-Fi network from your mobile device.
- Use the app to control the camcorder, browse images, or download files.
6.9. Remote Control
The included 2.4G remote control allows for convenient operation from a distance.
Point the remote control towards the camcorder and press the desired function buttons.
6.10. IR Night Vision
Activate IR Night Vision mode for recording in low-light or dark conditions.
Figure 6.6: A visual comparison demonstrating the enhanced clarity provided by IR Night Vision compared to ordinary night vision.
Access the IR Night Vision setting through the camcorder's menu.
7. Maintenance
7.1. Cleaning
- Use a soft, dry cloth to clean the camcorder body.
- For the lens, use a specialized lens cleaning cloth and solution. Avoid touching the lens surface with your fingers.
- Do not use harsh chemicals or abrasive cleaners.
7.2. Storage
- Store the camcorder in a cool, dry place away from direct sunlight.
- Remove batteries if the camcorder will not be used for an extended period.
- Keep the camcorder in its protective case to prevent dust and scratches.
8. Troubleshooting
If you encounter issues, refer to the following common problems and solutions:
| Problem | Possible Cause | Solution |
|---|---|---|
| Camcorder does not power on. | Low or depleted battery. Incorrect battery installation. | Charge the batteries. Ensure batteries are inserted with correct polarity. |
| Cannot record video/take photos. | No SD card inserted. SD card full or corrupted. | Insert an SD card. Delete unnecessary files or format the card (backup data first). |
| Poor image/video quality. | Lens is dirty. Insufficient lighting. Incorrect settings. | Clean the lens. Ensure adequate lighting. Adjust resolution or exposure settings. |
| Wi-Fi connection issues. | Incorrect app or connection steps. Interference. | Ensure "Lercenker" app is installed. Follow Wi-Fi connection steps carefully. Move closer to the camcorder. |
If the problem persists, please contact customer support.
9. Specifications
Detailed technical specifications for the CAMWORLD AC09 Camcorder:
| Feature | Specification |
|---|---|
| Brand | CAMWORLD |
| Model Number | AC09 |
| Model Name | Dual Lens Video Camcorder |
| Effective Capture Resolution | 56 Megapixels |
| Video Recording Resolution | 4K |
| Video Capture Format | MP4 |
| Photo Sensor Technology | CMOS |
| Optical Sensor Technology | CMOS |
| Screen Size | 3 Inches |
| Special Feature | Touch Screen |
| Optical Zoom | 16x |
| Digital Zoom | 16x |
| Maximum Focal Length | 200 Millimeters |
| Maximum Aperture | 2.8 f |
| Minimum Aperture | 2.8 Millimeters |
| Image Stabilization | Yes |
| Form Factor | Compact |
| Item Weight | 250 Grams |
| Color | Black |
| Wireless Technology Type | 802.11a/b/g/n/ac |
| Battery Type | 2 Lithium-ion batteries required |
| Batteries Included | No |
| Box Contents | Microphone |
| UPC | 711696980759 |
| GTIN | 711696980759 |
10. Warranty and Support
For warranty information or technical support, please refer to the documentation included with your purchase or contact CAMWORLD customer service through their official website. Please have your model number (AC09) and purchase details ready when contacting support.