
1. Introduction
This manual provides detailed instructions for the installation, operation, and maintenance of the COKYIS W3230 Microcomputer High-Precision Temperature Controller. This device is designed for precise temperature regulation in various applications, ensuring stable and accurate control. Please read this manual thoroughly before use to ensure correct operation and to prevent damage to the device or connected equipment.
2. Product Overview
The COKYIS W3230 is a compact, embedded temperature control switch featuring a digital display for both current (PV) and set (SV) temperatures. It is equipped with intuitive buttons for easy configuration and a temperature probe for accurate measurement.

Figure 2.1: Front view of two W3230 temperature controllers. The top display (PV) shows the current temperature, and the bottom display (SV) shows the set temperature. Buttons include 'Up', 'Down', 'SET', and 'Restart'.
Key Components:
- PV Display: Shows the current measured temperature (Process Value).
- SV Display: Shows the desired set temperature (Set Value).
- OUT Indicator: Illuminates when the output relay is active.
- SET Button: Used to enter and confirm settings.
- Up/Down Buttons: Used to adjust temperature values and navigate settings.
- Restart Button: Resets the device.
- Temperature Probe: External sensor for temperature measurement.
3. Safety Information
To ensure safe operation and prevent damage, please observe the following safety precautions:
- Ensure the power supply voltage matches the controller's specified working voltage (110V-220V for this model). Incorrect voltage can cause severe damage.
- All wiring should be performed by a qualified professional to prevent electrical shock or fire hazards.
- Do not expose the device to water, excessive moisture, or extreme temperatures outside its operating range.
- Avoid installing the controller in areas with strong electromagnetic interference.
- Disconnect power before performing any installation, wiring, or maintenance.
- Do not attempt to open or modify the device. Refer all servicing to qualified personnel.
4. Setup and Installation
The W3230 temperature controller is designed for embedded installation. Follow these steps for proper setup:
4.1. Mounting
- Cut an opening in your panel with dimensions of approximately 76mm x 39mm (based on overall dimensions 79x43x26mm and standard embedded installation).
- Insert the controller into the opening from the front.
- Secure the controller using the provided mounting clips or screws from the rear.
4.2. Wiring
Refer to the wiring diagram usually printed on the side or back of the device. Ensure all connections are secure and correct for your specific application (heating or cooling).
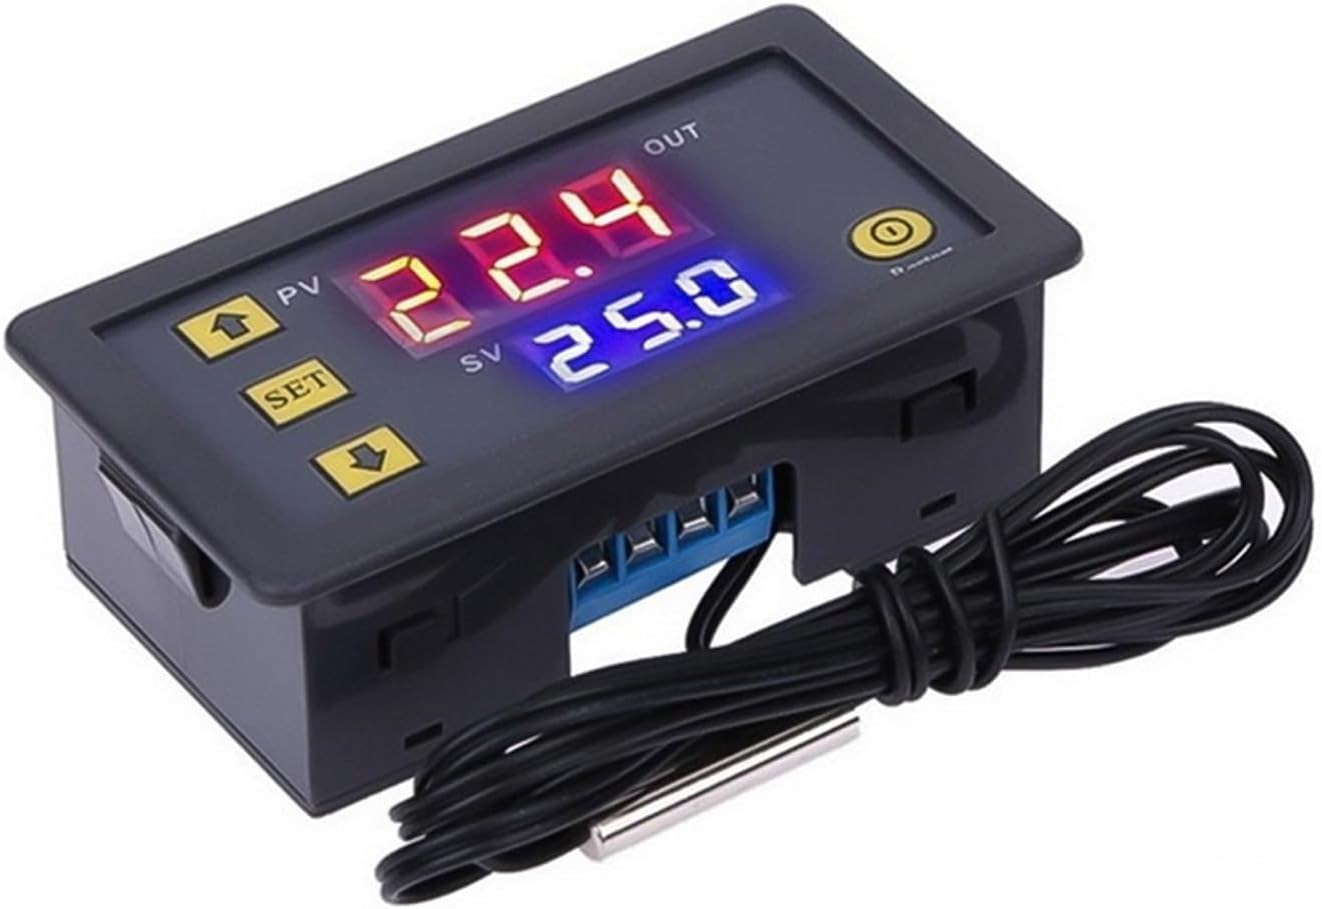
Figure 4.1: W3230 controller with temperature probe and visible wiring terminals. Ensure correct polarity and voltage for power and load connections.
- Power Supply: Connect the 110V-220V AC power supply to the designated power input terminals.
- Load Connection: Connect your heating or cooling device (load) to the relay output terminals. Ensure the load's power requirements do not exceed the controller's relay capacity.
- Temperature Sensor: Connect the temperature probe to the sensor input terminals. Ensure the probe is placed in the area where temperature needs to be measured.
After all connections are made, double-check for any loose wires or incorrect wiring before applying power.
5. Operating Instructions
5.1. Power On
Once power is applied, the controller will display the current temperature (PV) on the upper red display and the set temperature (SV) on the lower blue display.
5.2. Setting the Temperature (SV)
- Press the SET button once. The SV display will start flashing.
- Use the Up (▲) and Down (▼) buttons to adjust the desired temperature.
- Press the SET button again to confirm the new set temperature. The SV display will stop flashing.
5.3. Output Control
The controller will automatically activate or deactivate the output relay based on the comparison between the PV (current temperature) and SV (set temperature), according to its internal control logic (e.g., heating or cooling mode, differential settings). The OUT indicator will light up when the relay is active.
5.4. Restart Function
Press the Restart button to reset the controller. This may be useful in case of unexpected behavior or to clear temporary errors.
6. Maintenance
Regular maintenance ensures the longevity and accurate performance of your temperature controller.
- Cleaning: Wipe the device's surface with a soft, dry cloth. Do not use abrasive cleaners or solvents.
- Sensor Care: Keep the temperature probe clean and free from debris. Ensure it is securely placed and not damaged.
- Connection Checks: Periodically inspect all wiring connections to ensure they are tight and free from corrosion.
- Environmental Conditions: Ensure the operating environment remains within the specified temperature and humidity ranges.
7. Troubleshooting
If you encounter issues with your W3230 controller, refer to the following common problems and solutions:
| Problem | Possible Cause | Solution |
|---|---|---|
| Controller does not power on. | No power supply; incorrect wiring; faulty power source. | Check power connections; verify power supply voltage; test power source. |
| PV display shows 'LLL' or 'HHH'. | Temperature sensor disconnected; sensor fault; temperature out of range. | Check sensor connection; replace sensor if faulty; ensure temperature is within -50°C to +120°C. |
| Output (OUT indicator) not activating. | Incorrect temperature settings (SV); control mode issue; faulty relay. | Verify SV setting; check control mode parameters (if applicable); test load device. |
| Temperature reading is inaccurate. | Sensor placement; sensor fault; external interference. | Relocate sensor to a representative area; replace sensor; shield from interference. |
8. Specifications
- Model: W3230
- Control Type: Temperature
- Control Mode: Intelligent temperature control regulator
- Measurement Object: Temperature
- Temperature Range: -50°C to +120°C
- Temperature Measurement Error: ±1°C
- Installation Type: Embedded installation
- Output Signal: Standard relay output
- Working Voltage: 110V-220V AC (for this specific model)
- Overall Dimensions: 79mm (L) x 43mm (W) x 26mm (D)
- Weight: Approximately 44g
- Brand: COKYIS
9. Warranty and Support
For warranty information or technical support, please contact your retailer or the manufacturer directly. Keep your purchase receipt as proof of purchase. Please note that specific warranty terms may vary by region and seller.