1. Product Overview
The AOGLLATI Queen Bed Frame Model AG-KJ-Q is designed for comfort and functionality. It features a sturdy construction, integrated LED lighting, convenient USB charging ports, and four under-bed storage drawers. This manual provides essential information for assembly, operation, and maintenance to ensure safe and proper use of your bed frame.
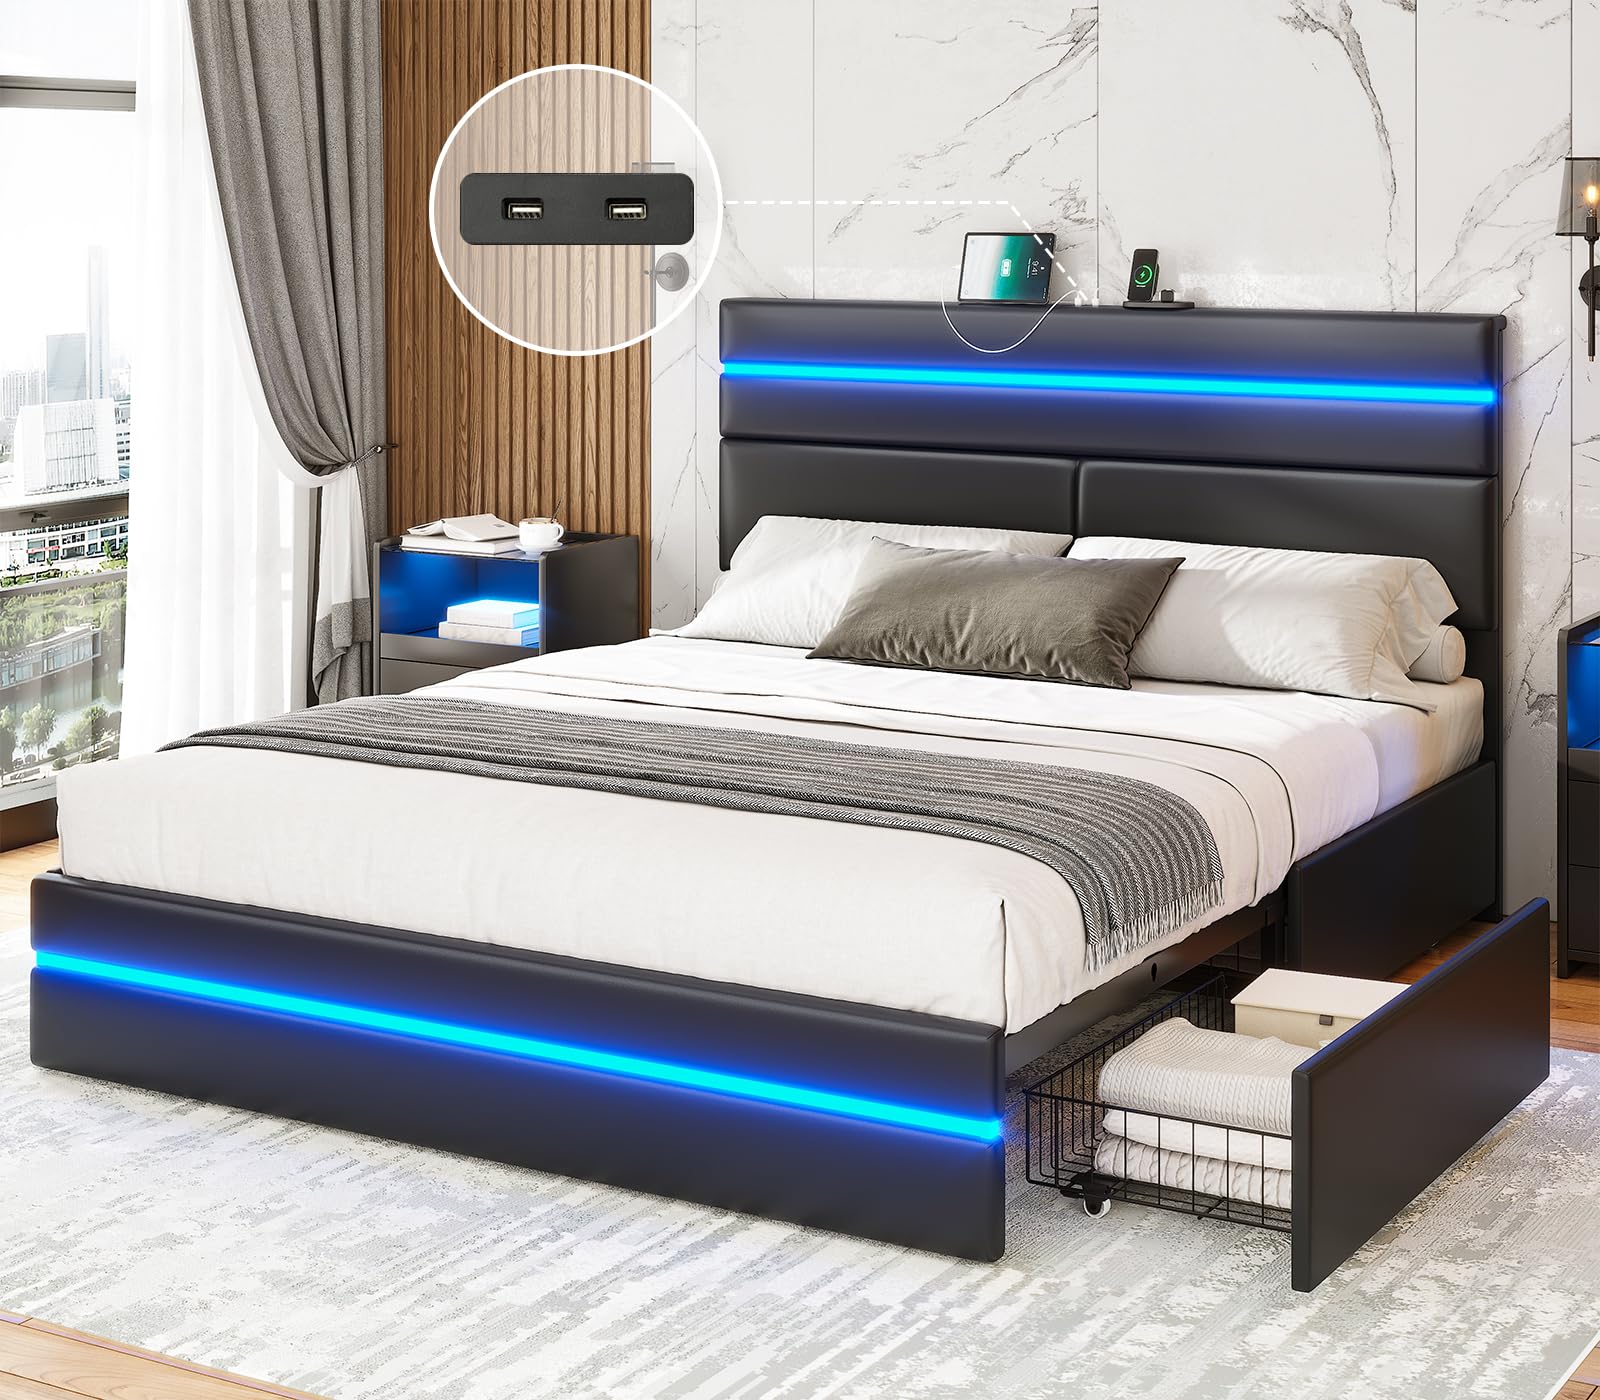
Image 1.1: Overview of the AOGLLATI Queen Bed Frame, showcasing its design with LED lights and under-bed storage.
2. Safety Information
- Weight Capacity: Do not exceed the maximum weight recommendation of 1000 pounds for the Queen size bed frame.
- Electrical Components: Keep electrical components (LED lights, USB ports) dry and avoid liquid spills. Disconnect power before cleaning or maintenance.
- Assembly: Always follow assembly instructions carefully. Incorrect assembly can lead to instability or injury. Ensure all bolts and fasteners are securely tightened.
- Children: Keep small parts away from children during assembly.
- Placement: Place the bed frame on a flat, stable surface.
3. Package Contents
Before beginning assembly, verify that all components listed in the included Installation Manual are present and undamaged. The package typically includes:
- Headboard with integrated LED lights and USB charging station
- Footboard with integrated LED lights
- Side rails
- Wood slats and support legs
- Four storage drawers with wheels
- Hardware pack (screws, bolts, Allen wrench)
- LED light remote control
- Power adapter for LED lights and USB ports
- Installation Manual
4. Setup and Assembly
Assembly of the AOGLLATI Queen Bed Frame requires two adults and approximately 1-2 hours. Please refer to the detailed Installation Manual provided in the packaging for step-by-step instructions and diagrams. Ensure you have adequate space and all tools are available before starting.
4.1 Key Assembly Steps
- Unpack all components and lay them out on a clean, soft surface to prevent scratches.
- Attach the side rails to the headboard and footboard using the provided hardware. Do not overtighten.
- Install the central support beam and support legs.
- Place the wood slats onto the bed frame. The press-fit design ensures secure placement and reduces noise.
- Assemble the four storage drawers and insert them under the bed frame. Ensure the wheels are properly aligned.
- Connect the power adapter to the bed frame's electrical components (LED lights, USB ports) and then plug it into a wall outlet.

Image 4.1: Illustration of the under-bed storage drawers, highlighting their wheels and locking mechanism for easy access and stability.

Image 4.2: Detail of the bed frame's slat system, designed for stability and to prevent noise.
5. Operating Instructions
5.1 LED Lighting System
The bed frame features double LED light strips on both the headboard and footboard. These lights can be controlled via a remote control or a dedicated mobile application.
- Power On/Off: Use the power button on the remote or in the app to turn the lights on or off.
- Brightness Adjustment: Adjust the light intensity using the brightness controls.
- Color Selection: Choose from millions of colors to match your preference.
- Light Modes: Select from 30 different light modes, including music mode and mic mode, which react to sound.
- Timing Function: Set a timer for the lights to automatically turn off.

Image 5.1: Visual representation of the LED lighting system, demonstrating color options, light modes, and control methods (remote and app).
5.2 USB Charging Station
The headboard is equipped with two 5V/2A USB charging ports, allowing you to conveniently charge your electronic devices.
- Usage: Plug your device's USB charging cable into one of the ports.
- Power: Ensure the bed frame is plugged into a live electrical outlet for the USB ports to function.

Image 5.2: Detail of the two USB charging ports located on the headboard for convenient device charging.
5.3 Storage Drawers
The four under-bed storage drawers are designed for easy access and organization.
- Opening/Closing: Each drawer is equipped with smooth-rolling wheels for easy pulling out and pushing in.
- Capacity: Use the drawers to store bedding, clothing, or other items. Avoid overloading.
6. Maintenance
Proper care will extend the life and appearance of your bed frame.
- Cleaning: Wipe the faux leather surfaces with a damp cloth. Avoid harsh chemicals or abrasive cleaners.
- Dusting: Regularly dust the frame with a soft, dry cloth.
- Fasteners: Periodically check all bolts and screws to ensure they remain tight. Retighten as necessary.
- Electrical: Ensure the power cord is not pinched or damaged.
7. Troubleshooting
| Problem | Possible Cause | Solution |
|---|---|---|
| LED lights not working | Power cord disconnected; remote battery low; LED strip damaged. | Check power connection; replace remote battery; contact customer support if damaged. |
| USB ports not charging | Bed frame not plugged in; device cable faulty; USB port damaged. | Ensure power is connected; try a different cable/device; contact customer support. |
| Bed frame is wobbly/noisy | Loose fasteners; uneven floor. | Retighten all bolts and screws; place shims under legs if floor is uneven. |
| Drawers are difficult to open/close | Overloaded drawer; wheels obstructed; misaligned. | Reduce contents; clear obstructions; check wheel alignment. |
8. Specifications
| Feature | Detail |
|---|---|
| Model Number | AG-KJ-Q |
| Size | Queen |
| Product Dimensions (L x W x H) | 83.5" x 63" x 43.5" |
| Weight Capacity | 1000 lbs |
| Material | Engineered Wood, Metal, Faux Leather |
| Headboard Features | Integrated LED lights, 2 USB charging ports (5V/2A) |
| Footboard Features | Integrated LED lights |
| Storage | 4 sliding drawers with wheels |
| Assembly Required | Yes |
| Color | Black |

Image 8.1: Detailed dimensions of the Queen size bed frame.
9. Product Video
Watch this official product video for a visual guide to the AOGLLATI Bed Frame with Double LED Lights.
Video 9.1: Official product video showcasing the AOGLLATI Bed Frame with its double LED lights, USB charging, and storage features.
10. Warranty and Support
For warranty information, please refer to the documentation included with your purchase or visit the official AOGLLATI website. If you encounter any issues or require assistance, please contact AOGLLATI customer support.
- Customer Support: Refer to your purchase receipt or the AOGLLATI brand store for contact details.
- Online Resources: Visit the AOGLLATI Store on Amazon for additional product information and support.