VEVOR HS-660
VEVOR 150 dB Train Horn Kit
Model: HS-660
Introduction
This manual provides comprehensive instructions for the installation, operation, and maintenance of your VEVOR 150 dB Train Horn Kit (Model HS-660). This powerful air horn system is designed to provide a loud and clear warning signal for various 12V vehicles, including trucks, SUVs, off-road vehicles, and cruises. Please read this manual thoroughly before installation and use to ensure proper function and safety.

Image: The VEVOR 150 dB Train Horn Kit, showcasing the air compressor and the four trumpet horns, designed to safeguard long-distance trips with its powerful sound.
Safety Information
Always prioritize safety during installation and operation. Failure to follow these guidelines may result in injury or damage to the product or vehicle.
- High Sound Level: This horn produces a very loud 150 dB sound. Avoid prolonged exposure to prevent hearing damage. Do not activate the horn near pedestrians or in residential areas unnecessarily.
- Electrical Safety: Ensure the vehicle's power is disconnected before beginning installation. All electrical connections must be secure and properly insulated to prevent short circuits. Use appropriate fuses as specified.
- Air Pressure: The air compressor operates at high pressure. Do not tamper with the pressure relief valve or attempt to modify the system. Ensure all air lines are securely connected.
- Mounting: Mount the components securely to prevent movement or detachment during vehicle operation.
- Ventilation: Ensure the compressor is installed in a well-ventilated area to prevent overheating.
Product Components
The VEVOR 150 dB Train Horn Kit includes the following main components:
- Four Trumpet Horns: Designed for maximum sound output.
- Air Compressor with 6L Tank: Provides the necessary air pressure for horn operation. Features automatic pressure regulation.
- Air Hoses and Fittings: For connecting the compressor to the horns.
- Mounting Hardware: Bolts, nuts, washers, and rubber pads for secure installation.
- Pressure Gauge: For real-time monitoring of air tank pressure.
- Drain Plug: Located on the air tank for moisture removal.

Image: A complete view of all components included in the VEVOR Train Horn Kit, laid out for inspection.

Image: Detailed view of the 1.6-gallon heavy-duty steel compressor, highlighting its automatic pumping below 90 psi and automatic shut-off above 120 psi, ensuring optimal air pressure.
Setup and Installation
Installation requires basic automotive electrical and mechanical knowledge. If you are unsure, seek professional assistance.
- Choose Mounting Locations:
Select a secure, dry, and well-ventilated location for the air compressor and tank. The horns should be mounted in a position that allows for maximum sound projection and protection from road debris and water. Consider under-vehicle mounting for the compressor and horns if space permits.

Image: An example of the horn kit installed underneath a vehicle, demonstrating a common mounting position for optimal performance and protection.
- Mount Components:
Securely fasten the compressor/tank assembly and the horn assembly using the provided mounting hardware. Utilize the thick rubber pads to reduce vibration and noise, enhancing stability. Ensure components are clear of moving parts and heat sources.

Image: Illustrates the use of thick rubber pads for enhanced stability and vibration reduction, crucial for installation in any condition.
- Connect Air Lines:
Connect the air compressor output to the horn manifold using the provided PA gas hose. Ensure all connections are tight and leak-proof. The PA gas hose is temperature resistant up to 120°C.
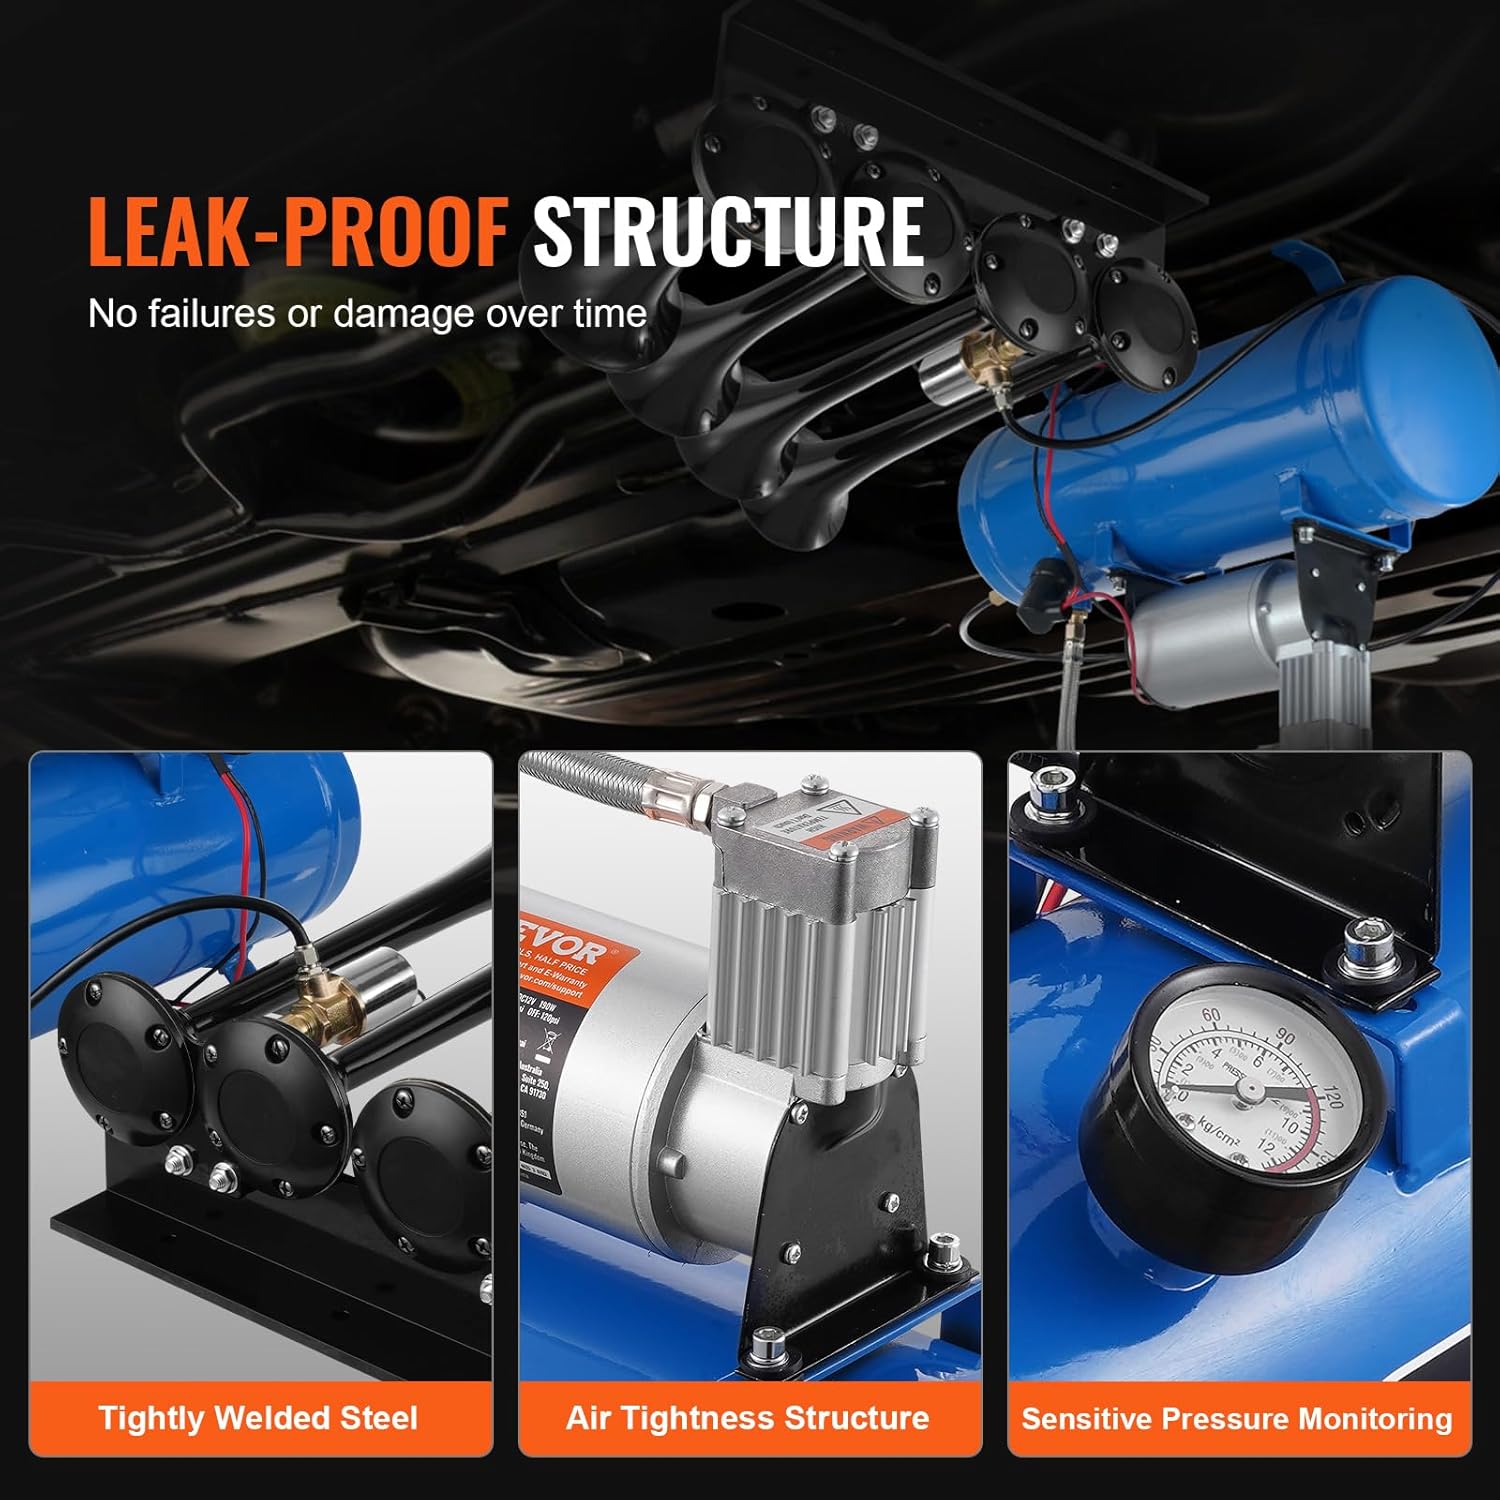
Image: Highlights the leak-proof structure of the system, including tightly welded steel and an air-tight design, minimizing the risk of air leakage over time.
- Electrical Wiring:
Connect the compressor to a 12V power source in your vehicle. It is recommended to use a relay and a dedicated fuse (not included) to protect the circuit. The compressor motor is equipped with overload protection up to 100°C. Ensure all wiring is properly routed and secured to prevent chafing or damage.
- Test System:
Once all connections are made, turn on the vehicle's power and allow the compressor to build pressure. Test the horn function. Check for any air leaks or unusual noises.
Operating Instructions
The VEVOR Train Horn Kit is designed for straightforward operation once installed.
- Automatic Compressor Operation: The air compressor features an automatic pressure switch. It will automatically begin pumping when the air pressure in the tank drops below 90 psi and will shut off when the pressure reaches 120 psi. This ensures optimal air pressure is maintained for horn activation.
- Pressure Monitoring: The integrated pressure gauge allows for real-time monitoring of the air tank pressure.
- Horn Activation: Activate the horn via the connected switch (not included). A brief press will produce a short blast, while holding the switch will produce a continuous sound.

Image: Explains the fully automatic pumping feature, showing the compressor starts below 90 psi and shuts off above 120 psi, with a pressure gauge for real-time monitoring.
Maintenance
Regular maintenance will ensure the longevity and reliable performance of your horn kit.
- Drain Moisture: Periodically drain any accumulated moisture from the air tank using the drain plug. This prevents rust and ensures optimal air quality.
- Check Connections: Regularly inspect all air line connections and electrical wiring for tightness and signs of wear or damage.
- Clean Components: Keep the horns and compressor clean from dirt and debris. Use a damp cloth for cleaning; avoid harsh chemicals.
- Inspect for Leaks: Listen for any hissing sounds indicating air leaks. A soapy water solution can be applied to connections to identify small leaks by observing bubbles.

Image: Illustrates key features contributing to durability and ease of maintenance, including the drain plug for wetness removal and the heat-resistant PA air tube.
Troubleshooting
If you encounter issues with your VEVOR Train Horn Kit, refer to the following common problems and solutions:
| Problem | Possible Cause | Solution |
|---|---|---|
| Horn does not sound or is weak. |
|
|
| Compressor runs continuously or does not shut off. |
|
|
| Compressor overheats. |
|
|
Specifications
Key technical specifications for the VEVOR 150 dB Train Horn Kit (Model HS-660):
| Feature | Specification |
|---|---|
| Sound Level | 150 dB |
| Voltage | 12 Volt |
| Compressor Pressure Range | 90-120 psi (Automatic) |
| Tank Capacity | 6 Liters (approx. 1.6 Gallons) |
| Material | Zinc Alloy (horns), Steel (tank), Alloy Steel (general) |
| Horn Size (L x W x H) | 32.5 x 34.5 x 12 cm (12.8 x 13.6 x 4.7 inches) |
| Compressor Size (L x W x H) | 41.5 x 15.3 x 28.5 cm (16.3 x 6.0 x 11.2 inches) |
| Net Weight | 6.1 kg (13.4 lbs) |
| Compatibility | Universal fit for 12V vehicles (Trucks, SUVs, Off-road, Cruises) |

Image: Detailed dimensions of both the horn assembly and the compressor unit, providing precise measurements for installation planning.
Warranty and Support
For specific warranty terms and conditions, please refer to the documentation provided with your purchase or contact VEVOR customer support directly. VEVOR is committed to providing quality products and support.
If you require technical assistance or have questions not covered in this manual, please visit the official VEVOR website or contact their customer service department. Have your product model number (HS-660) and purchase details ready when contacting support.
Note: Warranty information and support contact details may vary by region and retailer. Always consult the official VEVOR resources for the most accurate and up-to-date information.