1. Introduction
This user manual provides comprehensive instructions for the installation, operation, and maintenance of your XTRONS TX121L Autoradio. Please read this manual thoroughly before using the device to ensure proper functionality and safety.
2. Product Overview
The XTRONS TX121L is a 10.1-inch QLED display double DIN Android car stereo system designed to enhance your in-car entertainment and navigation experience. It features Android 12, built-in WiFi, 4G connectivity, USB, Apple CarPlay, Android Auto, and DSP audio processing.
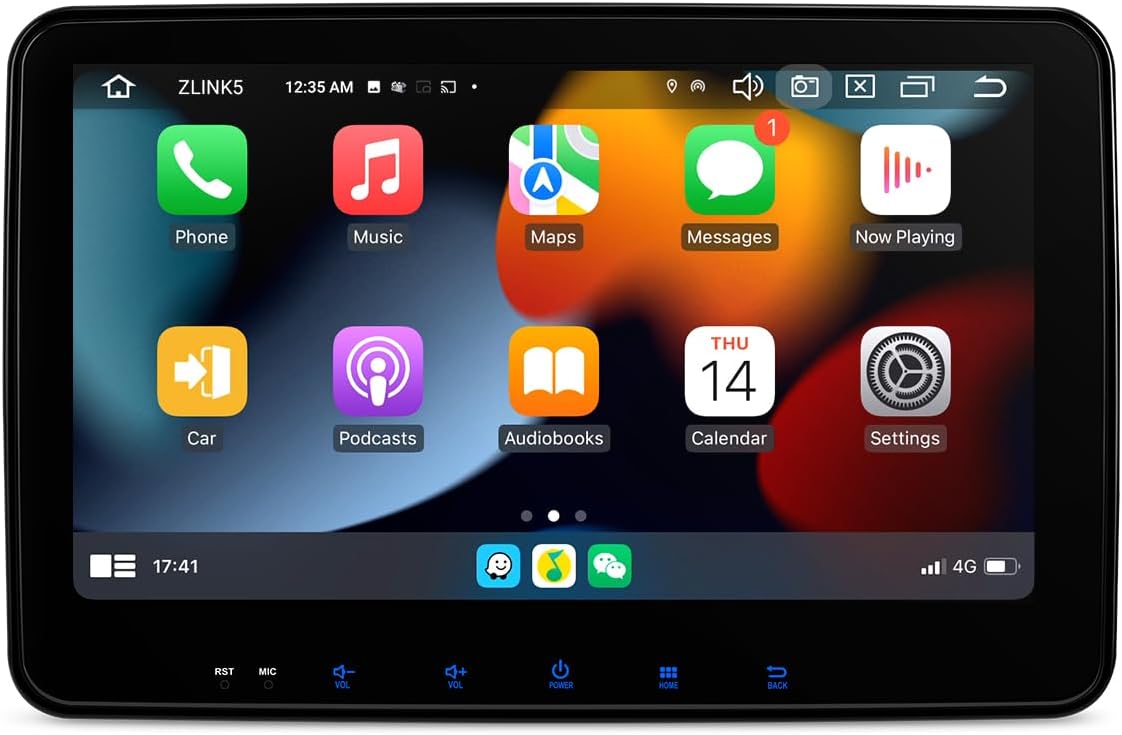
Figure 2.1: Front view of the XTRONS TX121L Autoradio displaying the main user interface with various application icons such as Phone, Music, Maps, Messages, and Settings.

Figure 2.2: The XTRONS TX121L Autoradio screen showing a split view with navigation on the left and music playback controls on the right. The display highlights QLED technology and features like Wireless CarPlay and Android Auto.
3. Key Features
- Operating System: Android 12
- Display: 10.1-inch QLED Capacitive Touchscreen (1280x720 HD Resolution)
- Processor: Octa-core
- Memory: 4GB RAM, 64GB ROM
- Connectivity: Built-in WiFi, 4G LTE, USB
- Integration: Wireless Apple CarPlay, Wireless Android Auto
- Audio: Built-in DSP (Digital Signal Processor), RDS Radio
- Video: 2K Video Playback
- Mounting: Double DIN, Dashboard Mount

Figure 3.1: Overview of the XTRONS TX121L Autoradio highlighting key features such as Octa-core processor, 4GB RAM, 64GB ROM, QLED display, Android OS, Wireless CarPlay/Android Auto, DSP, 2K video, 4G LTE, 5G WiFi, and RDS.
4. Setup and Installation
Installation of the XTRONS TX121L Autoradio requires technical knowledge and should ideally be performed by a qualified professional. Ensure the vehicle's battery is disconnected before beginning installation.
4.1. Package Contents
Verify all components are present before installation:
- XTRONS TX121L Head Unit
- Power Harness
- GPS Antenna
- USB Cables
- RCA Cables
- Mounting Brackets and Screws
- External Microphone
- User Manual (this document)
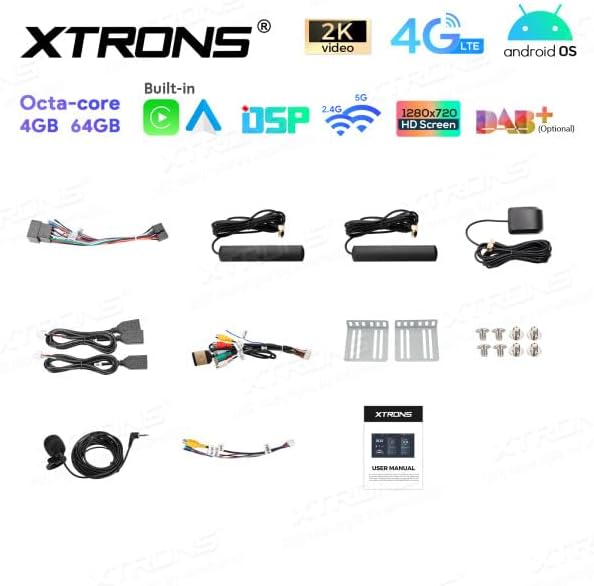
Figure 4.1: Image showing the complete package contents of the XTRONS TX121L Autoradio, including the main unit, various wiring harnesses, GPS antenna, USB cables, RCA cables, mounting hardware, external microphone, and the user manual.
4.2. Wiring Diagram
Refer to the detailed wiring diagram provided with your unit for specific connections. Key connections include:
- Power: Connect ACC, B+, and GND wires to the vehicle's power system.
- Speakers: Connect speaker wires to the corresponding vehicle speaker outputs.
- Antenna: Connect the GPS antenna and radio antenna.
- USB: Connect USB cables for external devices or data transfer.
- RCA: Connect RCA cables for external amplifiers, subwoofers, or video inputs/outputs.
- Reverse Camera: Connect the reverse camera input if applicable.
4.3. Physical Installation
- Carefully remove the existing car stereo or blank panel from your dashboard.
- Connect all necessary wiring harnesses to the XTRONS TX121L unit.
- Mount the unit into the double DIN slot using the provided mounting brackets and screws. Ensure it is securely fastened.
- Reconnect the vehicle's battery.
- Test the unit's functionality before fully reassembling the dashboard.

Figure 4.2: Dimensional diagram of the XTRONS TX121L Autoradio, showing its length, height, and depth, which are crucial for proper installation into a double DIN slot.
5. Operating Instructions
5.1. Initial Power On and Setup
Upon first power-on, the system may guide you through an initial setup process, including language selection, time zone, and network configuration.
5.2. Main Interface Navigation
The main screen displays various application icons. Tap an icon to launch the corresponding application.

Figure 5.1: The main screen of the XTRONS TX121L Autoradio, showing a grid of application icons including Maps, Phone, News, Weather, SMS, GameSnacks, Settings, Exit, Calendar, Podcasts, Reminder, and Customize.
5.3. Connecting to Wi-Fi and 4G
- Go to Settings > Network & Internet.
- Enable Wi-Fi and select your desired network, then enter the password.
- For 4G connectivity, ensure a compatible SIM card is inserted (if applicable to your model variant) and mobile data is enabled in settings.
5.4. Using Apple CarPlay and Android Auto
The unit supports both wireless Apple CarPlay and Android Auto. Connect your compatible smartphone via Bluetooth and/or Wi-Fi as prompted by the system.
5.5. Navigation
Utilize pre-installed navigation apps or download your preferred navigation software from the Google Play Store. Ensure the GPS antenna is properly installed for accurate positioning.
5.6. Multimedia Playback
The unit supports various multimedia formats. Play music or videos from USB drives, SD cards, or streaming services via internet connection.

Figure 5.2: The XTRONS TX121L Autoradio screen showing the YouTube application interface, demonstrating its capability for online video streaming.
5.7. Radio Operation
Access the Radio application to tune into FM/AM stations. The unit supports RDS for displaying station information.
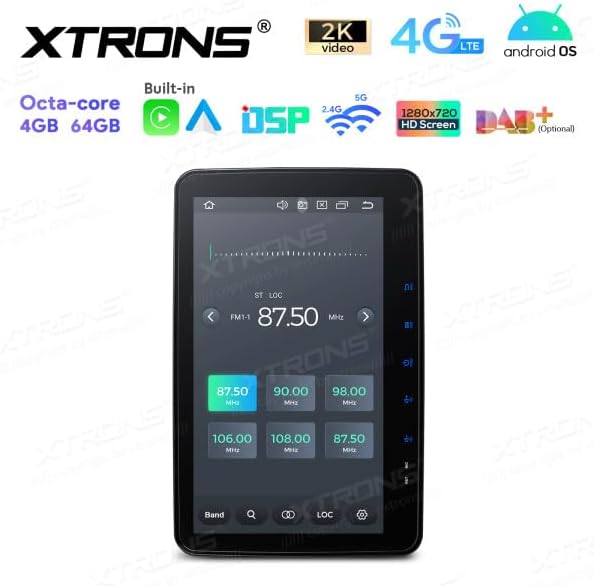
Figure 5.3: The XTRONS TX121L Autoradio screen displaying the radio tuning interface, showing frequency selection and preset options.
6. Maintenance
6.1. Cleaning the Display
Use a soft, lint-free cloth to gently wipe the screen. For stubborn smudges, slightly dampen the cloth with water or a screen-safe cleaner. Avoid abrasive materials or harsh chemicals.
6.2. Software Updates
Periodically check for software updates via the system settings (Settings > About device > System update) to ensure optimal performance and access to new features. Updates may require a stable internet connection.
6.3. General Care
- Avoid exposing the unit to extreme temperatures or direct sunlight for prolonged periods.
- Do not spill liquids on the unit.
- Ensure proper ventilation around the unit to prevent overheating.
7. Troubleshooting
This section addresses common issues you might encounter. For problems not listed here, please contact XTRONS customer support.
| Problem | Possible Cause | Solution |
|---|---|---|
| Unit does not power on. | Incorrect wiring; Blown fuse; Vehicle battery issue. | Check power connections (ACC, B+, GND). Verify vehicle fuses. Ensure battery is charged. |
| No sound from speakers. | Speaker wires disconnected; Volume too low; Mute enabled. | Check speaker wiring. Increase volume. Disable mute function. |
| GPS signal lost or inaccurate. | GPS antenna improperly installed or obstructed. | Ensure GPS antenna is mounted in a clear location with an unobstructed view of the sky. Check antenna connection. |
| Wi-Fi/4G connection issues. | Incorrect password; Out of range; SIM card issue. | Verify Wi-Fi password. Move closer to Wi-Fi source. Check SIM card insertion and mobile data settings. |
| Touchscreen unresponsive. | Temporary software glitch. | Perform a soft reset (refer to unit's specific reset procedure, often a small reset button or holding power button). |
8. Technical Specifications
| Feature | Specification |
|---|---|
| Brand | XTRONS |
| Model | TX121L |
| Operating System | Android 12 |
| Screen Size | 10.1 Inches |
| Display Type | QLED, LED |
| Screen Resolution | 1280x720 (HD Screen) |
| Touchscreen Type | Capacitive |
| Processor | Octa-core |
| Memory (RAM) | 4 GB |
| Storage (ROM) | 64 GB |
| Connectivity | Wi-Fi (2.4G/5G), USB, 4G LTE |
| Special Features | Android Auto, Apple CarPlay, Built-in DSP, 2K Video Playback, RDS |
| Mounting Type | Dashboard Mount (Double DIN) |
| Vehicle Service Type | Car |
9. Warranty and Support
For warranty information and technical support, please refer to the warranty card included with your product or visit the official XTRONS website. Keep your purchase receipt as proof of purchase.
Availability of Spare Parts: Information unavailable on spare parts.
Guaranteed Software Updates Until: Information not available.
For further assistance, you may contact the seller: MARTYANDPAUL2010.


