1. Introduction
Thank you for choosing the BOZYBO KA006 Wireless Weather Station. This device provides comprehensive indoor and outdoor environmental data, including temperature, humidity, air pressure, moon phase, and weather forecasts. It also features an atomic clock with automatic time adjustment and an adjustable backlight display. Please read this manual carefully to ensure proper setup and operation.
2. Package Contents
Verify that all items are present in your package:
- 1 x BOZYBO KA006 Weather Station (Main Unit)
- 1 x Wireless Remote Sensor
- 1 x Power Charger (DC Adapter)
- 1 x User Manual (This document)
3. Product Overview
3.1 Main Unit Display
The main unit features a 7.5-inch HD full-color screen designed for high visibility from various angles. The display shows:
- Indoor Temperature and Humidity
- Outdoor Temperature and Humidity
- Air Pressure and History
- Moon Phase
- Calendar and Atomic Clock
- Weather Forecast and Trend
- Outdoor Index

Image: The main unit display is visible from various angles, ensuring clear readability of all displayed information.
3.2 Main Unit Buttons and Back
The main unit includes control buttons for settings and adjustments, typically located on the back or top of the device. The back panel also houses the battery compartment and power input.
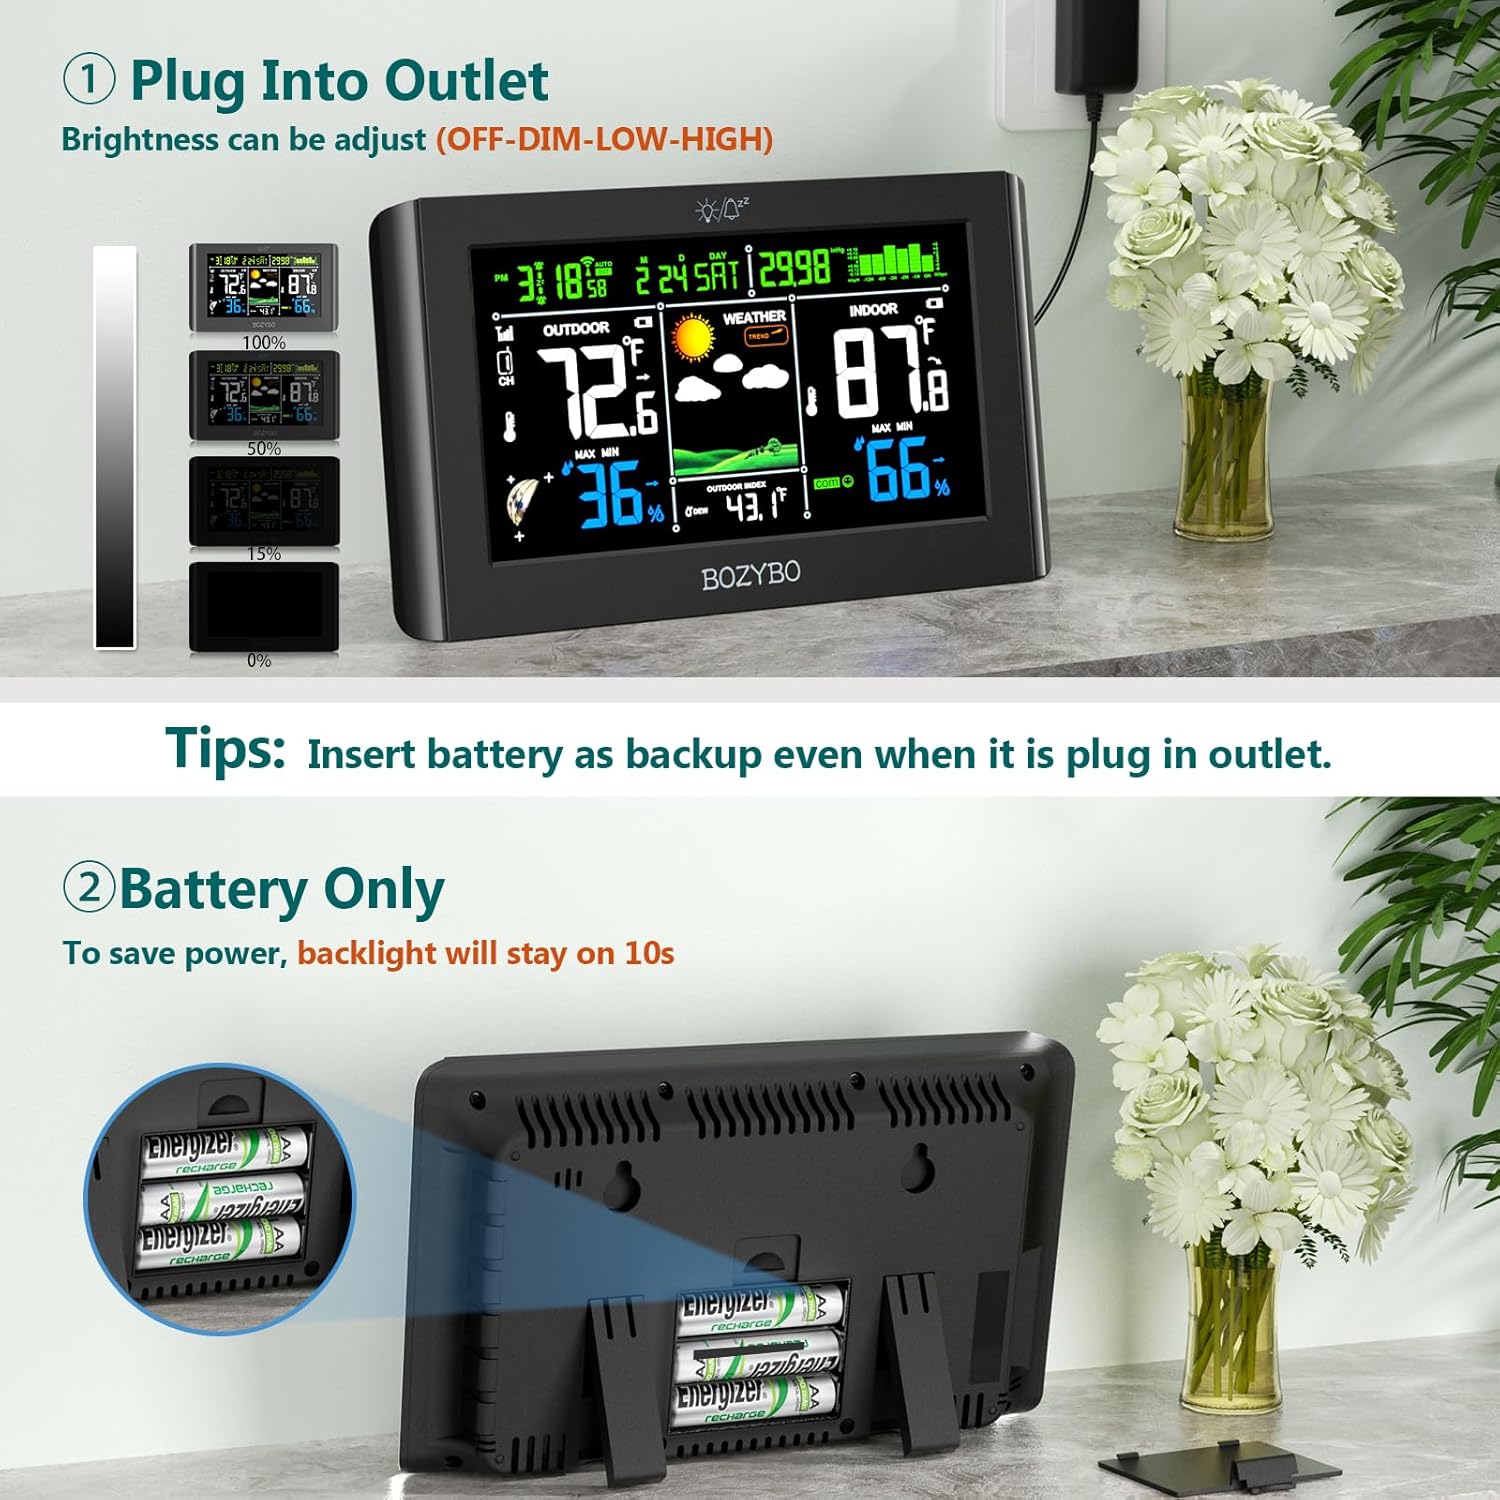
Image: Rear view of the weather station, illustrating the battery compartment for backup power and the DC adapter input.
3.3 Wireless Remote Sensor
The remote sensor measures outdoor temperature and humidity and transmits data wirelessly to the main unit. It is designed for outdoor placement.

Image: The wireless remote sensor installed outdoors, demonstrating its 328ft/100m transmission range to the indoor main unit.
4. Setup
4.1 Powering the Main Unit
- Primary Power: Connect the provided DC adapter to the main unit and plug it into a power outlet. This ensures continuous operation and full backlight functionality.
- Battery Backup: For backup power during outages, or for temporary use without the adapter, insert appropriate batteries (not included) into the battery compartment on the back of the main unit. When operating on battery power only, the backlight will turn off after 10 seconds to conserve energy.
4.2 Installing the Remote Sensor
- Insert batteries (not included) into the remote sensor.
- Place the remote sensor in a suitable outdoor location, protected from direct sunlight and heavy rain, to ensure accurate readings. The wireless transmission range is up to 328 feet (100 meters) in open areas.
4.3 Pairing Sensors
The main unit will automatically attempt to connect with the remote sensor upon initial power-up. If connection is not established, or if you are adding additional sensors:
- Ensure both the main unit and remote sensor have power.
- Press the 'Channel' button on the main unit to select the desired channel (1, 2, or 3).
- Press the 'TX' button inside the remote sensor's battery compartment to send a signal.
- The main unit should display the outdoor temperature and humidity for the selected channel.
The weather station supports up to 3 remote sensors, allowing you to monitor different locations such as a nursery, storage room, or wine cellar. Additional sensors can be purchased separately (Model: B0BNMD1QZG).

Image: The main unit displaying data from multiple remote sensors, illustrating its capability to monitor up to three distinct locations.
4.4 Initial Time and Date Setup (Atomic Clock)
The weather station features an atomic clock with WWVB (radio signal) and DST (Daylight Saving Time) functions for automatic time adjustment.
- Upon initial setup, the station will attempt to receive the WWVB signal. This process may take some time.
- You can manually set the time zone (PST, MST, CST, EST) using the appropriate buttons on the main unit.
- The DST function will automatically adjust for Daylight Saving Time changes.

Image: The weather station displaying the atomic clock function, indicating its ability to receive WWVB signals for real-time automatic time adjustments.
5. Operating Instructions
5.1 Display Information
The 7.5-inch color display provides a comprehensive overview of current conditions. Refer to the screen layout for specific data points such as indoor/outdoor temperature and humidity, weather forecast icons, moon phase, time, and date.
5.2 Adjusting Backlight Brightness
When the main unit is powered by the DC adapter, the backlight brightness can be adjusted to three levels: High Bright, Low Bright, or Off. Use the designated button (refer to the main unit's controls) to cycle through these settings. When operating on battery power, the backlight will automatically turn off after 10 seconds to conserve power.
5.3 Weather Forecast
The weather station forecasts local weather for the next 12-24 hours by monitoring air pressure and its historical trends. For accurate forecasts, allow 7-10 days for the station to analyze air pressure history after initial setup.
5.4 Temperature and Humidity Monitoring
The main unit continuously displays indoor temperature and humidity. Data from paired remote sensors will be shown as outdoor temperature and humidity for the corresponding channel.
5.5 Atomic Clock Functions
The atomic clock automatically synchronizes with the WWVB signal for precise timekeeping. The DST function ensures automatic adjustment for Daylight Saving Time. Ensure the correct time zone is selected during setup.
6. Maintenance
- Cleaning: Wipe the main unit and remote sensor with a soft, dry cloth. Do not use abrasive cleaners or solvents.
- Battery Replacement: Replace batteries in both the main unit (if used for backup) and remote sensor when the low battery indicator appears on the display.
- Sensor Placement: Periodically check the remote sensor's outdoor placement to ensure it remains protected from extreme weather conditions and direct sunlight for optimal accuracy.
7. Troubleshooting
| Problem | Possible Cause | Solution |
|---|---|---|
| No outdoor temperature/humidity reading | Remote sensor not paired or out of range; low sensor battery. | Ensure sensor batteries are fresh. Re-pair the sensor (Section 4.3). Move sensor closer to the main unit. |
| Incorrect time displayed | WWVB signal not received; incorrect time zone set. | Ensure main unit is in an area with good signal reception. Manually set time zone (Section 4.4). Allow time for WWVB synchronization. |
| Backlight turns off quickly | Main unit running on battery power. | This is normal behavior to conserve battery. Connect the DC adapter for continuous backlight. |
| Inaccurate weather forecast | Insufficient time for air pressure history analysis. | Allow 7-10 days after initial setup for the station to gather sufficient air pressure data for accurate forecasting. |
8. Specifications
| Feature | Detail |
|---|---|
| Model Number | KA006 |
| Display Type | Digital, 7.5-inch Full Color |
| Connectivity Technology | Wireless |
| Power Source (Main Unit) | DC Adapter (Primary), Battery Powered (Backup) |
| Power Source (Remote Sensor) | Battery Powered (Batteries not included) |
| Temperature Accuracy | ±1 °C |
| Upper Temperature Rating | 140 Degrees Fahrenheit |
| Wireless Transmission Range | Up to 328 feet (100 meters) in open air |
| Supported Remote Sensors | Up to 3 (one included) |
| Special Features | Adjustable Brightness, Atomic Clock (WWVB & DST), Alarm Clock, Moon Phase, Weather Forecast |
| Item Weight | 1.39 pounds (0.63 Kilograms) |
| Package Dimensions | 9.06 x 7.4 x 1.5 inches |
9. Warranty and Support
For warranty information or technical support, please refer to the contact details provided with your purchase or visit the official BOZYBO website. Keep your purchase receipt for warranty claims.